Lynn Robinson. Showman Scenic
+36
martinj
prince of wales
gwr1475
burrell1
ejparrott
iain
Adam Brown
tractor mike
northburrell
Tassie Tiger
atomenter
Richard
Tim Pennett
Flasback
MrStationHouse
mikero
chop
Dan
IanL
Kevster
Steam Traction World
Tim Watson
Robfishman
Brian M
sonick45
tef 20
greystones
Graeme81
bjwlancashire
Tony King
Steve Traill
Rickster
Vapor
highpressure
craig@STW
lynnr
40 posters
Page 3 of 40
Page 3 of 40 •  1, 2, 3, 4 ... 21 ... 40
 Re: Lynn Robinson. Showman Scenic
I must confess, my wife's face was a picture when I put the front tyres in her brand new oven in her brand new kitchen just to get some heat in them to fit them 
 She wanted to know what all the black sticky smelly stuff was too!!!


 She wanted to know what all the black sticky smelly stuff was too!!!
bjwlancashire- Number of posts : 938
Location : Mellor, Lancashire
Registration date : 2010-09-07
 Yet again more painting
Hi All
Yes no sleep or work today so painting belly tank.


Once it has hardened off some what I can then cut the paint to get nice sharp corners before it hardens totally.
Yes no sleep or work today so painting belly tank.


Once it has hardened off some what I can then cut the paint to get nice sharp corners before it hardens totally.

lynnr- Number of posts : 3242
Age : 56
Location : Highland, 4inch showman
Registration date : 2010-08-06

lynnr- Number of posts : 3242
Age : 56
Location : Highland, 4inch showman
Registration date : 2010-08-06
 Re: Lynn Robinson. Showman Scenic
If you get hold of a rub out tool from the paint suppliers you can "push" the bits where its bleeds under the tape whilst its still wet and tidy it up quite easily. Thats how I do mine.
 Ah! that what it is.
highpressure wrote:If you get hold of a rub out tool from the paint suppliers you can "push" the bits where its bleeds under the tape whilst its still wet and tidy it up quite easily. Thats how I do mine.
Thanks. I forgot to get one of them. Then could not remember what it was.

lynnr- Number of posts : 3242
Age : 56
Location : Highland, 4inch showman
Registration date : 2010-08-06
 Progress
Hi All
Been working on fitting kit8 to the tender. With me being one of the late starters some of the castings are delayed. Suppose I have caught STW bit on the hop as I have purchased more kits to catch up with the main production run. Think I am 1 kit behind everyone else now instead of the 7 I started behind. So sorry to STW for causing a problem .
.
Will try and get some pictures up this evening as the weekend went a bit pair shaped and I never got a chance to do any pictures.
Has anyone modified the taps on the tender to work?
Been working on fitting kit8 to the tender. With me being one of the late starters some of the castings are delayed. Suppose I have caught STW bit on the hop as I have purchased more kits to catch up with the main production run. Think I am 1 kit behind everyone else now instead of the 7 I started behind. So sorry to STW for causing a problem
Will try and get some pictures up this evening as the weekend went a bit pair shaped and I never got a chance to do any pictures.
Has anyone modified the taps on the tender to work?

lynnr- Number of posts : 3242
Age : 56
Location : Highland, 4inch showman
Registration date : 2010-08-06
 Progress
Hi Lynn,
yes, same as you didn't like the thin copper pipe so modified them. Tony King got me on to it really, if you see his thread he has done a really good job.
I did virtually the same thing except I used old brass keys to make up the spouts, annealled them and bent them to shape. There is enough metal to put a thread on the outlet side and screw a new version on then blend it in with a bit of sanding down.
I then centre drilled the through the body and the tap with a 2mm drill and hey presto, they work.
Rickster- Number of posts : 267
Location : canterbury, Kent
Registration date : 2010-02-19
 Tender taps
I wish I could claim the tap mod as mine, alass not, I think it was Tim Watson? Anyway, it's easy to find in the DCC section, under "tender taps"
They look really good, however I wonder if it's worth all the effort to actually make them work, as the easiest way to check water level is the time honoured dip stick method & as Steve points out the belly tank gives more flexibility when controlling water levels, which is why STW didn't bother to drill the taps through.
Tony
Tony King- Number of posts : 856
Age : 69
Location : scotland
Registration date : 2008-10-31
 Tender Taps
Apologies Tony and Tim!
I only have one excuse, I've been laid up for the last 4 days with a virus and wasn't thinking staight!
However, even if you don't want them to work, the outlet pipes could do with a bit of an improvement in the aesthetics department, and for me it was worth the buggering about with.
I only have one excuse, I've been laid up for the last 4 days with a virus and wasn't thinking staight!
However, even if you don't want them to work, the outlet pipes could do with a bit of an improvement in the aesthetics department, and for me it was worth the buggering about with.
Rickster- Number of posts : 267
Location : canterbury, Kent
Registration date : 2010-02-19
 Re: Lynn Robinson. Showman Scenic
Hi Lynnr
any new pics ? Its always good to see your progress
any new pics ? Its always good to see your progress

Graeme81- Number of posts : 178
Location : Ireland
Registration date : 2009-05-25
 Pics
Pics
Graeme81 wrote:Hi Lynnr
any new pics ? Its always good to see your progress
Hi Graeme
Just received my kit 10 last night
Been onto STW as I have a problem with one of the brake lever castings from kit 8 (it arrived last night as well). It is 2mm short on the machined shaft. Will be sending the bit back for review and replacement.
Did you get all the parts in the "guess what it is" thread?

lynnr- Number of posts : 3242
Age : 56
Location : Highland, 4inch showman
Registration date : 2010-08-06
 Re: Lynn Robinson. Showman Scenic
Hi Lynn,
I had a stab at the parts but I only got some of them...its hard when you see them in pictures like that!!
I had a stab at the parts but I only got some of them...its hard when you see them in pictures like that!!

Graeme81- Number of posts : 178
Location : Ireland
Registration date : 2009-05-25
 by your command
Hi All
More pictures and some questions for STW.
Start of day.

Test fit of the main axil tube casting

Test fit of left hand crank bearing casting. Looking good. The precision is fantastic. Had to remove the top coat of paint but not the primer.

Assembly of the 2nd shaft tube with the dummy spring hanger attached.

Water level glass mounting bracket attached.

Question for STW
Why are these holes threaded? Should the bolts be put through from the inside and ground down? (they are very long) or should they be put in from the outside as I have done for the moment and these holes should not be threaded?


Also a bit short of washers if by normal engineering practice they go both sides of the parts?


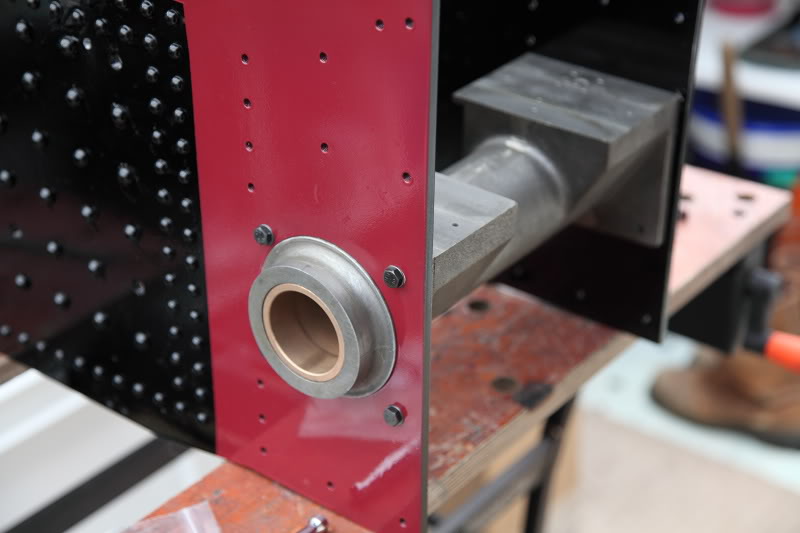
Crank shaft left hand support casting in place with the pump shaft bearing casting in place. Needed to do some sanding between the 2 items to get a nice snug fit.

Right hand side crank shaft bearing support casting. I take it the threaded studs do go in the top.


Rear axil shaft oilers dry fitted to check fit. All looking good.

Now does these holes line up?

Bolted in rear axil bolted in.


Flywheel brake pivot in place. Almost spot on. Will need a bit of sanding to get the pivot post perpendicular to the horn plate. Think it is about 3degs out in the y axis.

After 4 hours of honing the bushes the rear axil is in its home. Very stiff to turn by hand but will be fine once 2 very large rubber trimmed flywheels are attached.


By my reckoning that makes this assembly around about 90Kg so will NOT be lifting it off the workmate by myself.
Hum... wonder what the safe working load is for the workmate?
Not sure if I am going to do any painting at the current time or wait until the boiler as this assemble will have to come apart again for mounting to the boiler.
More pictures and some questions for STW.
Start of day.

Test fit of the main axil tube casting

Test fit of left hand crank bearing casting. Looking good. The precision is fantastic. Had to remove the top coat of paint but not the primer.

Assembly of the 2nd shaft tube with the dummy spring hanger attached.

Water level glass mounting bracket attached.

Question for STW
Why are these holes threaded? Should the bolts be put through from the inside and ground down? (they are very long) or should they be put in from the outside as I have done for the moment and these holes should not be threaded?


Also a bit short of washers if by normal engineering practice they go both sides of the parts?


Crank shaft left hand support casting in place with the pump shaft bearing casting in place. Needed to do some sanding between the 2 items to get a nice snug fit.

Right hand side crank shaft bearing support casting. I take it the threaded studs do go in the top.


Rear axil shaft oilers dry fitted to check fit. All looking good.

Now does these holes line up?

Bolted in rear axil bolted in.


Flywheel brake pivot in place. Almost spot on. Will need a bit of sanding to get the pivot post perpendicular to the horn plate. Think it is about 3degs out in the y axis.

After 4 hours of honing the bushes the rear axil is in its home. Very stiff to turn by hand but will be fine once 2 very large rubber trimmed flywheels are attached.


By my reckoning that makes this assembly around about 90Kg so will NOT be lifting it off the workmate by myself.
Hum... wonder what the safe working load is for the workmate?
Not sure if I am going to do any painting at the current time or wait until the boiler as this assemble will have to come apart again for mounting to the boiler.

lynnr- Number of posts : 3242
Age : 56
Location : Highland, 4inch showman
Registration date : 2010-08-06
 Missed one
A view between the horn plates.


lynnr- Number of posts : 3242
Age : 56
Location : Highland, 4inch showman
Registration date : 2010-08-06
 Re: Lynn Robinson. Showman Scenic
Great pictures and especially the comments/feedback on the fit of components.

bjwlancashire- Number of posts : 938
Location : Mellor, Lancashire
Registration date : 2010-09-07
 Re: Lynn Robinson. Showman Scenic
Lynn, I'm thinking that the fasteners supplied for the 2nd shaft casting are too long. you should have more M6x15's and less M6x20's.
on the control model they are fitted from the inside. I'll have a word with Steve later and confirm this is correct
on the control model they are fitted from the inside. I'll have a word with Steve later and confirm this is correct

craig@STW- Number of posts : 1410
Location : location Location
Registration date : 2010-05-06
 Re: Lynn Robinson. Showman Scenic
OK, the bolts on the 2nd shaft casting should be fitted from the inside. they do seem to be a bit long but they will not interfere with anything.
you can either leave them as, trim them short or put a nut on the end.
you can either leave them as, trim them short or put a nut on the end.

craig@STW- Number of posts : 1410
Location : location Location
Registration date : 2010-05-06
 No painting this weekend
The world is monochromatic again. Though it was going away last night. But alas nope.


lynnr- Number of posts : 3242
Age : 56
Location : Highland, 4inch showman
Registration date : 2010-08-06
 Re: Lynn Robinson. Showman Scenic
Its 75° fahrenheit where i am!!! °C = ([°F] − 32) × 5⁄9= ~24° celsius!!! 

Graeme81- Number of posts : 178
Location : Ireland
Registration date : 2009-05-25
 It is all apart
Hi All
Well having had a hard think about the painting process on the Hornplate, axil, second shaft and bearing castings. It is going to be better painting each part individually. Only problem with painting individually are the nuts and bolts of things. Will have to, shock horror, brush paint them!
How am I going to manage.
Axel tube, 2nd shaft tube, rear spec plate, inner face of forward spec plate, crank bearing castings will be bright red.
Brake assemblies for both the main wheels and flywheel will be gloss black.
Forward facing surface of the front spec plate will be main engine colour.
Think that sort of confirms to the normal convention.

lynnr- Number of posts : 3242
Age : 56
Location : Highland, 4inch showman
Registration date : 2010-08-06
 Re: Lynn Robinson. Showman Scenic
I'm thinking of leaving my nuts bear !
Rickster- Number of posts : 267
Location : canterbury, Kent
Registration date : 2010-02-19
 Re: Lynn Robinson. Showman Scenic
Rickster wrote:I'm thinking of leaving my nuts bear !
You can see he dont live in Scotland


Vapor- Number of posts : 384
Age : 114
Location : Isle of Wight (2" Burrell & 5" Duchess ex MW)
Registration date : 2008-06-18
 ROFL
ROFL
Vapor wrote:Rickster wrote:I'm thinking of leaving my nuts bear !
You can see he dont live in Scotland
Hack Hack splutter splutter

lynnr- Number of posts : 3242
Age : 56
Location : Highland, 4inch showman
Registration date : 2010-08-06
 Re: Lynn Robinson. Showman Scenic
I cant be bothered with painting nuts afterwards. Once its been steamed a few times and gets all covered in sh*t you wont see any way. Been there done that. Besides engines that are too clean look anal 


Page 3 of 40 •  1, 2, 3, 4 ... 21 ... 40
 Similar topics
» Lynn Robinson. Showman Scenic
» Lynn Robinson. Showman Scenic Part 2
» The Engine Shed. Photo gallery.
» Lynn Robinson 4" water bowser
» Lynn Robinson. 4" traction Wagon. Twins. "Mara" and "Uisge"
» Lynn Robinson. Showman Scenic Part 2
» The Engine Shed. Photo gallery.
» Lynn Robinson 4" water bowser
» Lynn Robinson. 4" traction Wagon. Twins. "Mara" and "Uisge"
Page 3 of 40
Permissions in this forum:
You cannot reply to topics in this forum
