New boy on the block!
+11
LiveSteam
Simon C
Nigncoz
Adam.C
Will@STW
milford59
Synergyn9
GlenB
Nigel C
Mark building a burrell
Mark the spark
15 posters
Page 7 of 8
Page 7 of 8 •  1, 2, 3, 4, 5, 6, 7, 8
 Re: New boy on the block!
Hi Nigncoz.
Yes you have missed out a plug !
It would have been in kit 21 with the washout plugs.
It’s part number is BU22115. Tubeplate plug.
Hope you can find it for tomorrow.
Simon C
Yes you have missed out a plug !
It would have been in kit 21 with the washout plugs.
It’s part number is BU22115. Tubeplate plug.
Hope you can find it for tomorrow.
Simon C

Simon C- Number of posts : 305
Location : Derby
Registration date : 2017-07-07
Nigncoz likes this post
 Re: New boy on the block!
Thanks Chris, was really worried I'd missed something and had to take it apart again. 
After fitting the missed plug, which I assume I'll have to take out again, I've still got some leaks from the pipes that come out the top of the boiler (sorry don't know their name) which I'll have to sort but main air lose at the moment is from the pipes where the water spy glass fits, I assume I have to fit the glass and it's components before I can go any further which is strange because it's the Kits after the Air test instructions.
Still no sign of the engine starting but not surprising with all the leaks
Just a thought, Does anyone know of something on the market which stops the leaks I can't get a spanner too?
Nigncoz- Number of posts : 90
Location : Stoke-on-Trent
Registration date : 2020-03-24
 Re: New boy on the block!
Hi
You need to seal the threads on the steam take off for the sight glass as it must hold pressure of around 90psi.
Apart from welding around the fitting there is no recommended "compound" to fix a leak without taking the joint or threaded fitting apart
You might actually get it to seal under steam as steam works differently than air. One it is expansive and has heat to it.
_________________
Lynn
Technical Support
Steam Traction World Ltd
 Re: New boy on the block!
Thanks to all these Bank Holidays it seem a good idea to try and sort some of these leaks, sorted them all out quite easily by extra PTFE tape and just tightening things up.
The obvious large leak was from the Water Gauge glass tube so I tried to fit it, I used the metal bar to get everything in-line and then tried the glass, it was tight getting it over the 2nd shaft tube but it was going into the bottom at an angle (sorry forgot the proper names for things) thus the nut wouldn't fit and you guessed it it broke the glass tube, the kit came with a good length of tube but several tries later I'd used it all up.
What I need to do is extend the brass "T" shaped fitting to give me more space over the 2nd shaft tube and hopefully get it in-line better, now the important question is" is there any such animal?" Hopefully the picture below shows what I'm on about and someone can help?

Nigncoz- Number of posts : 90
Location : Stoke-on-Trent
Registration date : 2020-03-24
 Upper water gauge set
In your photo it is somewhat hard to estimate, but I guess the T-shaped piece of your upper water gauge set might be too short. This could have been the reason, that you had difficulties to get it over the second shaft tube. Please look into my latest post. Towards the end of it you find a photo, which shows the situation of my own machine. Quite the contrary I had to shorten the lower water gauge extension (BU21228) by a few millimeters, after that I had no problems with the alingment of the upper and the lower part of the water gauge set. Maybe you got a wrong part.
When you read my post through the end you will find out that I ran into a similiar problem with one of the elbows (BU21229) for the steam pipes. This problem has been solved in the mean time: Lynn helped me and I got new elbows with longer threads.
When you read my post through the end you will find out that I ran into a similiar problem with one of the elbows (BU21229) for the steam pipes. This problem has been solved in the mean time: Lynn helped me and I got new elbows with longer threads.

karl heinz marschner- Number of posts : 35
Location : Duesseldorf, Germany
Registration date : 2021-04-13
 Re: New boy on the block!
Thanks very much Karl besides my ramblings and a poor photo you hit the nail on the head, that's exactly what's wrong so I'll have a word with Lynn and hope she can help.
Nigncoz- Number of posts : 90
Location : Stoke-on-Trent
Registration date : 2020-03-24
 Re: New boy on the block!
Well still trying to stop all the leaks, seem to be doing this for ages PTFE taped everything now!
Thought i had cracked it today when the engine tried to go with the pressure up to 50 on the gauge but then noticed a massive leak from this water outlet, sorry don't know what it's called as usual. maybe someone can help, but the screw doesn't reach the bottom where it's supposed to seal, another request to Lynn for advice.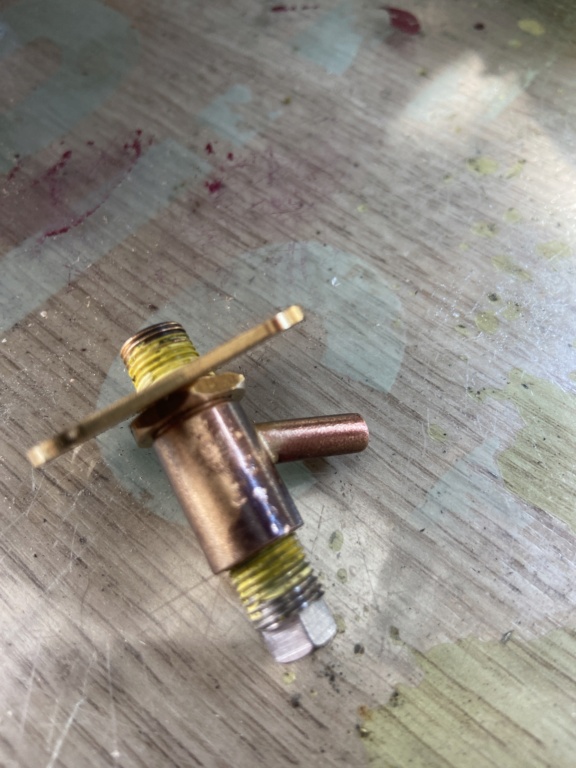
I have been trying to fit some of the pipework in the mean time but the first bit i tried didn't seem to fit together 001146 which the drawing calls for but the instructions 001156, Lynn soon sorted for me. But i do think some of the numbers either on the pipework or the instructions are wrong, i will ask her who knows.
I have also had a go at the oiler but found a problem straight away with the lid bowed and so doesn't fit the body, again advice sort.
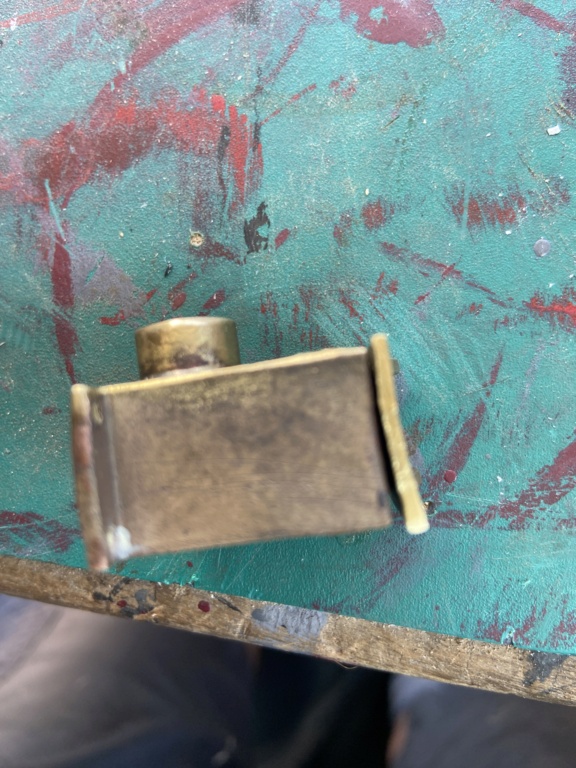
Hoping for better luck tomorrow!
Thought i had cracked it today when the engine tried to go with the pressure up to 50 on the gauge but then noticed a massive leak from this water outlet, sorry don't know what it's called as usual. maybe someone can help, but the screw doesn't reach the bottom where it's supposed to seal, another request to Lynn for advice.

I have been trying to fit some of the pipework in the mean time but the first bit i tried didn't seem to fit together 001146 which the drawing calls for but the instructions 001156, Lynn soon sorted for me. But i do think some of the numbers either on the pipework or the instructions are wrong, i will ask her who knows.
I have also had a go at the oiler but found a problem straight away with the lid bowed and so doesn't fit the body, again advice sort.

Hoping for better luck tomorrow!
Nigncoz- Number of posts : 90
Location : Stoke-on-Trent
Registration date : 2020-03-24
 Re: New boy on the block!
Thought i would try and fit the pipe work whilst waiting for the parts to be returned from STW and erindoors has gone shopping, wish i hadn't, 3 hours later no further forward as i can't get the injector pipe to sit right never which way i manipulate it.
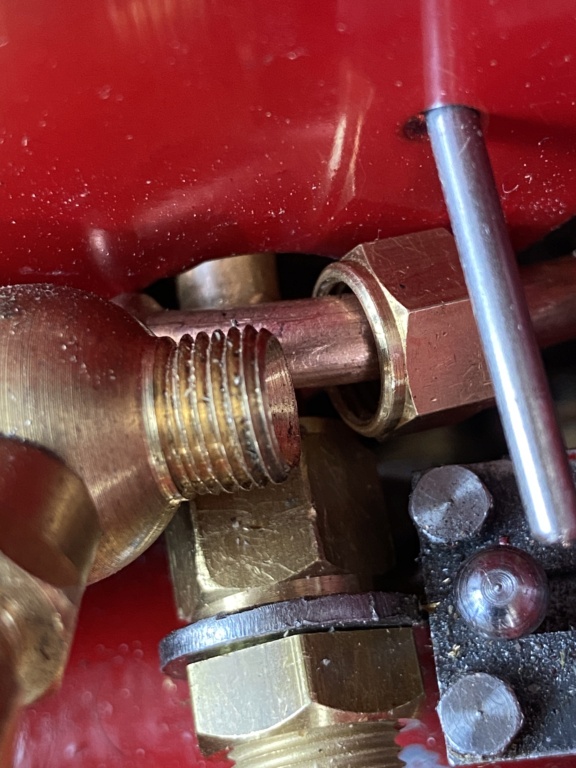
As you can see it comes through the fender at an angle and this the best i can make it sit, still no good.
Should there be an elbow or something? It does apologise in the instructions but that just compounds the frustration.
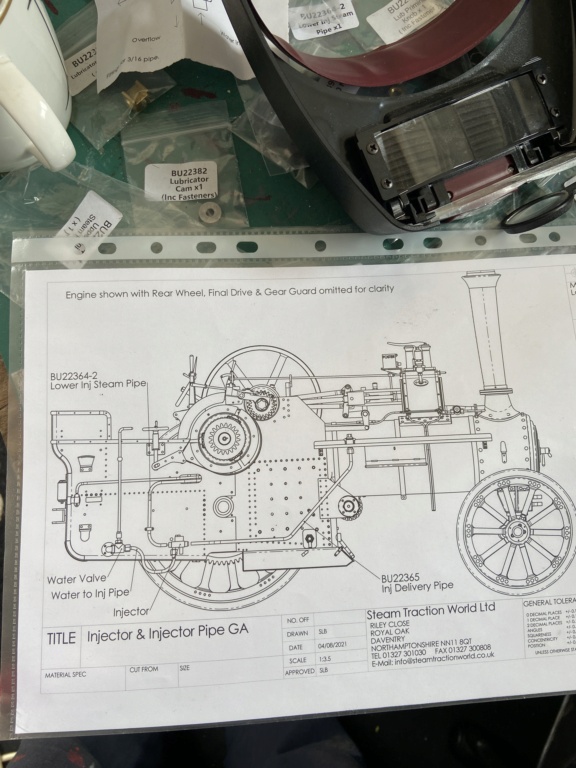
These are the drawings i'm following if it helps?

As you can see it comes through the fender at an angle and this the best i can make it sit, still no good.
Should there be an elbow or something? It does apologise in the instructions but that just compounds the frustration.

These are the drawings i'm following if it helps?
Nigncoz- Number of posts : 90
Location : Stoke-on-Trent
Registration date : 2020-03-24
 Re: New boy on the block!
Well what a mare I've had!!!!!!
Finally got the pipes fitted after 4 days, time I'll never get back!
STW returned the drain cock I was waiting for so I can complete the air test, had to send it back again because it still leaked massively doubt it had been looked at!
Had to admit defeat on the Lubricator assembly, Couldn't make head nor tail of the instructions and the drawings didn't help, so returned it to STW along with the drain cock, hopeful someone better than me can work it out?
Went back to Kit 22b whilst waiting, the instructions made a big thing of finally getting the pipe fastenings all it meant to me was something else that didn't fit, the screws are too short, luckily got some flat head screw that fitted.
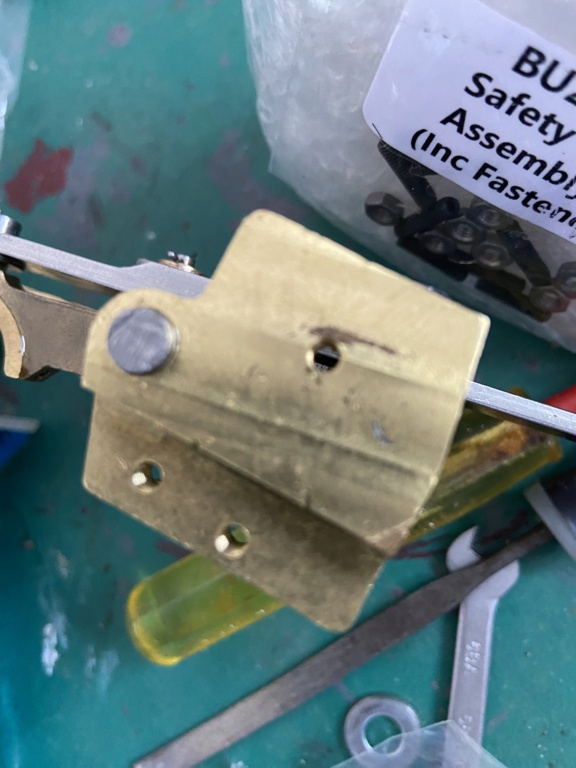
Moved on to the Gear changer, the lever wouldn't fit on the shaft nor the brass boss on it's shaft, fettled to fit but when I fitted Gear Change Bar it seems to be fouling on the stops not letting me change gear. hopefully the attached photo will show better.

Anybody got any clues please?
If I wasn't on the last kit I think I would given up by now!!
Finally got the pipes fitted after 4 days, time I'll never get back!
STW returned the drain cock I was waiting for so I can complete the air test, had to send it back again because it still leaked massively doubt it had been looked at!
Had to admit defeat on the Lubricator assembly, Couldn't make head nor tail of the instructions and the drawings didn't help, so returned it to STW along with the drain cock, hopeful someone better than me can work it out?
Went back to Kit 22b whilst waiting, the instructions made a big thing of finally getting the pipe fastenings all it meant to me was something else that didn't fit, the screws are too short, luckily got some flat head screw that fitted.
Moved on to the Gear changer, the lever wouldn't fit on the shaft nor the brass boss on it's shaft, fettled to fit but when I fitted Gear Change Bar it seems to be fouling on the stops not letting me change gear. hopefully the attached photo will show better.

Anybody got any clues please?
If I wasn't on the last kit I think I would given up by now!!
Nigncoz- Number of posts : 90
Location : Stoke-on-Trent
Registration date : 2020-03-24
 Re: New boy on the block!
The gear change looks perfectly positioned to pull first gear in?
A hint of filing, as per the instructions, will allow it to be pivoted to hold first gear out, and pulling second gear in.
Although that might be better done when assembled over the gears - you can see when the gears are nicely in mesh/in-line and adjust as required.
A hint of filing, as per the instructions, will allow it to be pivoted to hold first gear out, and pulling second gear in.
Although that might be better done when assembled over the gears - you can see when the gears are nicely in mesh/in-line and adjust as required.
Bricol- Number of posts : 2
Location : N.Yorks
Registration date : 2023-07-30
Nigncoz likes this post
 Re: New boy on the block!
Thanks Bricol, I'll fit it on the engine as you suggest and adjust. I have been waiting for Lynn to make sure I'm looking to fit it on the 2 screw in the Hornplates which would mean me taking the 2 screws out but seems to be 3 holes in the Gear Change side.
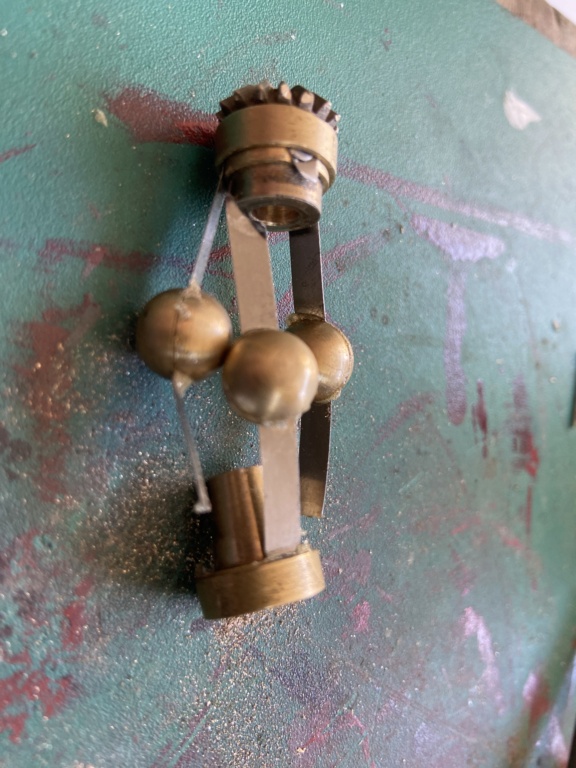
I thought I'd give the Governor a whirl whilst waiting for the Lubricator to be assembled by STW, I hope, fingers crossed!
Assembled okay, filed the heads of the screws as instructed and fitted the Collars, set aside whilst I did the shaft assembly, then a "twang and again and another" and blow me the sprung steel springs had broke, basically given up the ghost

The instructions state that they can't be disassembled which is obvious as the heads have been filed off to fit the collars. I know it's only a dummy but what am I supposed to do now?

I thought I'd give the Governor a whirl whilst waiting for the Lubricator to be assembled by STW, I hope, fingers crossed!
Assembled okay, filed the heads of the screws as instructed and fitted the Collars, set aside whilst I did the shaft assembly, then a "twang and again and another" and blow me the sprung steel springs had broke, basically given up the ghost
The instructions state that they can't be disassembled which is obvious as the heads have been filed off to fit the collars. I know it's only a dummy but what am I supposed to do now?

Nigncoz- Number of posts : 90
Location : Stoke-on-Trent
Registration date : 2020-03-24
 Re: New boy on the block!
Done them up too tight and over-stressed the thin spring steel?
Snap a hacksaw blade - draw cut a slot in the screw head and undo with a flat bladed screwdriver - if you've not got a dremel type device with a thin slitting disc.
Or just tap round with a punch/centre-pop?
Snap a hacksaw blade - draw cut a slot in the screw head and undo with a flat bladed screwdriver - if you've not got a dremel type device with a thin slitting disc.
Or just tap round with a punch/centre-pop?
Bricol- Number of posts : 2
Location : N.Yorks
Registration date : 2023-07-30
Nigncoz likes this post
 Re: New boy on the block!
Thanks Bricol I'll give it a go
Nigncoz- Number of posts : 90
Location : Stoke-on-Trent
Registration date : 2020-03-24
 Re: New boy on the block!
So I've spent the summer of rain sealing up all the air leaks I could find, perhaps got too anal on that then this weekend finally got the pressure up to 10PSI on the gauge so gave it a go...............
Well there is supposed to be a video of it kicking into life but it won't download, how disappointing, albeit for few seconds and only in reverse. I'm guessing something wants adjusting but I'm not far away.
Any help would be appreciated but please put it in plain English because as you might have guessed/read I don't know what things are called
Nigncoz- Number of posts : 90
Location : Stoke-on-Trent
Registration date : 2020-03-24
 Re: New boy on the block!
There is a short instruction, which explains how to post a video, you find it as follows:
Main forum: Steam Traction World
Sub forum: Letting off steam
Posting:
How to upload videos to the forum
by bazzer, Tue 11 April 2017 8:33
I wish you good luck!
Karl Heinz
Main forum: Steam Traction World
Sub forum: Letting off steam
Posting:
How to upload videos to the forum
by bazzer, Tue 11 April 2017 8:33
I wish you good luck!
Karl Heinz

karl heinz marschner- Number of posts : 35
Location : Duesseldorf, Germany
Registration date : 2021-04-13
 Re: New boy on the block!
Thanks Karl but i don't think it's really worth it for 3 seconds, i did have it running longer but by the time i got the camera ready it had stopped.
Any clues on what needs adjusting though?
Any clues on what needs adjusting though?
Nigncoz- Number of posts : 90
Location : Stoke-on-Trent
Registration date : 2020-03-24
 Re: New boy on the block!
Nigncoz wrote:Thanks Karl but i don't think it's really worth it for 3 seconds, i did have it running longer but by the time i got the camera ready it had stopped.
Any clues on what needs adjusting though?
I think we'll need to know a bit more before being able to offer any advice on adjustments, what was the fire like, how much pressure you had amount of water in the boiler, any noticeable steam leaks and from where, when it stopped what was the pressure/fire/water/ash all like.
2" engines do need a fair bit practice and skill to keep all the balls in the air at once, but once you have mastered it you'll be good to steam absolutely any size engine as the bigger they get the more relaxed it all becomes.
To be honest I wouldnt even dream about trying film anything yet as you'll need to be paying all your attention on the engine at this stage
LiveSteam- Number of posts : 788
Location : Hampshire
Registration date : 2013-09-08
 Re: New boy on the block!
Thanks for your time and info LiveSteam but you have got ahead of me I'm afraid as I'm trying still trying to run on air only as to not burn my fingers.
Still your advice would be appreciated.
Thanks
Nigel
Still your advice would be appreciated.
Thanks
Nigel
Nigncoz- Number of posts : 90
Location : Stoke-on-Trent
Registration date : 2020-03-24
 Re: New boy on the block!
Ah right, sorry I didnt realise you were still on air, its a totally different beast to steam. it has zero expansion properties for starters, air also wont tend to carry much lubricant over to the cylinder so watch that aspect as I mentioned a while back.
Lack of heat in the whole engine will likely mean a fair bit slack everywhere also a lot of leaks will likely seal themselves up when its got some heat in it due to expansion.
I'd like to think you could get more than 10psi in it but the fact it did turn over a bit is a positive at this stage.
I'd be tempted to see if the pump works next, purely by putting water in the tender and turning the engine over by hand and seeing if you get anything out of the output and then out of the pipe that connects to boiler clack valve, basically see if it primes up OK
You might find a fair bit of leakage could be from the clack valves as they will be bone dry and steam will improve them sealing up.
As long as most things are reasonably free moving and not binding up anywhere and the pump primes up, if it was me I'd be tempted to lob a fire in it and see how things fair leak wise, dont worry about it actually running, at this stage its purely a leak test to see how things fair when its hot, you might not even manage to make much pressure but it will teach you a lot. Of course keep an eye on the water level.
Be prepared to make the engine grubby mind, start with say some charcoal, dont be tempted to run before you can walk, charcoal wont have as much calorific value compared to coal and will burn out quicker and should be easier to manage than coal at this stage. Remember the 2" doesnt hold a huge amount of water so if theres lot of steam leaks you may find it will use up the water fairly quickly and if it not actually running you wont really be able to get more water in it. Dont even contemplate the injector at this stage
I remember steaming our small 5" gauge Polly locomotive for the first few times and I dont think I even turned the wheels on the first 2 fires, all I did was just manage to run it up to about 20psi the first time and 50psi the second time chasing leaks the whole time BUT having a fire in it did give me renewed vigor.
Lack of heat in the whole engine will likely mean a fair bit slack everywhere also a lot of leaks will likely seal themselves up when its got some heat in it due to expansion.
I'd like to think you could get more than 10psi in it but the fact it did turn over a bit is a positive at this stage.
I'd be tempted to see if the pump works next, purely by putting water in the tender and turning the engine over by hand and seeing if you get anything out of the output and then out of the pipe that connects to boiler clack valve, basically see if it primes up OK
You might find a fair bit of leakage could be from the clack valves as they will be bone dry and steam will improve them sealing up.
As long as most things are reasonably free moving and not binding up anywhere and the pump primes up, if it was me I'd be tempted to lob a fire in it and see how things fair leak wise, dont worry about it actually running, at this stage its purely a leak test to see how things fair when its hot, you might not even manage to make much pressure but it will teach you a lot. Of course keep an eye on the water level.
Be prepared to make the engine grubby mind, start with say some charcoal, dont be tempted to run before you can walk, charcoal wont have as much calorific value compared to coal and will burn out quicker and should be easier to manage than coal at this stage. Remember the 2" doesnt hold a huge amount of water so if theres lot of steam leaks you may find it will use up the water fairly quickly and if it not actually running you wont really be able to get more water in it. Dont even contemplate the injector at this stage
I remember steaming our small 5" gauge Polly locomotive for the first few times and I dont think I even turned the wheels on the first 2 fires, all I did was just manage to run it up to about 20psi the first time and 50psi the second time chasing leaks the whole time
LiveSteam- Number of posts : 788
Location : Hampshire
Registration date : 2013-09-08
 Re: New boy on the block!
Well it's taken 3 years but I've finally got the engine together, Thanks for everyone's help. 
The only things I have to do besides retouching up the paint work and a good clean, spiders will have to find a new home, is sort out the Whistle because no matter how much I reduce the pin which goes into the body it is still fast and pulling the chain gives no movement and get the handles to fit the Water pump and valves on the side of the engine, sorry don't know what they are called.
If anyone is brave enough to give me some guidance on firing things up in plain English I'll be more than grateful to accept it.


Nigncoz- Number of posts : 90
Location : Stoke-on-Trent
Registration date : 2020-03-24
LiveSteam likes this post
 Re: New boy on the block!
Well obviously fill it with water as a start  I'd suggest about 3/4 up the glass as that will give you plenty of head room if have issues with pump and injector which you'll likely have.
It might be an idea to check the pumps working before lighting a fire by turning it over by hand and crack off the pipe on the clack and wait for water to squirt out while you turn the fly wheel over.
I'd go with charcoal soaked in meths or paraffin and even just stay on that for your first firing as it doesnt last too long so if things get out of hand its fairly easy to get it to go out.
Of course dont forget to oil everything and get ready for hours and hours of cleaning afterwards
Nice build by the way.
LiveSteam- Number of posts : 788
Location : Hampshire
Registration date : 2013-09-08
 Re: New boy on the block!
Lovely thanks for that, I've ordered some pipe to fit the Blowdown Valve ready to fill it with water and some of the right oil and water treatment because the water around here is hard and full of crap.
Might be a silly question but I've removed the blanks from the bottom of the boiler which I fitted to air test it, shouldn't I have done that? If not which case are there others should I leave in?
Thanks
Nigel
Might be a silly question but I've removed the blanks from the bottom of the boiler which I fitted to air test it, shouldn't I have done that? If not which case are there others should I leave in?
Thanks
Nigel
Nigncoz- Number of posts : 90
Location : Stoke-on-Trent
Registration date : 2020-03-24
 Re: New boy on the block!
Hello Nigncoz,
your finished machine looks really good. Mine is also completed, but I have not started any painting, so a lot more work is waiting for me. But before beginning with this I have to drag my machine from the basement up to the groundfloor to make a first test run with steam.
In your last post you have not explained what you mean by blanks from the bottom of the boiler. So I cannot give you any advice. A photo would be helpful.
But here is another hint; Sometimes you have mentioned, that you have difficulties to give the various parts the right names, and you ask for plain english. I thind it is simply impossible to explain such a complex machinery in plain english, you definitely need the special technical terms. But all these terms you find in the piece-lists together with the part-numbers, which you have got with your kits. I added all these names to the part numbers in the drawings. This made it much easier for me to understand the instructions.
I wish you best success for your first steaming
Karl Heinz

karl heinz marschner- Number of posts : 35
Location : Duesseldorf, Germany
Registration date : 2021-04-13
 Re: New boy on the block!
Hello Nigncoz,
As for help for how to steam, check out Lynn‘s series of videos on youtube like
https://youtu.be/SeDtge22nuw?si=iFaSTtwht-PqPdYk
Although it‘s a 4“ Showmans, the procedure is much the same, just needs some downsizing of wood and coal
Hope this helps
Elwood
As for help for how to steam, check out Lynn‘s series of videos on youtube like
https://youtu.be/SeDtge22nuw?si=iFaSTtwht-PqPdYk
Although it‘s a 4“ Showmans, the procedure is much the same, just needs some downsizing of wood and coal
Hope this helps
Elwood

elwood-59- Number of posts : 306
Location : Germany-NRW
Registration date : 2014-12-17
 Re: New boy on the block!
Nigncoz wrote:Lovely thanks for that, I've ordered some pipe to fit the Blowdown Valve ready to fill it with water and some of the right oil and water treatment because the water around here is hard and full of crap.
Might be a silly question but I've removed the blanks from the bottom of the boiler which I fitted to air test it, shouldn't I have done that? If not which case are there others should I leave in?
Thanks
Nigel
Being that its a 2 inch you could get away with just buying in some de-ionised water or distilled water as you're not going to be using vast amounts really.
I presume you are talking about the wash out bungs at the bottom of the boiler, they do need to be fitted or the water will just run out of them.
All boiler bungs including the fusible plug in the fire box need to be in place.
LiveSteam- Number of posts : 788
Location : Hampshire
Registration date : 2013-09-08
Page 7 of 8 •  1, 2, 3, 4, 5, 6, 7, 8
 Similar topics
» New kid on the block
» Piston Bottoming out
» Cylinder block material.
» cylinder Block
» Cylinder Block
» Piston Bottoming out
» Cylinder block material.
» cylinder Block
» Cylinder Block
Page 7 of 8
Permissions in this forum:
You cannot reply to topics in this forum