New boy on the block!
+11
LiveSteam
Simon C
Nigncoz
Adam.C
Will@STW
milford59
Synergyn9
GlenB
Nigel C
Mark building a burrell
Mark the spark
15 posters
Page 5 of 8
Page 5 of 8 •  1, 2, 3, 4, 5, 6, 7, 8
 Re: New boy on the block!
That is looking great !!
milford59- Number of posts : 307
Location : Milford on Sea
Registration date : 2019-05-19
 Re: New boy on the block!
Well done, looking GREAT!
Nigncoz- Number of posts : 90
Location : Stoke-on-Trent
Registration date : 2020-03-24
 Re: New boy on the block!
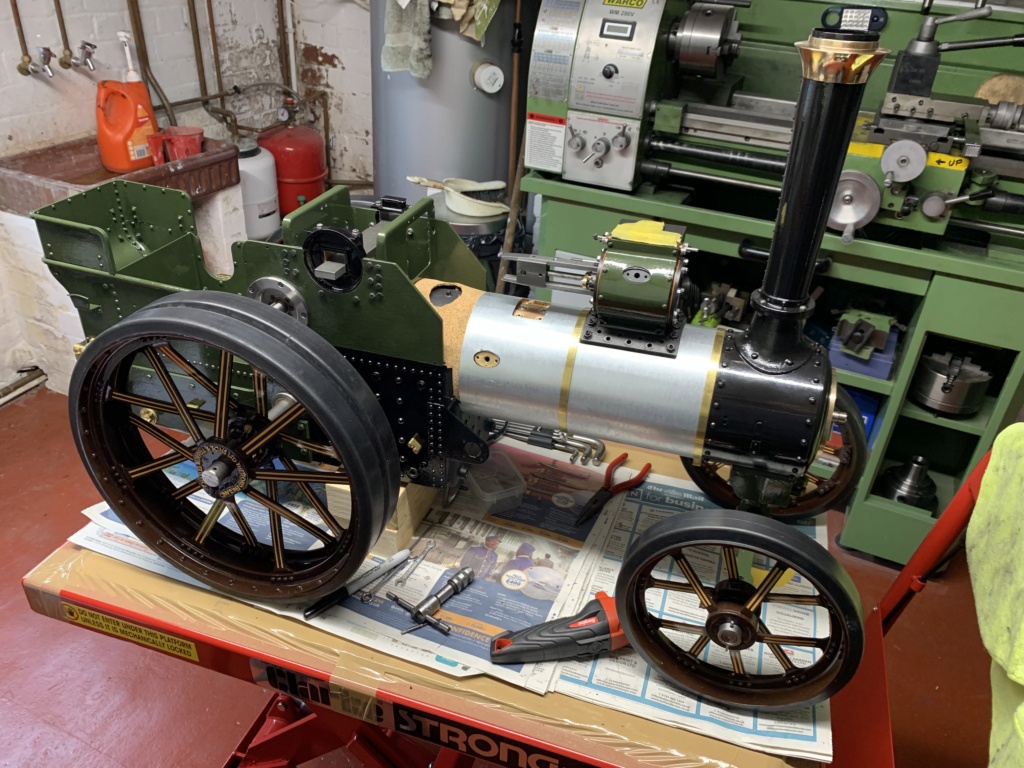
So, onto the cladding. I don't think I am going to enjoy this. 
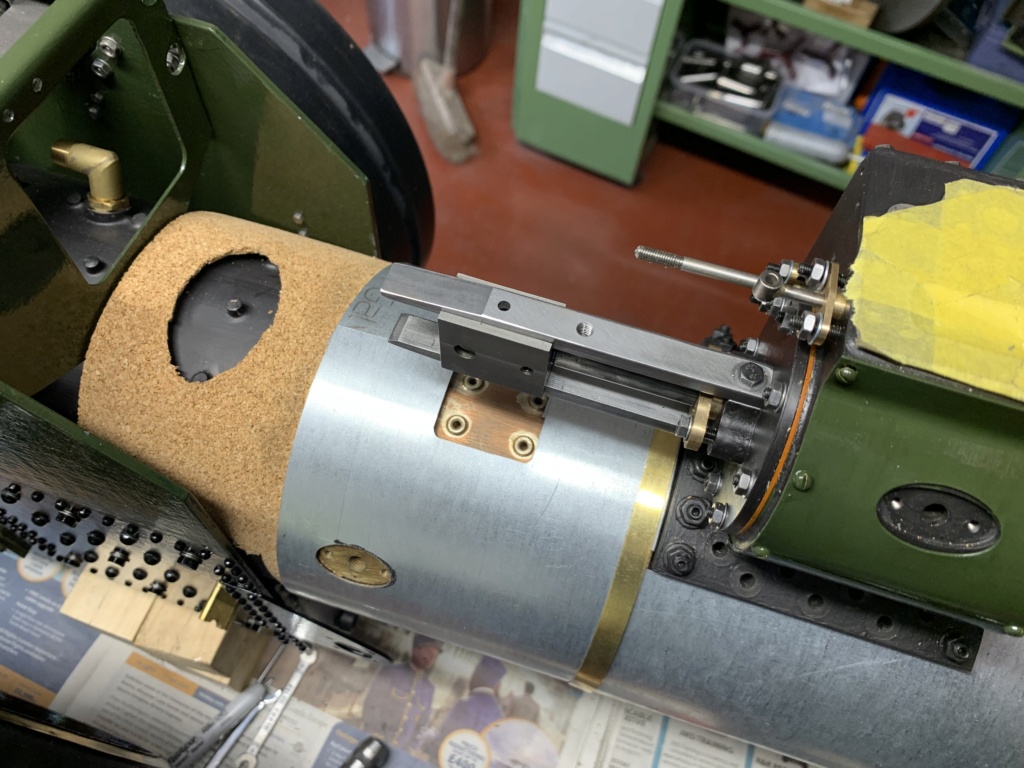
Started on the cylinder cladding and after a lot of fettling I have pretty much given up on fitting the brass finishing strips. In my view, it looks ok without but may ask STW for a new set at a later date.
Onto the boiler cladding and test fitted the first 4 sections but do not intend to paint until I have more of the components attaching through the cladding, then I can file to fit if required.
For the rear cladding section with the manhole cover, it looks to require a fair amount of trimming as approx. 5mm too long.
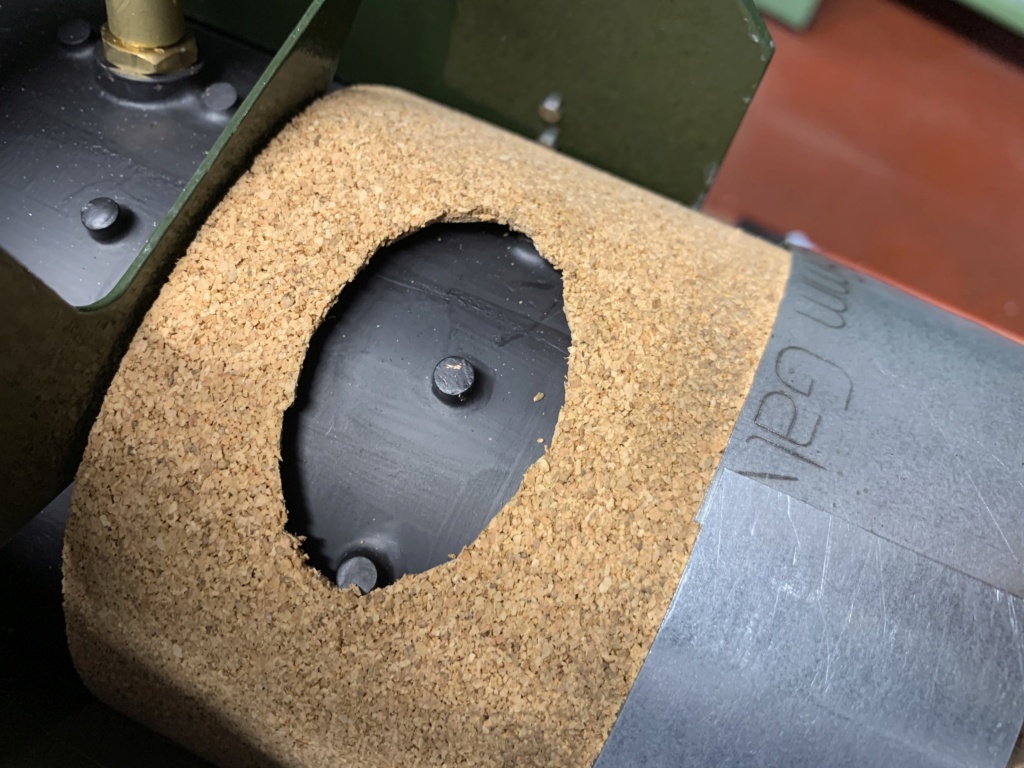
Was I meant to file down the protruding stay ends on top of the boiler as they impede the cork sitting flat and the fitment of the manhole cover?


Synergyn9- Number of posts : 66
Location : Manchester
Registration date : 2019-10-23
Mark building a burrell likes this post
 Re: New boy on the block!
Back on the scene eventually, learnt a lesson there on moving during a Pandemic!
Treated myself to a Tap and Die set off Fleabay but haven't got a clue how to use it, tried to get the thread size of the M3 hex screws to clear the paint from the threads of the plates but couldn't find the right Tap.
Pity you didn't get an answer for the filing off the protruding stays, would have been nice to know, what did you do in the end?
Looking forward to receiving my kits again:D
Nigncoz- Number of posts : 90
Location : Stoke-on-Trent
Registration date : 2020-03-24
 Re: New boy on the block!
I didn't file the stays on the boiler just put the cork over it and fitted the cladding
Mark building a burrell- Number of posts : 64
Location : Beverley
Registration date : 2018-11-20
 Re: New boy on the block!
I've lowered the stays a little but have yet to fit the cladding properly.
With it being summer, gardening and decorating the outside of the house have become the priority, so all work has stopped on the engine for the time being
With it being summer, gardening and decorating the outside of the house have become the priority, so all work has stopped on the engine for the time being
Synergyn9- Number of posts : 66
Location : Manchester
Registration date : 2019-10-23
 Re: New boy on the block!
Finally got to make a start on Kit 11a&b, All went together well with the piston moving freely but when i put the fingers on the Crosshead and bolted them up the piston was fixed solid, added a slither of Kitchen Foil as it says in the instructions to no avail, eventually i had to add a washer between the fingers and the cover to get any movement. Has anyone else had this problem or is it just me?
Nigncoz- Number of posts : 90
Location : Stoke-on-Trent
Registration date : 2020-03-24
 Re: New boy on the block!
Wait until you get your wayshaft bracket and then sort out the guide bars I had to use some drink can folded to get correct shims so the crosshead moved freely
Mark building a burrell- Number of posts : 64
Location : Beverley
Registration date : 2018-11-20
Nigncoz likes this post
 Re: New boy on the block!
Great thanks for that Mark 
Nigncoz- Number of posts : 90
Location : Stoke-on-Trent
Registration date : 2020-03-24
 Re: New boy on the block!
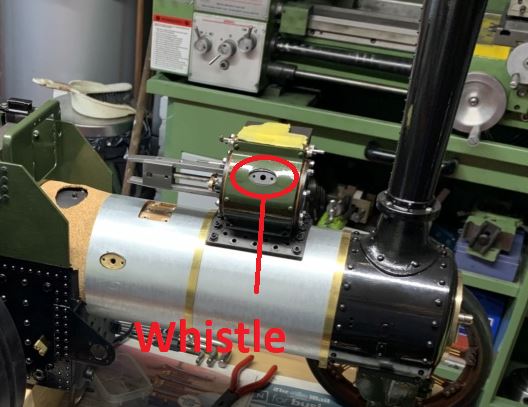
Just got out the garage after dry assembling the cylinder block etc, all gone well but a bit confused about the statement in the instructions about the elliptical recess for the whistle, don't know where that is and i have to put PTFE tape on these studs. Are these all that needs PTFE tape and which studs do i put the Foliac on? talking of studs is there any reason why some of the studs don't go in as far as some others?
Nigncoz- Number of posts : 90
Location : Stoke-on-Trent
Registration date : 2020-03-24
LiveSteam- Number of posts : 788
Location : Hampshire
Registration date : 2013-09-08
Nigncoz likes this post
 Re: New boy on the block!
Nigncoz wrote:Just got out the garage after dry assembling the cylinder block etc, all gone well but a bit confused about the statement in the instructions about the elliptical recess for the whistle, don't know where that is and i have to put PTFE tape on these studs. Are these all that needs PTFE tape and which studs do i put the Foliac on? talking of studs is there any reason why some of the studs don't go in as far as some others?
When I attached my cylinder block, it was also the case that some studs went in further than others. I just went with it as they were secure and I did not want to cause any damage such as stripped threads in the boiler. You can trim them down with a Dremel later anyway.
I applied liquid ptfe sealant to all the studs (available at Screwfix)
Last couple of days I have got the crank, conrod, flywheel and cylinder all co-operating and as has been said I would not worry about getting the guide bars to allow piston movement until all the components are mounted on the engine. I ended up using 2 pieces of coke can on the top guide at the cylinder end to get all moving.
Also I lapped the crankshaft with some medium valve grinding paste and the conrod onto the crank. I understand Yellow Timesaver Lapping paste is best for the job. However at £13 + £8.50 postage for a small pot, I gave it a miss and made sure that I removed all trace of the valve lapping paste.
Now with flywheel attached I can turn it over fairly easily, so will hopefully bed in fairly quickly once in steam
Only drama I have had is snapping the brass oil filler screw on the conrod. Too heavy handed with the spanner
Synergyn9- Number of posts : 66
Location : Manchester
Registration date : 2019-10-23
Nigncoz likes this post
 Re: New boy on the block!
Lovely, Thanks for all the info, a trip to Screwfix is in order. Don't you think we might have to remove things at some stage so Dremel the excess on the studs might be unwise. just a thought!
Nigel
Nigel
Nigncoz- Number of posts : 90
Location : Stoke-on-Trent
Registration date : 2020-03-24
 Re: New boy on the block!
Nigncoz wrote:Lovely, Thanks for all the info, a trip to Screwfix is in order. Don't you think we might have to remove things at some stage so Dremel the excess on the studs might be unwise. just a thought!
Nigel
I'll take the risk. Can always replace studs. Important thing is to leave enough thread proud to lock 2 nuts on to aid removal
Current progress:

Synergyn9- Number of posts : 66
Location : Manchester
Registration date : 2019-10-23
milford59 and Nigncoz like this post
 Re: New boy on the block!
A little more progress tonight having received the next kit last week.
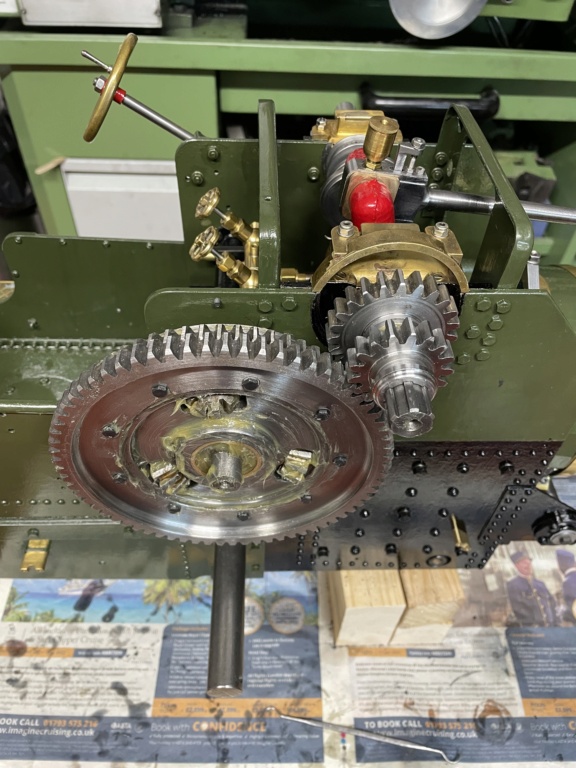
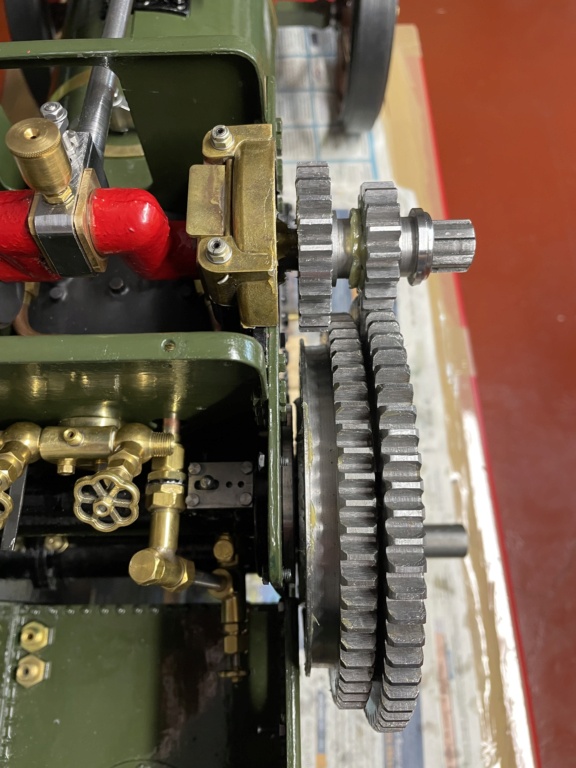
Struggling to understand the diff lock and how it works but hopefully it will become clearer as I complete the assembly.
So in normal running is the diff lock engaged or disengaged? I am assuming that engaged has the lock lever pushed towards the diff?
So when disengaged should the 4 prongs on the lock ring (BU21717) disengage fully from the Compensating Centre (BU21704)
I misread the instructions and probably took a little too much off the prongs as I misunderstood that they should of been filed down only if they protruded from the inner bevel (BU21701) when diff lock withdrawn (disengaged?). So they are now a little short and I am worried they will not engage or disengage positively.
Will@STW - should I look to get a replacement? (BU21717)


Last edited by Synergyn9 on Wed 11 Aug 2021, 3:26 pm; edited 1 time in total
Synergyn9- Number of posts : 66
Location : Manchester
Registration date : 2019-10-23
 Re: New boy on the block!
OMG not looking forward to all that. Received Kit 17 myself last week but nothing i can do with it because i haven't received the boiler yet! so plenty to go at eventually.
Nigncoz- Number of posts : 90
Location : Stoke-on-Trent
Registration date : 2020-03-24
 Re: New boy on the block!
Hi Nick
How short are the prongs? It depends on whether they go into the compensating center when the diff lock is engaged.
The diff lock works by pushing the prongs into the compensating center through the inside bevel gear, thereby locking the bevel to the center so that neither can turn at different speeds. This action locks the whole diff assembly together so that both rear wheels turn at the same speed all the time, and are not independent of one another as they would normally be. This gives the engine more traction in slippery conditions, however when turning, the outside wheel (so for example when turning left this will be the right hand wheel) will drag slightly as it tries to go a further distance than the inside wheel but without being allowed to turn faster as there is no differential doing the job of separating it from the inside wheel. So naturally in normal conditions you will need the diff lock to be disengaged as normally you want the diff to do its job.
I cannot think of any situation where you will require the diff to be locked on a 2" Burrell. They are (relatively speaking) quite light, and in situations where they will get stuck you would normally get a couple of people to lift them out for you, and in situations where that is a problem you are unlikely to drive them around anyway.
Many thanks
Will@STW

Will@STW- Number of posts : 196
Age : 27
Location : Daventry
Registration date : 2019-01-29
 Re: New boy on the block!
Thanks Will for the clarification.
So basically on a 2", you would always run with the diff lock off and pinned in place i.e. lever to the left as you look from behind?
So, as long as the prongs do not protrude through the inner bevel (BU21701) when the diff lock is off, all is good?
So basically on a 2", you would always run with the diff lock off and pinned in place i.e. lever to the left as you look from behind?
So, as long as the prongs do not protrude through the inner bevel (BU21701) when the diff lock is off, all is good?
Synergyn9- Number of posts : 66
Location : Manchester
Registration date : 2019-10-23
 Re: New boy on the block!
Synergyn9 wrote:Thanks Will for the clarification.
So basically on a 2", you would always run with the diff lock off and pinned in place i.e. lever to the left as you look from behind?
So, as long as the prongs do not protrude through the inner bevel (BU21701) when the diff lock is off, all is good?
Hi Nick
Correct, when the lever is across to the left (from the drivers position), the prongs are pulled out and the diff can do what it is meant to, and if the prongs don't go all the way through the inner bevel when the lock is disengaged then you shouldn't have a problem (if the lock is disengaged and does go through the inside bevel and into the diff center then that is when problems can crop up, as it will never unlock).
Many thanks
Will@STW

Will@STW- Number of posts : 196
Age : 27
Location : Daventry
Registration date : 2019-01-29
 Re: New boy on the block!
Thanks Will. All should be ok then. Will finish assembly of Kit 17 later today 

Synergyn9- Number of posts : 66
Location : Manchester
Registration date : 2019-10-23
 Re: New boy on the block!
I will also look at adding that explanation of how the diff lock works to the instructions so that people in future have a better understanding of what it is they are building (that's one of the reasons people buy our kits is to understand how it works before putting a fire in).
Many thanks
Will@STW
Many thanks
Will@STW

Will@STW- Number of posts : 196
Age : 27
Location : Daventry
Registration date : 2019-01-29
 Re: New boy on the block!
I think that is a really good idea Will.
Being a complete novice to the world of traction engines, any additional info is much appreciated.
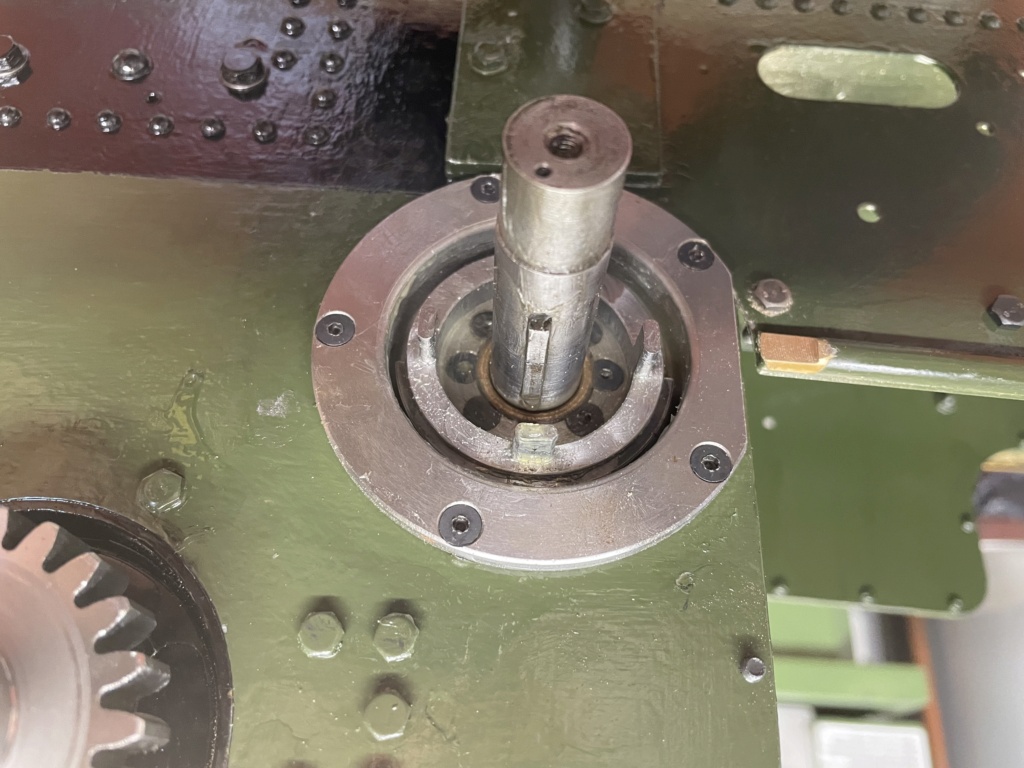
I have put it all together now but the diff is not able to rotate a full 360 degrees, so will strip down and examine the teeth to see if any fettling is required. Currently more like 90 degrees before it locks solid.
Also if gears fully tightened to shaft all becomes very tight. So presumably some easing to be done
I also filed down the brass tender trim slightly as the inner bevel gear was rubbing (see pic, don't seem to be able to post right way up)

Synergyn9- Number of posts : 66
Location : Manchester
Registration date : 2019-10-23
 Re: New boy on the block!
Following some great advice from SteamHuffy, all seems good.
I placed a thin washer at the other end of the 2nd shaft between gear BU21715 and the end washer BU21722, thus allowing a little more length for the gears and diff at the other end.
All seems good with no play evident and diff is free to rotate.
I placed a thin washer at the other end of the 2nd shaft between gear BU21715 and the end washer BU21722, thus allowing a little more length for the gears and diff at the other end.
All seems good with no play evident and diff is free to rotate.
Synergyn9- Number of posts : 66
Location : Manchester
Registration date : 2019-10-23
 Re: New boy on the block!
Not had time to write anything for a while so thought i'd better update.
Got a nice parcel at the beginning of the month,
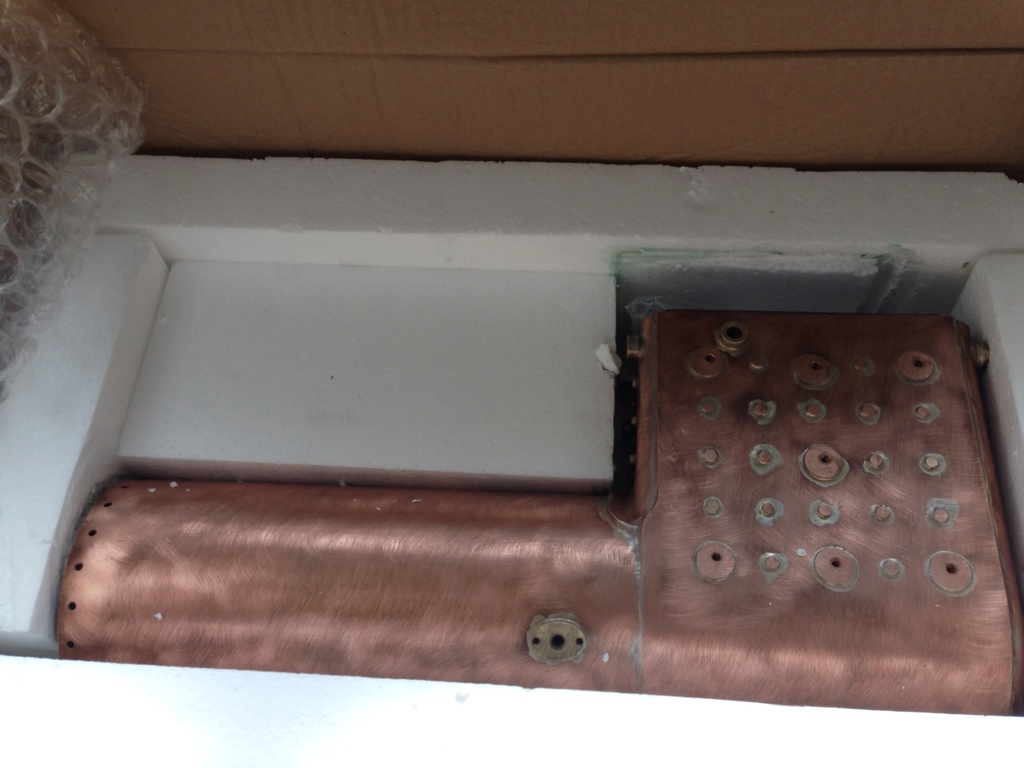
so set about adding all the bits which where lying about, all went well except for the easy job of fitting the Fire Door had to add washers to where it connected to the bosses on the boiler which made the screws to short to attach them, Will soon sorted me out with longer ones, thanks Will.
Had to laugh at the line in the instruction " The Fender is simply slid over the protrusions and bolt on" 3 days of "Fettling" meant it fitted right but the time painting was a bit of a waste because of my own clumsiness with the Dremel and spanner slips, will have to sort it out at a later date.
Had to modify the Ashpan flap a little so it opens over the nuts holding the flap on and the pins holding it all on the boiler where too small but all okay now.
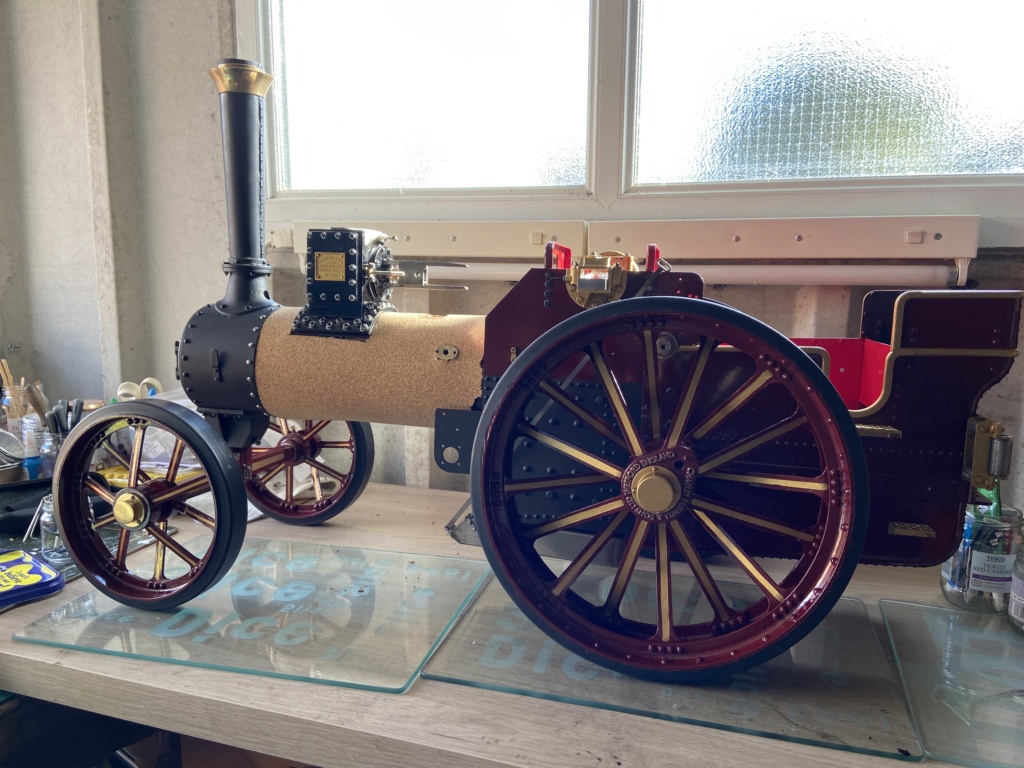
Just the fitting of the cladding should finish it off nicely.
Looking forward to what comes next!!
Got a nice parcel at the beginning of the month,

so set about adding all the bits which where lying about, all went well except for the easy job of fitting the Fire Door had to add washers to where it connected to the bosses on the boiler which made the screws to short to attach them, Will soon sorted me out with longer ones, thanks Will.
Had to laugh at the line in the instruction " The Fender is simply slid over the protrusions and bolt on" 3 days of "Fettling" meant it fitted right but the time painting was a bit of a waste because of my own clumsiness with the Dremel and spanner slips, will have to sort it out at a later date.
Had to modify the Ashpan flap a little so it opens over the nuts holding the flap on and the pins holding it all on the boiler where too small but all okay now.

Just the fitting of the cladding should finish it off nicely.
Looking forward to what comes next!!
Nigncoz- Number of posts : 90
Location : Stoke-on-Trent
Registration date : 2020-03-24
Will@STW likes this post
 Re: New boy on the block!
Looking good. I've been busy on other things so got 2 kits waiting to go on 
Synergyn9- Number of posts : 66
Location : Manchester
Registration date : 2019-10-23
Page 5 of 8 •  1, 2, 3, 4, 5, 6, 7, 8
 Similar topics
» New kid on the block
» Piston Bottoming out
» Cylinder block material.
» cylinder Block
» Cylinder Block
» Piston Bottoming out
» Cylinder block material.
» cylinder Block
» Cylinder Block
Page 5 of 8
Permissions in this forum:
You cannot reply to topics in this forum
