
Lynn Robinson. Showman Scenic
Page 7 of 40 •  1 ... 6, 7, 8 ... 23 ... 40
 ![]()
Re: Lynn Robinson. Showman Scenic
![]() craig@STW Fri 19 Aug 2011, 10:03 pm
craig@STW Fri 19 Aug 2011, 10:03 pm
so much easier this way.

craig@STW- Number of posts : 1410
Location : location Location
Registration date : 2010-05-06
Re: Lynn Robinson. Showman Scenic
![]() Rickster Fri 19 Aug 2011, 10:05 pm
Rickster Fri 19 Aug 2011, 10:05 pm
I had similar problems to Lynn but I had to remove the cylinder block - see my previous thread and drill the bottom holes out 9.5mm to get it to fit.
cheers
Rick
Rickster- Number of posts : 267
Location : canterbury, Kent
Registration date : 2010-02-19
Re: Lynn Robinson. Showman Scenic
![]() craig@STW Fri 19 Aug 2011, 10:13 pm
craig@STW Fri 19 Aug 2011, 10:13 pm
craig@STW- Number of posts : 1410
Location : location Location
Registration date : 2010-05-06
Re: Lynn Robinson. Showman Scenic
![]() Graeme81 Fri 19 Aug 2011, 11:11 pm
Graeme81 Fri 19 Aug 2011, 11:11 pm
oh, i was sure we had included these to "take the strain".
hopefully they will be included in the kits for the ppl who are a bit behind (me!) so

Graeme81- Number of posts : 178
Location : Ireland
Registration date : 2009-05-25
Extra bolts
![]() lynnr Sun 21 Aug 2011, 9:16 am
lynnr Sun 21 Aug 2011, 9:16 am
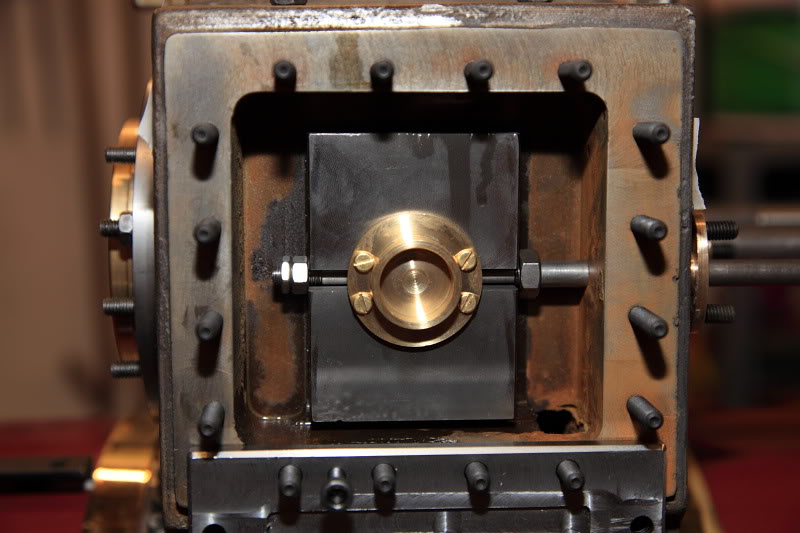
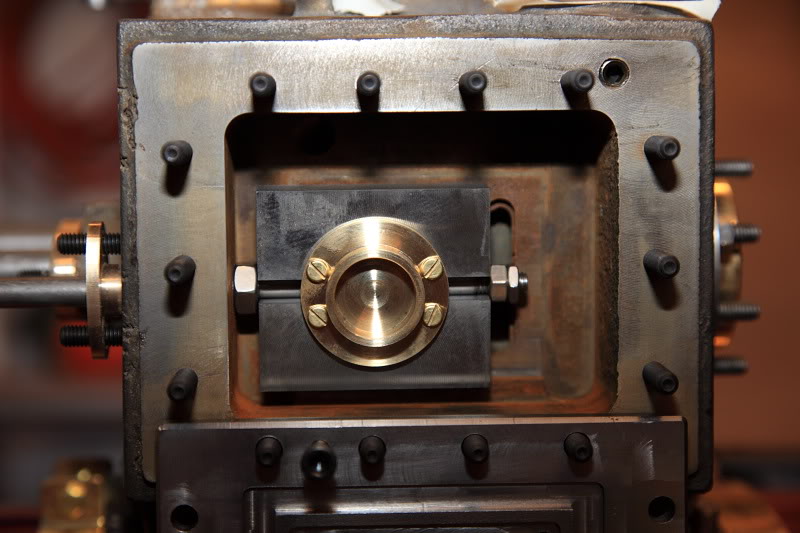
No extra bolts supplied. Still having problems with 2 holes on the left hand side bottom flange 2nd bolt in from the front and 5th from the front.

lynnr- Number of posts : 3242
Age : 55
Location : Highland, 4inch showman
Registration date : 2010-08-06
Filing and not the paper kind
![]() lynnr Sun 21 Aug 2011, 4:09 pm
lynnr Sun 21 Aug 2011, 4:09 pm
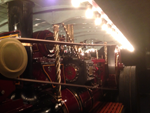
Back to school today. File bashing. Been filing the slot in the middle part of the cleading.
Done quite well and though I had it so put all the cleading on. Still needs a bit of fettling of the slot as the left side is not going down far enough so holding the cleading off the formers and hence not a straight edge at the block.
Right hand side looking good with only a 3mm gap.


Left side needs some work.


Dang! she looks good

lynnr- Number of posts : 3242
Age : 55
Location : Highland, 4inch showman
Registration date : 2010-08-06
Re: Lynn Robinson. Showman Scenic
![]() Brian M Mon 22 Aug 2011, 6:47 pm
Brian M Mon 22 Aug 2011, 6:47 pm
craig@STW wrote:i thought we sent out "normal" bolts to help put the cylinder on and then you replace these with the studs ????
so much easier this way.
Hello Craig,
Can you please clarify that is the case, as I am having my boiler and cylinder leaving the workshop tomorrow
Cheers,
Brian
Brian M- Number of posts : 261
Location : Cheshire
Registration date : 2011-01-30
Message to Craig
![]() lynnr Tue 23 Aug 2011, 8:05 am
lynnr Tue 23 Aug 2011, 8:05 am
Craig is on Holidays but Steve or Dean should pop on at some point. I would suggest phone.
lynnr- Number of posts : 3242
Age : 55
Location : Highland, 4inch showman
Registration date : 2010-08-06
Re: Lynn Robinson. Showman Scenic
![]() Steam Traction World Tue 23 Aug 2011, 11:24 am
Steam Traction World Tue 23 Aug 2011, 11:24 am
Regards
Steve
Steam Traction World- Admin
- Number of posts : 946
Location : Daventry UK
Registration date : 2008-06-18 -

Re: Lynn Robinson. Showman Scenic
![]() craig@STW Sat 27 Aug 2011, 6:36 pm
craig@STW Sat 27 Aug 2011, 6:36 pm
craig@STW- Number of posts : 1410
Location : location Location
Registration date : 2010-05-06
Back on track. Kit 13
![]() lynnr Sat 27 Aug 2011, 8:24 pm
lynnr Sat 27 Aug 2011, 8:24 pm
Slow progress on this kit as today I had to do a 400 mile round trip to collect my caravan as sister and family were using it.
So progress. Got lots of goodies to fill in some of the holes left after STW have been at the cylinder.
Only one minor problem. Regulator packing gland. Looks like and measures that the fixing holes for the glands are M5 and there is no mention of M5 on the packing list and I do not have any in the box. Need to wait until Tuesday as it is bank holiday for some, not me.
Not painted the block yet as I want to see where some of the plates cover what part of the machined surfaces etc.
Also all unfilled holes have tape over them. Would dread a bit of FOD going in to the block at this late stage.


lynnr- Number of posts : 3242
Age : 55
Location : Highland, 4inch showman
Registration date : 2010-08-06
Painting time again
![]() lynnr Sun 28 Aug 2011, 6:45 pm
lynnr Sun 28 Aug 2011, 6:45 pm
Easy day today been a paintin'
Remembered finally to paint the tender water tank top. Also the new steps since they arrived with kit 13.
Done some lining out on the cleading. Not typical as I do not actually like the black line first. So this is how I have done it.


And also painted the rubbing pads.

I still have one set of lines to do but did not want to disturb the wet black on the rubbing pads so will do the last 2 lines in a couple of days.
If all is fine after inspection I will be finally mounting the belly tank for, i hope, the last time
lynnr- Number of posts : 3242
Age : 55
Location : Highland, 4inch showman
Registration date : 2010-08-06
Re: Lynn Robinson. Showman Scenic
![]() Kevster Sun 28 Aug 2011, 7:06 pm
Kevster Sun 28 Aug 2011, 7:06 pm
What technique do you use to do your lining ?
thanks
Kev

Kevster- Number of posts : 424
Location : Hertfordshire 4 inch; DCC road loco
Registration date : 2011-01-27
Lining
![]() lynnr Sun 28 Aug 2011, 8:25 pm
lynnr Sun 28 Aug 2011, 8:25 pm
Kevster wrote:Hi Lynnr,
What technique do you use to do your lining ?
thanks
Kev
Hi Kev
For these lines I used the finesse tape from [url=UK Pinstripping]http://www.pinstripinguk.com/tapes.htm[/url]
F2 from the double line tape. The tape has a clear holder film that hosts 3 strips of masking tape. You lay the tape down and peel the backing off to leave perfect gaps. Not much use for tight curves.
Tender was done with Scotch® 471 Series BLUE Plastic Fine Line Tape from the same company. White layout pencil to setup the lines.
Lining paints are One Shot Paints. Creates a deep even colour in a single coat. I have the reducer which thines the paint slightly and reduces the drying time. Paint wait 30 mins remove tapes and you do not get tearing as the paint has not stuck to the tapes unlike normal masking tapes.
lynnr- Number of posts : 3242
Age : 55
Location : Highland, 4inch showman
Registration date : 2010-08-06
Re: Lynn Robinson. Showman Scenic
![]() Kevster Sun 28 Aug 2011, 8:57 pm
Kevster Sun 28 Aug 2011, 8:57 pm
Sure looks good, i will give it a go when I get to do my lining.
Kevster- Number of posts : 424
Location : Hertfordshire 4 inch; DCC road loco
Registration date : 2011-01-27
Re: Lynn Robinson. Showman Scenic
![]() Kevster Sun 28 Aug 2011, 9:03 pm
Kevster Sun 28 Aug 2011, 9:03 pm
Kevster- Number of posts : 424
Location : Hertfordshire 4 inch; DCC road loco
Registration date : 2011-01-27
Re: Lynn Robinson. Showman Scenic
![]() lynnr Sun 28 Aug 2011, 9:32 pm
lynnr Sun 28 Aug 2011, 9:32 pm
Kevster wrote:Forgot to ask what sort of brush do you use?
Xcaliber 000 and a series 444 scroller both used for freehand. The wheel spokes were done with the Beugler. Yellow done with a slight offset and run both sides to get an even centred line. Then a thin wheel for the red edging. Lines on the rim done freehand with the Xcaliber and rotating the wheel by external means, battery drill with a rubber barrel on it.
Brushes from Pinstripping UK. Beugler from a company in Canada.
lynnr- Number of posts : 3242
Age : 55
Location : Highland, 4inch showman
Registration date : 2010-08-06
Kevster- Number of posts : 424
Location : Hertfordshire 4 inch; DCC road loco
Registration date : 2011-01-27
No problem
![]() lynnr Sun 28 Aug 2011, 9:48 pm
lynnr Sun 28 Aug 2011, 9:48 pm
Kevster wrote:Thanks for all the info lynn
No worries mate. BTW that wheel needs some paint on it!
lynnr- Number of posts : 3242
Age : 55
Location : Highland, 4inch showman
Registration date : 2010-08-06
Re: Lynn Robinson. Showman Scenic
![]() Kevster Mon 29 Aug 2011, 7:14 am
Kevster Mon 29 Aug 2011, 7:14 am
Kevster- Number of posts : 424
Location : Hertfordshire 4 inch; DCC road loco
Registration date : 2011-01-27
Not much progress
![]() lynnr Tue 30 Aug 2011, 7:50 pm
lynnr Tue 30 Aug 2011, 7:50 pm
Just a quick update.
Got the belly tank on this evening. Very Very tight fit. I had to loosen the brackets on the belly tank to get the bolts into the horn plate attachment points. Then tightened up the bolts on the belly tank end to pull everything together. Fits like a glove.
Enjoy.


lynnr- Number of posts : 3242
Age : 55
Location : Highland, 4inch showman
Registration date : 2010-08-06
Lynns Shhowmans
![]() Tony King Wed 31 Aug 2011, 6:50 am
Tony King Wed 31 Aug 2011, 6:50 am
Regards,
Tony
Tony King- Number of posts : 856
Age : 68
Location : scotland
Registration date : 2008-10-31
Looking good
![]() lynnr Fri 02 Sep 2011, 4:16 pm
lynnr Fri 02 Sep 2011, 4:16 pm
Thank you.
Going to get the polishing kit out this weekend hopefully and get some of this new brass work polished up. Need to keep the "bling" factor going.
I have not used any paint polish or brass cleaner yet as I do not want contamination until all the painting is finished and only use the polishing kit with the engine covered over.
lynnr- Number of posts : 3242
Age : 55
Location : Highland, 4inch showman
Registration date : 2010-08-06
Brass and Polish
![]() lynnr Wed 07 Sep 2011, 8:41 am
lynnr Wed 07 Sep 2011, 8:41 am
Been at the polishing again
lynnr- Number of posts : 3242
Age : 55
Location : Highland, 4inch showman
Registration date : 2010-08-06
Brass needs polishing
![]() lynnr Wed 07 Sep 2011, 5:45 pm
lynnr Wed 07 Sep 2011, 5:45 pm
It is the stars now!


How I did it.
Polish the rims of the brass plates to a nice high shine. Etch prime centre. Immediately using standard thinners on kitchen towel wipe the rim clean of all primer. Paint top coat and do the same to get a nice even smooth edge.
Name rings can be done the same way.

lynnr- Number of posts : 3242
Age : 55
Location : Highland, 4inch showman
Registration date : 2010-08-06
Page 7 of 40 • 1 ... 6, 7, 8 ... 23 ... 40 ![]()
» Lynn Robinson. Showman Scenic Part 2
» The Engine Shed. Photo gallery.
» Lynn Robinson 4" water bowser
» Lynn Robinson. 4" traction Wagon. Twins. "Mara" and "Uisge"
|
|
|