
Boiler cleading
Page 1 of 2 • 1, 2 ![]()

Boiler cleading
![]() TonyT Thu 30 Oct 2008, 7:17 pm
TonyT Thu 30 Oct 2008, 7:17 pm
Just wondered if anyone has cut their boiler cleading into smaller parts to fit it around the boiler,and if they have,has it worked.
Any advice would be very helpful,thanks
Tony

TonyT- Number of posts : 134
Age : 56
Location : Truro,Cornwall. (2" Burrell)
Registration date : 2008-06-17
Re: Boiler cleading
![]() BUNGLE Thu 30 Oct 2008, 10:03 pm
BUNGLE Thu 30 Oct 2008, 10:03 pm
REGARDS
BRUCE
BUNGLE- Number of posts : 232
Age : 65
Location : HERTS (2" BURRELL)
Registration date : 2008-06-17
Re: Boiler cleading
![]() TonyT Thu 30 Oct 2008, 11:10 pm
TonyT Thu 30 Oct 2008, 11:10 pm
Thanks for that,I shall wait for advice from above.
cheer's Tony
TonyT- Number of posts : 134
Age : 56
Location : Truro,Cornwall. (2" Burrell)
Registration date : 2008-06-17
Boiler Cladding
![]() JDA Wed 05 Nov 2008, 12:39 pm
JDA Wed 05 Nov 2008, 12:39 pm
JDA
JDA- Number of posts : 12
Age : 87
Location : Leatherhead 2" burrell
Registration date : 2008-06-22
Re: Boiler cleading
![]() TonyT Wed 05 Nov 2008, 4:23 pm
TonyT Wed 05 Nov 2008, 4:23 pm
I've taken the brave move of cutting my boiler cleading to fit it after having a chat with Steve
I cut it behind the clack valve holes and now I can fit it around the boiler with relative ease see photo below
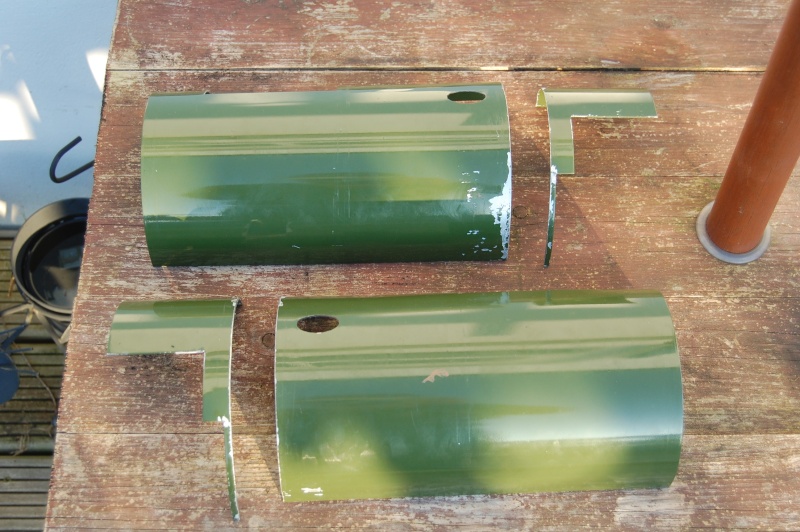
As you can see I'm going to have to paint it all again but I think it was worth it
There's also a couple more photo's in the 2" gallery
cheer's for now
Tony
TonyT- Number of posts : 134
Age : 56
Location : Truro,Cornwall. (2" Burrell)
Registration date : 2008-06-17
Re: Boiler cleading
![]() BUNGLE Wed 05 Nov 2008, 6:51 pm
BUNGLE Wed 05 Nov 2008, 6:51 pm
I THINK WE WILL NOW GO THAT ROUTE AS WELL.
DON'T SEEM TO BE GETTING AS MUCH TIME TO 'PLAY' AT THE MOMENT AS WE'ED LIKE, STILL GOT TO FIT OUR CRANK YET !
REGARDS
BRUCE
BUNGLE- Number of posts : 232
Age : 65
Location : HERTS (2" BURRELL)
Registration date : 2008-06-17
Boiler Cleading - Questions for Steve/Dean
![]() Big Al Sun 09 Nov 2008, 9:38 am
Big Al Sun 09 Nov 2008, 9:38 am
Steve was suggesting that when the clack valves are fitted and the studs cut down the cleadings should fit, I have looked at the old Modelworks brochure and they dont mention which kit they come with so I assume they are either kit 21 or 22. That's a long time to wait to see if the cleading will fit and by then all the diff gear should be fitted and it would involve an enormous amount of work to strip it all down to remove the hornplates to allow the cleading to fit! It would be useful if these valves were fitted to the control model so that we can be given the exact length of the studs and cut them down in readiness.
I have tentatively tried to remove the studs for the clack valves but they wont budge, am wondering how they are fitted and also why already. It would resolve the problem if they could be removed.
If all else fails I will resort to fitting the cleading early and hoping it doesn't get scratched, I know that it will scratch the cylinder block sides in any event as it is such a tight fit.
What's everyone else doing about this problem?
Alan
P.S. No Kit 16B Friday
Big Al- Number of posts : 147
Age : 70
Location : Oxford, England (2" Burrell)
Registration date : 2008-06-18
Re: Boiler cleading
![]() Julia Sun 09 Nov 2008, 11:04 am
Julia Sun 09 Nov 2008, 11:04 am
If the back sections could be joined together before fitting it could be made to work much the same as the 4". I think I would loose the long thin strip that goes under the boiler.

Julia- Number of posts : 71
Location : South East England
Registration date : 2008-06-17
Re: Boiler cleading
![]() BUNGLE Sun 09 Nov 2008, 7:42 pm
BUNGLE Sun 09 Nov 2008, 7:42 pm
I WAS HOPING FOR SOME FEED BACK FROM STEVE AS TO HIS FINDINGS WITH THE CONTROL MODEL STUDS BY NOW. KNOW HE IS VERY BUSY.
REGARDS
BRUCE
Last edited by BUNGLE on Sun 09 Nov 2008, 7:42 pm; edited 1 time in total (Reason for editing : SPACING)
BUNGLE- Number of posts : 232
Age : 65
Location : HERTS (2" BURRELL)
Registration date : 2008-06-17
Re: Boiler cleading
![]() TonyT Mon 17 Nov 2008, 10:19 pm
TonyT Mon 17 Nov 2008, 10:19 pm
Sorry about the delay in answering but just had the week from hell (lost job,car engine let go along way from home!)
As a result I have a bit more time to play with "The Other Woman"
When I first spoke to Steve about the cleading he did say that the clack valve studs would have to be cut off to 6mm at some point,so that would help,but I'm not prepared to do that yet.
The rear part of the cleading is held together by the manhole cover and the boiler band,I did countersink the base of the manhole cover where it sat high on a boiler stay so it sat flush to the boiler.
I've also cut the 2 thin strips off the underside of the cleading,it now fits a lot better around the boiler.
I'm going to fit the weighshaft bracket permanently to the boiler before final fit of the cleading so that any filing around the block and bracket can be done.
If you haven't painted your cleading yet,you might find a couple of 150mm jubilee clips come in handy to help hold things together.
I hope this helps you to come to a decision,but like I said in an earlier post,I think its the way foward
Are there any other builders with an insight to this,any help will help all
cheer's for now Tony
TonyT- Number of posts : 134
Age : 56
Location : Truro,Cornwall. (2" Burrell)
Registration date : 2008-06-17
Re: Boiler cleading
![]() Steam Traction World Mon 17 Nov 2008, 11:25 pm
Steam Traction World Mon 17 Nov 2008, 11:25 pm
I know you've all been waiting a long time about answers to the potential cladding problem. No answers yet, but we've eventually got round to removing ours late last week. We kept all our control model together for such a long time because we were waiting for a 'proper' boiler we could use rather than the prototype one fitted. As we wanted to test out the components for kit 16A & B, we had to choose our time carefully. Anyway, I should be able to post some news about the cladding by the end of this week.
The reason why the studs were fitted as part of the boiler construction is that we couldn't stop the threads being filled with silver solder, looks like we solved one problem and created another. More news later in the week.
Regards
Steve & Dean
Steam Traction World- Admin
- Number of posts : 946
Location : Daventry UK
Registration date : 2008-06-18 -

Re: Boiler cleading
![]() BUNGLE Tue 18 Nov 2008, 4:14 pm
BUNGLE Tue 18 Nov 2008, 4:14 pm
VERY SORRY TO HEAR ABOUT YOUR JOB, THINGS ARE S**T FOR BUSINESS AT THE MOMENT, COMPARED TO LAST FEW YEARS.
CARS A PROB TOO !
ALL I SEEM TO HAVE HEARD THIS YEAR IS PEOPLE HAVING AGRO DURING THIS YEAR (WE'VE HAD PROBS IN ALL ASPECTS OF OUR LIFE THIS YEAR) LETS HOPE 2009 BRINGS A TURN OF BETTER LUCK FOR ALL.
ALL THE VERY BEST IN SEEKING EMPLOY.
REGARDS
BRUCE
BUNGLE- Number of posts : 232
Age : 65
Location : HERTS (2" BURRELL)
Registration date : 2008-06-17
Re: Boiler cleading
![]() Steam Traction World Fri 21 Nov 2008, 3:04 pm
Steam Traction World Fri 21 Nov 2008, 3:04 pm
Right, I 've actually spent a bit of time looking at the problem of fitting the cladding after the hornplates have been fitted. I cut the clack valve studs down to around 10mm which is still too long, but better to be safe than sorry. The cladding will fit quite easily if you remove around 10mm from either side where the cladding goes horizontally along the inside of the hornplates. Each boiler will vary slightly, so I would first remove around 6mm and try it, then remove a bit more until it fits so you don't end up with a big gap between the hornplates and the cladding.
The alternative is to do what Tony has done. Both solutions appear to work equally as well.
Regards
Steve
Steam Traction World- Admin
- Number of posts : 946
Location : Daventry UK
Registration date : 2008-06-18 -
2" Boiler Cleading
![]() Big Al Sun 30 Nov 2008, 4:56 pm
Big Al Sun 30 Nov 2008, 4:56 pm
On my boiler it did fit, but it will trash the paintwork still if not very very careful.
I hadn't fitted the weightshaft when I first tried it and still managed to trash the front edges of the hornplates and had to be very careful where it came close to the cylinder block. The left hand cleading is even worse to fit because of the steering rod lower bearing on the hornplate, the top bolt holding the bearing in place protrudes slightly but enough the gouge the paint on the cleading as you try and fit it. It's all still very tight and when I tried fitting them with the weightshaft bracket on it had even tighter clearances. Those studs on the clack valves are indeed the problem but I will persevere and see how it goes after they are cut to the correct length. If it's still tight I will revert to plan B and copy Bruce's method.
Anyone else got similar problems?
Alan
Big Al- Number of posts : 147
Age : 70
Location : Oxford, England (2" Burrell)
Registration date : 2008-06-18
Re: Boiler cleading
![]() forge Mon 01 Dec 2008, 5:24 pm
forge Mon 01 Dec 2008, 5:24 pm
forge- Number of posts : 107
Location : Norfolk (2" Burrell)
Registration date : 2008-07-01
Re: Boiler cleading
![]() BUNGLE Mon 01 Dec 2008, 10:16 pm
BUNGLE Mon 01 Dec 2008, 10:16 pm
REGARDS
BUNGLE
BUNGLE- Number of posts : 232
Age : 65
Location : HERTS (2" BURRELL)
Registration date : 2008-06-17
Re: Boiler cleading
![]() forge Tue 02 Dec 2008, 12:36 pm
forge Tue 02 Dec 2008, 12:36 pm
forge- Number of posts : 107
Location : Norfolk (2" Burrell)
Registration date : 2008-07-01
Re: Boiler cleading
![]() wallsie68 Sun 01 Feb 2009, 2:44 pm
wallsie68 Sun 01 Feb 2009, 2:44 pm
I am looking at fitting my hornplates and have been following this thread with interest for a few months. My boiler cleading fits fairly well after a bit of persuasion with a file. However, I haven't yet gone as far as the steps Steve suggests to ensure the cleading can be removed in the future.
I'm fairly new to this and am a bit confused. Why am I likely to need to remove the boiler cleading in the future, other than maybe to repaint it? I guess there must be good reason for all this discussion. Can anyone please enlighten a novice?
Thanks,
Dave.

wallsie68- Number of posts : 14
Location : Wendover, Bucks (2" Burrell)
Registration date : 2008-06-25
Boiler Cleading
![]() Big Al Mon 09 Feb 2009, 5:54 pm
Big Al Mon 09 Feb 2009, 5:54 pm
I'm with you, and also a novice.
There appears to be 2 schools of thought on this
1. Fit it before the hornplates with a risk that you may be able to remove it later if you wish to repaint it after it gets damaged. This could be even before you have finished building it if not carefull!
If you need to remove them to re paint them, assuming they will need to be re done after a couple of years (and you didn't damage them before you even steam the engine,) and they wont slide off, then you will need to take the hornplates off which will involve a fair amount of work with the links/pipes etc. If this is the case, then you also have the opportunity to clean/respray all the other components and have fun rebuilding the engine again. Not such a bad thing I suppose.
2. Make them removeable like Bungle and others, by cutting the back section off so they can be placed on at the last opportunity without fear of getting damaged during the build. They can then be easily removed at any time with minimum component removal for repair/respray. The risk is that you will need to cut very accurately and they will need to be level so that there is no change in contour when fitted as the clamps could put them out of true.
It is still an unknown option as to whether they will be able to be removed after the build even if Dean's suggestion to file/cut the back edges down is taken, as I suspect this was trialed before the weighshaft bracket was fitted. I'm not convinced they will be able to be removed so easily with this fitted. In any event the bolts holding the lower steering arm bracket will definitely have to come off.
At the end of the day, it's your choice mate, and if it's any help I still don't know which way to go.
Alan
Big Al- Number of posts : 147
Age : 70
Location : Oxford, England (2" Burrell)
Registration date : 2008-06-18
Re: Boiler cleading
![]() TonyT Mon 09 Feb 2009, 8:34 pm
TonyT Mon 09 Feb 2009, 8:34 pm
This boiler cleading is causing a few problems isn't it!
As you all know,I cut my cleading behind the clack valve holes and under the rear boiler band.The reason for this was so I could get the cleading on after the horn plates were fitted to the boiler,I did try to fit the cleading before I fitted the horn plates but I just wasn't happy with the fit.
What with all the problems there had been with MW,I was pretty keen to get my engine on 4 wheels so I decided to fit the horn plates and tackle the cleading later.I also made the decision to fit the weighshaft bracket before the final fit of the cleading.
I've had to a fair bit filing to the cleading to get it to fit nicely around the cylinder block,weighshaft bracket and clack valve holes.On the 2 smaller rear parts,I cut the 2 thin strips off the underside,which improved the fit vastly,and took Steve's advice and cut around 8mm off the bottom where they go down the sides of the horn plates.
I have also cut the clack valve studs down to 10mm as advised again by Steve at STW.
I haven't had any problems with the steering brackets though.
When it came to the final fit,I fitted the larger bits first,overlapping them as suggested,and then the 2 smaller bits afterwoods.I also re-shaped the manhole cover underplate and countersunk it where it sat high on a boiler stay.I fitted the front boiler band first,then the middle one,and finally the rear one.Then I fitted manhole gubbins.
I had never thought about taking the cleading off for future re-paints when I cut mine up,it was just to get the bloody stuff on!
The cleading is one of the main things people will look at,so it is worth thinking long and hard about it.I've found that cutting mine up made fitting a lot easier.Just a personal view,but I wouldn't want to try and take full lengths of cleading with the weighshaft bracket on,mine took ages to get just right when fitting and I dont want to take it off again!
I hope this helps you all in making your decisions.
This is what I like about these forums,we can all offer a little bit of advice to help each other.
cheer's for now
Tony
TonyT- Number of posts : 134
Age : 56
Location : Truro,Cornwall. (2" Burrell)
Registration date : 2008-06-17
Re: Boiler cleading
![]() BUNGLE Wed 11 Feb 2009, 4:20 pm
BUNGLE Wed 11 Feb 2009, 4:20 pm
AS YOU SO RIGHTLY SAY, HOPE YOUR INFO HELPS BUILDERS DECIDE THE ROUTE THAT SUITS THEM.
REGARDS
BUNGLE
BUNGLE- Number of posts : 232
Age : 65
Location : HERTS (2" BURRELL)
Registration date : 2008-06-17
cleading plus crank
![]() northburrell Sat 14 Feb 2009, 4:35 am
northburrell Sat 14 Feb 2009, 4:35 am
well got my boiler and upto date on my kits..all seamed well at first..
cleading well ask yourself this.. why would you ever want to remove the cleading?? the only reason i can think is to re-paint the model and i know that if i was repainting I would do the entire model so it would be stripped fully even the hornplates would come off... dont worry about it just get them trimmed up correctly. I have found that my boiler has warped a little in the making so my left hornplate is very close to the boiler meaning the cleading will hit it so it needs triming like steve says.. the right hand side only just misses the cleading but will be fine when adding the hornplates... Paint and line them,add the bands I cut some strips of masking tape just a little smaller in width than the band then stuck it all the way along the inside of the band carefully, this helps not take the paint of fyour model when placing the band, just mind not to dig the edges in and you paint will be fine..
or if you do really want to be able to remove it just cut the howl back of the cleading off and leave the fake man hole off... just a thought...
I had to do allot of trimming of the die block in order to get it to fit and run free.. the die is square and the link is curved so some filing is needed to shape it..
Jo
northburrell- Number of posts : 197
Location : edinburgh
Registration date : 2008-10-15
Cutting Boiler Cleading
![]() wallsie68 Tue 03 Mar 2009, 8:57 pm
wallsie68 Tue 03 Mar 2009, 8:57 pm
Thanks for all the info. I have pretty much buried my head in the sand with respect to the boiler cleading. My hornplates are on and the valve gear is coming along nicely. I even started lining to delay a decision on the cleading. However, its all nicely put together and I don't really want to take it apart again as I doubt I'll get it all to fit again! Therefore, I've lead myself down the route of cutting the cleading. Decision made!
Does anyone have any advice on how to do this? Did you just use a hacksaw or something more sophisticated.
Thanks,
Dave.
wallsie68- Number of posts : 14
Location : Wendover, Bucks (2" Burrell)
Registration date : 2008-06-25
Re: Boiler cleading
![]() TonyT Tue 03 Mar 2009, 9:48 pm
TonyT Tue 03 Mar 2009, 9:48 pm
I used a "Dremel" type tool and plenty of cutting disc's
Hope this helps
cheer's Tony
TonyT- Number of posts : 134
Age : 56
Location : Truro,Cornwall. (2" Burrell)
Registration date : 2008-06-17
Re: Cutting Boiler Cleading
![]() wallsie68 Wed 04 Mar 2009, 10:13 pm
wallsie68 Wed 04 Mar 2009, 10:13 pm
wallsie68- Number of posts : 14
Location : Wendover, Bucks (2" Burrell)
Registration date : 2008-06-25
Page 1 of 2 • 1, 2 ![]()
» Heat protection for boiler cleading
» im from australia and need to know if the boiler needed to be change to suit aussie boiler code
» Boiler dimensions & Boiler tips
» Lynn Robinson. Showman Scenic
|
|
|