
Road Loco - 'Blackbeard'
Page 3 of 17 •  1, 2, 3, 4 ... 10 ... 17
 ![]()
Re: Road Loco - 'Blackbeard'
![]() sonick45 Fri 08 Jul 2011, 9:34 am
sonick45 Fri 08 Jul 2011, 9:34 am
I certainly won't be. Maybe straight up and down but not across it.
sonick45- Number of posts : 511
Location : Barton-Le-Clay (Beds)
Registration date : 2009-01-26
Re: Road Loco - 'Blackbeard'
![]() bjwlancashire Fri 08 Jul 2011, 3:07 pm
bjwlancashire Fri 08 Jul 2011, 3:07 pm
I would suggest that a small tweak on the vertical part of the bracket is enough to gain any extra clearance required. I might add that if you are drilling afixing hole in the lamp to bolt it securely in position then it could be drilled in such a position that lifts it 4 or 5mm higher than its current resting point. I was more concerned with the spokes hitting the lamp, if the chain clamp touched the bottom of the lamp for a split second it would not be as bad as being clattered side on by the spokes.
From the front the lamps do look better now the wheels are on for proportion, nicely positioned between smokebox and wheel.
I do agree with Nick's comment about the angle of attack on rough terrain - its not a 4x4
 Mind you some of the speed bumps we have on our roads today could probably get the axle this close if you go over them at 45 degrees.
Brian

bjwlancashire- Number of posts : 938
Location : Mellor, Lancashire
Registration date : 2010-09-07
Re: Road Loco - 'Blackbeard'
![]() Rickster Fri 08 Jul 2011, 4:18 pm
Rickster Fri 08 Jul 2011, 4:18 pm
Rickster- Number of posts : 267
Location : canterbury, Kent
Registration date : 2010-02-19
Re: Road Loco - 'Blackbeard'
![]() bjwlancashire Fri 08 Jul 2011, 4:36 pm
bjwlancashire Fri 08 Jul 2011, 4:36 pm
Rickster wrote:I've copied your design for my lamps as well Brian, but put them slightly higher up from the bottom of the perch and the lamps I've chosen are from M J Engineering. These look a bit narrower by comparison and though I haven't tried the fronts yet, I've only built the back one, this one does sit comfortably between axle/wheel/perch/steering angle.
Rick
Just remember two things, moving up the perch bracket will move the lamps up and out too. Also, I just looked at the MJ lamps and although the lamp body might be narrower they are based on a sprung lamp and as such have the cantilever mechanism replicated - it makes them look quite wide.
Good luck to all who use my design - Usual disclaimer, I will not be responsible for any cock ups, he, he.
Brian
bjwlancashire- Number of posts : 938
Location : Mellor, Lancashire
Registration date : 2010-09-07
Lamps
![]() lynnr Fri 08 Jul 2011, 6:03 pm
lynnr Fri 08 Jul 2011, 6:03 pm
Just been looking at your picture of the clearance to the axil. What is the distance from the steering shackle when in place?

lynnr- Number of posts : 3242
Age : 56
Location : Highland, 4inch showman
Registration date : 2010-08-06
Lamps
![]() Rickster Sat 09 Jul 2011, 8:51 pm
Rickster Sat 09 Jul 2011, 8:51 pm
They do get very hot though, even the handles need a rag about half hours use.
You will need to modify Brians design slightly - the upright portion that carries the lamps will need to have a taper to fit the hanging slot in the lamp.
cheers
Rick
Rickster- Number of posts : 267
Location : canterbury, Kent
Registration date : 2010-02-19
Re: Road Loco - 'Blackbeard'
![]() bjwlancashire Mon 11 Jul 2011, 5:09 pm
bjwlancashire Mon 11 Jul 2011, 5:09 pm
lynnr wrote:Hi
Just been looking at your picture of the clearance to the axil. What is the distance from the steering shackle when in place?
Hi Lynn
Welcome back from your hols!! Just been out for the weekend myself and I was able to have a of a 4" DCC Road Loco - Inspired!! Soon had the second front wheel on when I got home last night!!
This means I cannot measure it at the moment but I would estimate it was around 5-6mm to the lamp bottom. It all depends which lamps you will use as to what position works best. I will drill the fixing holes in my lamps once I have the steering shackles.
Brian
bjwlancashire- Number of posts : 938
Location : Mellor, Lancashire
Registration date : 2010-09-07
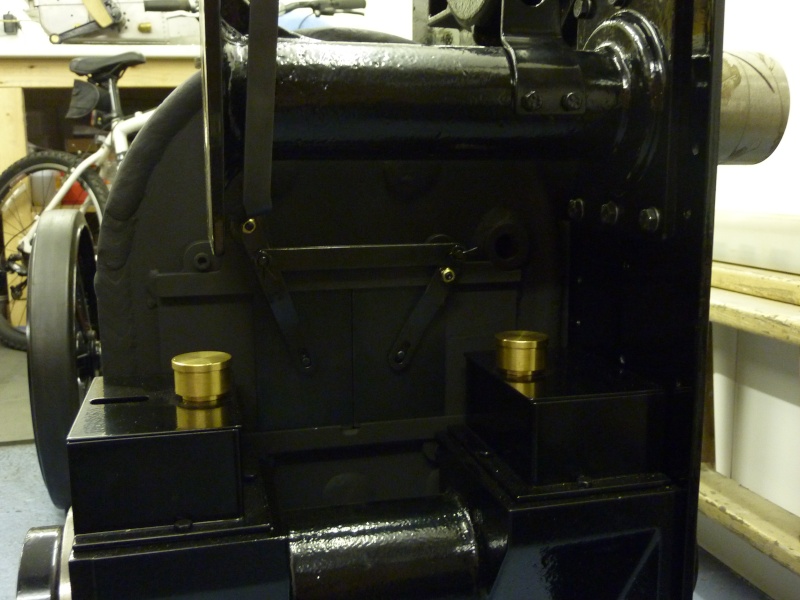
Firehole Door Mechanism
![]() bjwlancashire Sat 10 Sep 2011, 10:41 am
bjwlancashire Sat 10 Sep 2011, 10:41 am
First we got the firehole door mechanism cleaned up and assembled to test the fitting of it and then used the Frost Auto blacking kit to treat all the parts - nice kit and faster than the one I previously had from GLR Ditributors, the model engineering suppliers.
I also filed a groove in the lower door track in the centre to make a space for coal dust and grit to fall through as the doors are closed.
Finally, I sprayed some dry bicycle chain lubricant onto the tracks and door edges to make it run really smooth. This lubricant is designed to lubricate but is a dry lubricant so dust and dirt will not stick to the surfaces it is on - lets hope it all works after we start throwing coal in the hole.
It's good to finally have something to "play with", I spent ages opening and closing the door imagining the day I would be doing it to build the first fire

Last edited by bjwlancashire on Fri 11 Nov 2011, 12:39 am; edited 3 times in total
bjwlancashire- Number of posts : 938
Location : Mellor, Lancashire
Registration date : 2010-09-07
It's on it's wheels!!!!!!!!!
![]() bjwlancashire Sat 10 Sep 2011, 11:42 am
bjwlancashire Sat 10 Sep 2011, 11:42 am
Dad has been painting the hornplates with the craftmaster pain and although he was getting frustrated at the tiny specs in thepaint he did a good job. I don't think he wants to do anymore though. I have gone for matt black paint on the boiler and the horplate area that is the firebox sides. It will get dirty and oily in use and I will probably brush some oil on when it is in steam to give it that authentic look - no showroom look here.


As far as bolting up the hornplates is concerned, before putting the wheels on I lifted the rear end with my engine hoist by putting the straps around the rear axle bearing housing casting. I then loosened the honplate bolts sufficiently to take up the slack in the holes which meant that it would be in " as assembled" condition regarding the applied loads/stresses. Then I set about getting the crankshaft setting bar to fit nicely and rotate which worked a treat. It is only first stage of setting as there will be further adjustment when I get the crankshaft later this month and then when cylinder and motion go on but I believe I have started in the right way.

You might notice that the boiler/hornplates seem off centre, for those of you that don't already know this is actually correct. There is a lot more space between the wheel and horplates on the LHS with the winding drum etc. on that side and I think the fact the engine is "single drive" makes it more pronounced too. Take a look at Ex-Mayor or President from behind when you next get the chance or look through the collection of photos that came from STW with the kits.
Also, for any H&S reading this, my daughter in the flip flops was NOT involved during the heavy work on this particular evening, she just came in to see the results

The happy crew!!! My wife does not help in the build she merely allows me to persue my hobby and neglect the decorating

After all that excitement I could not resist fitting the as yet unpainted tender to a) make sure it fitted and b) to see the final size of the engine - it's big!!!!!!!!!!
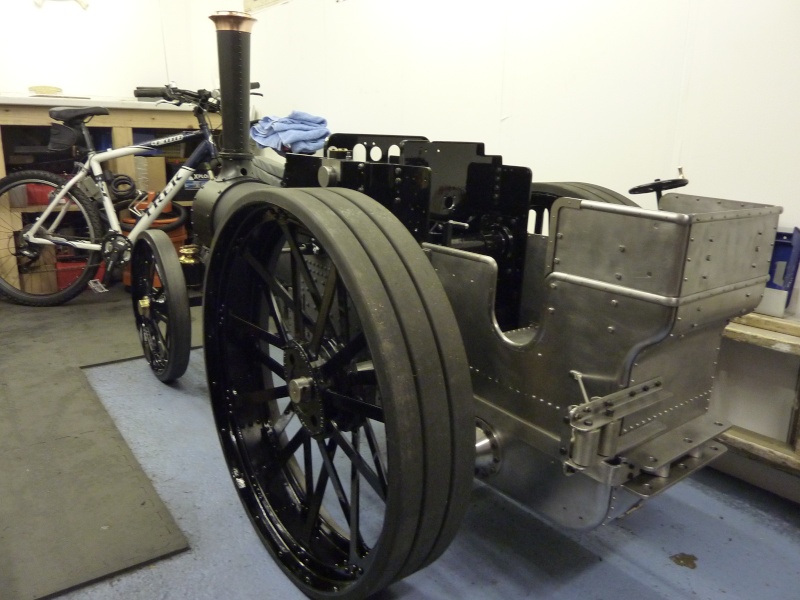

It is amazing that I have now got a rolling chassis so to speak in 12 months, something I would never have been able to do if I was making from scratch - I just don't have the amount of time available to make this much progress. It has been a real pleasure so far, the kits are excellent and I look forward to the next 12 months and hopefully finshing it this time next year. We are all looking forward to lighting the first fire and I will not be waiting until it is a finished engine!! I want to warm it a few times to get all the crap in the boiler loose and out of the blow down valve. I just need the various plugs and fittings and it does not even have to be sealed - using it like a kettle will do the job.
Now to get the belly tank done, it has been under my bench ever since I bought it last winter to exchange the end covers with TIm Watson so I could get the stars for the tank covers.
Bye for now!!
Last edited by bjwlancashire on Fri 11 Nov 2011, 12:41 am; edited 1 time in total
bjwlancashire- Number of posts : 938
Location : Mellor, Lancashire
Registration date : 2010-09-07
Thank you and looking wonderful
![]() lynnr Sat 10 Sep 2011, 3:23 pm
lynnr Sat 10 Sep 2011, 3:23 pm
Please you have posted new pictures and I must say for being all black it does look very nice. Also see you are doing what I did with mounting the hornplates and axils. Doing it in smaller chunks.
Keep them coming
lynnr- Number of posts : 3242
Age : 56
Location : Highland, 4inch showman
Registration date : 2010-08-06
Blackbeard & Co
![]() Tony King Sun 11 Sep 2011, 9:42 am
Tony King Sun 11 Sep 2011, 9:42 am
Good to see the family with your engine.............. Nice post, very interesting.......... loved your steam yachts post too!!
You are becoming quite the expert on all matters "steam"...... Well done!!
Regards
Tony
Tony King- Number of posts : 856
Age : 69
Location : scotland
Registration date : 2008-10-31
Re: Road Loco - 'Blackbeard'
![]() bjwlancashire Sun 13 Nov 2011, 9:55 pm
bjwlancashire Sun 13 Nov 2011, 9:55 pm
Wheels and tender are now off again to allow for the crankshaft setting, all the work on the motion coming up plus space to fit the gears once they are ready. Tender in process of painting, you know who you are and thanks for taking it on - just get it as good as yours
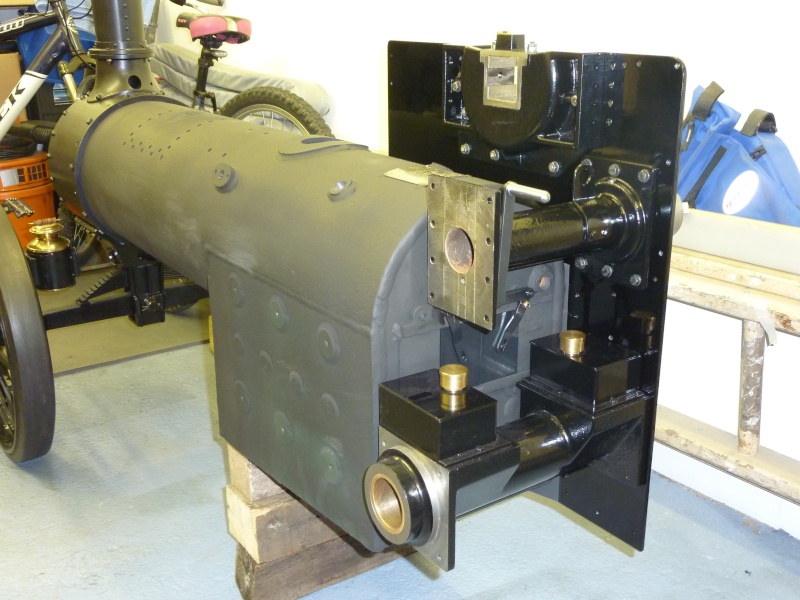
I have since received my cylinder casting and crank shaft and both are now fitted. There was a thin flash of iron to one side of the regulator valve running surface which had not be machined off so this was very carefully removed taking care not to let it drop into the steam cavity next to it. I should have taken a photo of this to explain it better but I removed it before I thought about a picture.
A couple of relaxing hours were spent one Saturday morning listening to Planet Rock on the radio and cutting all the studs to length once I had assessed the amount that needed removing. When that was done the messy bit started - all that foliac paste. It oozed out of every orifice once the first studs and nuts were being tightened. Everything lined up fine though, no fettling of the cylinder holes required to get the studs in so good job STW.
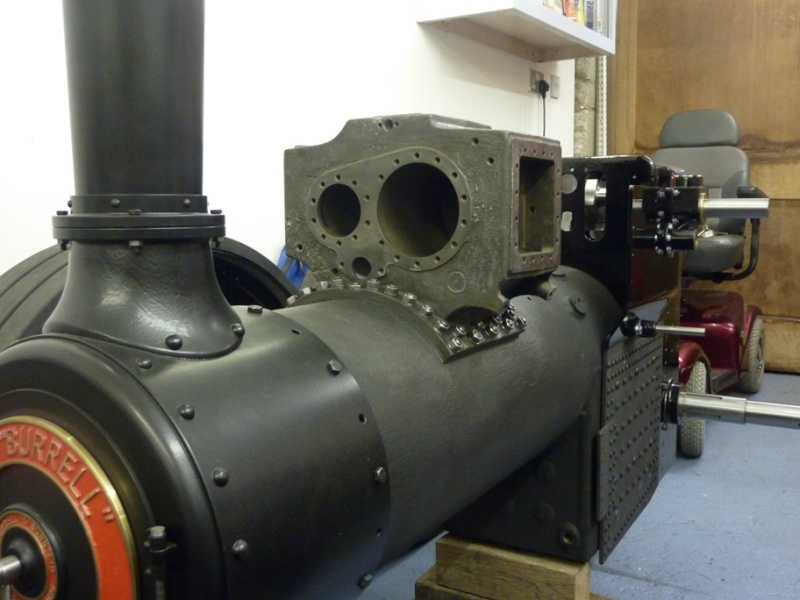

I must admit, my cylinder is not one of the better castings, it does seem to have its fair share of resin from the pressure injection process ( is that the correct description) the foundry does once the machining is finished. There is quite a lot in the low pressure cylinder gland area as one example. The control model casting is much better, it does not seem to have any visible resin on it, nothing jumps out at you when you look at it.

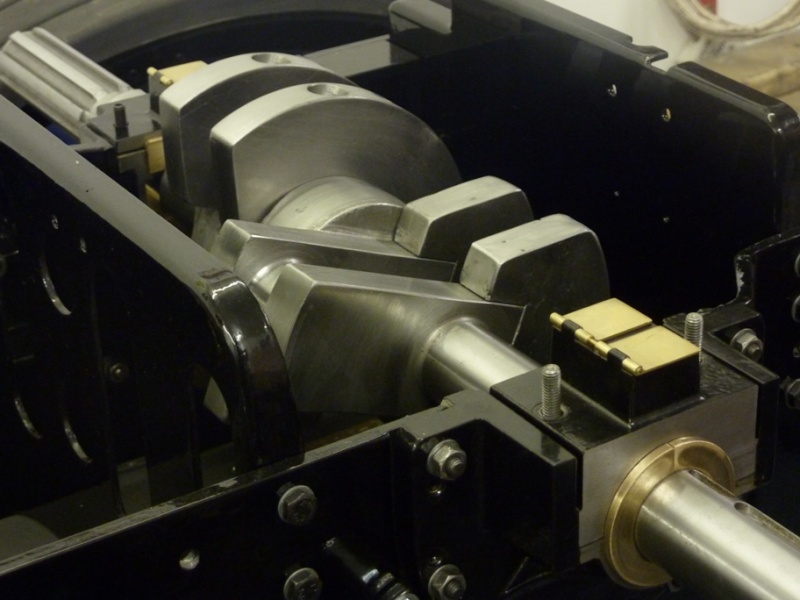
Regarding the crankshaft, one of the crank webs would not sit properly due to there being a raised surface next to the centre area the govenor belt will run on, it looked like it should have been machined flush with the side but was not. I need to remove this with the dremel otherwise the gap between the crank webs would have been reduced and could have caused problems with interference. That sorted it took a little while to clean up the crankshaft machining marks where the webs will not hide it and also clean the crank webs themselves prior to bolting them on
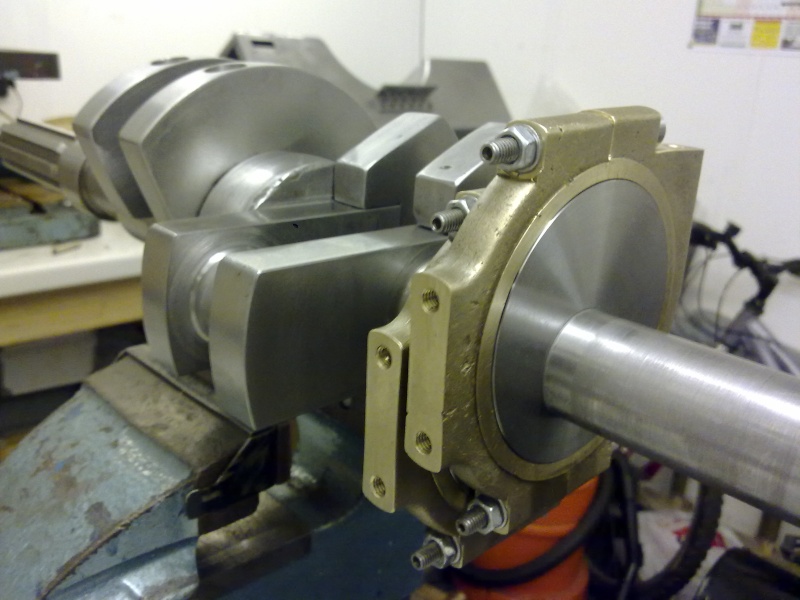
I was surprised how much the bearing alignment was out even though I had made sure the setting bar turning OK when first mounting the horn plates to the boiler. First the LH side bearing was not aligned front to back when I clamped the RH bearing onto the crankshaft. The gap betweenthe crankshaft end and the bearing housing was smaller at the front then the back by a good millimetre. Once I had this aligned by losening the RH hornplate (plus all the bearing tubes and spectacle plates) and letting it find its natural position, I then found another problem. I used marking ut blue to coat the RH and LH bearing parts and it was then obvius that the RH bearing was low compared to the LH bearing.
There is no way to lift one or the other hornplates as the bearing tubes are a good fit in the hornplates and as they are laser cut the hole spacing should be good. I had also noted that the RH bearing top clamp did not touch the RH bearing, it was below the clamping surface the bearing clamp sits on. I found some shim material and proceeded to pack up the RH bearing by putting shim in the bearing housing underneath the lower bearing half before dropping the bearing in. I did this up to 1mm and then when all was assembled, the marking out blue was rubbed off both LH and RH bearings evenly - success
One other thing, the LH bearing halves would also not clamp up, they rotated in the housing rather then the crankshaft rotating in the bearing. Two pieces of 0.1mm shim, one either side of the oil holes sorted this out, all clamps up tight now and still allows the crankshaft to rotate, not tight either although the RH bearing can be clamped tighter. Phew! I will have to do this all again once the conrods are here
bjwlancashire- Number of posts : 938
Location : Mellor, Lancashire
Registration date : 2010-09-07
Blackbeard's nameplates
![]() bjwlancashire Sun 13 Nov 2011, 10:14 pm
bjwlancashire Sun 13 Nov 2011, 10:14 pm
Anyway, as you can see I had to carefully


The style of font was chosen as I have seen pictures of the Fowler road locomotive "Nightmare" and they have used a gothic script for the nameplates. Therefore, I chose a font that looked appropriate for the time the pirates were on the high seas - the Caribbean ones not the Somalian ones

While all this is going on I put my 7 1/4" gauge Hymek and Aristocraft coach up for sale at the end of October and they are now sold, I just need to deliver them to the buyer and collect the money. This will allow me to get a couple of extra kits in December to close the gap on those ahead.
Also I have used some of the proceeds om my loco sale to buy a water bowser that was advertised on the Traction talk forum, not an STW one I’m afraid, a different design. I just need to collect it from the seller in Bedfordshire later this month. It does not have a seat but does hold 10 gallons and is already powder coated black so it's ready to roll.
I am now fitting the cylinder accessories kit - pistons, slide valves, cylinder covers etc. and once I have done this and got the conrods all lined up I will post some more pictures and any issues I had getting it all to turn over
Brian
Last edited by bjwlancashire on Mon 21 Nov 2011, 10:05 pm; edited 2 times in total
bjwlancashire- Number of posts : 938
Location : Mellor, Lancashire
Registration date : 2010-09-07
Re: Road Loco - 'Blackbeard'
![]() sonick45 Sun 13 Nov 2011, 11:12 pm
sonick45 Sun 13 Nov 2011, 11:12 pm
Nick
sonick45- Number of posts : 511
Location : Barton-Le-Clay (Beds)
Registration date : 2009-01-26
lynnr- Number of posts : 3242
Age : 56
Location : Highland, 4inch showman
Registration date : 2010-08-06
Name plates
![]() lynnr Mon 14 Nov 2011, 9:40 am
lynnr Mon 14 Nov 2011, 9:40 am
Did you specify the size of the name plates? If so what size did you specify. Did you also get the washout plate as well?
Plates look really nice.
lynnr- Number of posts : 3242
Age : 56
Location : Highland, 4inch showman
Registration date : 2010-08-06
Re: Road Loco - 'Blackbeard'
![]() bjwlancashire Mon 14 Nov 2011, 10:04 am
bjwlancashire Mon 14 Nov 2011, 10:04 am
lynnr wrote:
Did you specify the size of the name plates? If so what size did you specify. Did you also get the washout plate as well?
I did specify the length at 200mm long, Steve sent me the motion cover drawing with the usual caviat about "dimensions could still change" so I could decide what size to go for. I have held them in mid air in the aproximate position between cylinder and horn plates and they look just the right size.
Regarding the other plates I am assuming these will come from STW as they will be the same on everyone's engine.
Brian
Last edited by bjwlancashire on Mon 21 Nov 2011, 10:06 pm; edited 1 time in total
bjwlancashire- Number of posts : 938
Location : Mellor, Lancashire
Registration date : 2010-09-07
Nameplates Finished!!!!!!
![]() bjwlancashire Mon 21 Nov 2011, 10:04 pm
bjwlancashire Mon 21 Nov 2011, 10:04 pm


Also, the inspiration - Fowler Road Loco, Nightmare

bjwlancashire- Number of posts : 938
Location : Mellor, Lancashire
Registration date : 2010-09-07
Re: Road Loco - 'Blackbeard'
![]() Flasback Tue 22 Nov 2011, 7:13 am
Flasback Tue 22 Nov 2011, 7:13 am
 )
)
Flasback- Number of posts : 191
Location : Cheshire
Registration date : 2011-01-30
Re: Road Loco - 'Blackbeard'
![]() northburrell Tue 22 Nov 2011, 11:54 am
northburrell Tue 22 Nov 2011, 11:54 am
just word of warning about painting plates. if you use normal paint then you wont want to use Brasso on the plate. you'll find the brasso will fetch the paint off very quickly and ruin your paint.. Enamal is best for plates but still comes off with Brasso,, I use silver polish instead and it wont remove your paint as the chemicals in it are kinder to the paint. it's also wont leave horrible white dust in corners or small parts of the lettering and can be washed off after polishing without dulling the polish.
Jo
northburrell- Number of posts : 197
Location : edinburgh
Registration date : 2008-10-15
Polishing the name plates & smokebox rings
![]() Steve Traill Tue 22 Nov 2011, 2:38 pm
Steve Traill Tue 22 Nov 2011, 2:38 pm

Steve Traill- Number of posts : 800
Age : 67
Location : Illogan Redruth Cornwall
Registration date : 2008-06-29
Re: Road Loco - 'Blackbeard'
![]() bjwlancashire Tue 22 Nov 2011, 10:28 pm
bjwlancashire Tue 22 Nov 2011, 10:28 pm
Dwane, I saw the kit 3a on the control model a couple of weeks ago, it does look impressive. Get some photos on here as soon as you get the bits on - see if you can get it on before Lynn does
bjwlancashire- Number of posts : 938
Location : Mellor, Lancashire
Registration date : 2010-09-07
Re: Road Loco - 'Blackbeard'
![]() Flasback Wed 23 Nov 2011, 7:24 am
Flasback Wed 23 Nov 2011, 7:24 am
Flasback- Number of posts : 191
Location : Cheshire
Registration date : 2011-01-30
Re: Road Loco - 'Blackbeard'
![]() bjwlancashire Sun 26 Feb 2012, 9:25 pm
bjwlancashire Sun 26 Feb 2012, 9:25 pm
I have fitted the pistons, slide valves and slidebars although some of it will have to come apart again for painting/powdercoating once I finish putting the valve gear on. Pistons went in fine with the rings on, it was tricky trying to get your fingers in the right place to hold the piston ring ends together and push the pistons in but a helping hand from my dad was all it took - four hands are better then two.


The tiny regulator valve with the easy start valve holes showing - should be interesting to see how this works once we have steam in here.

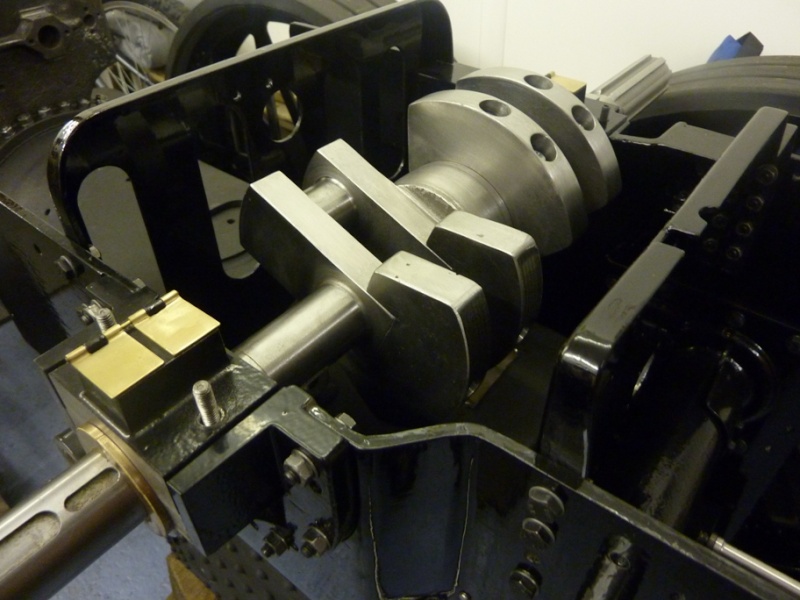
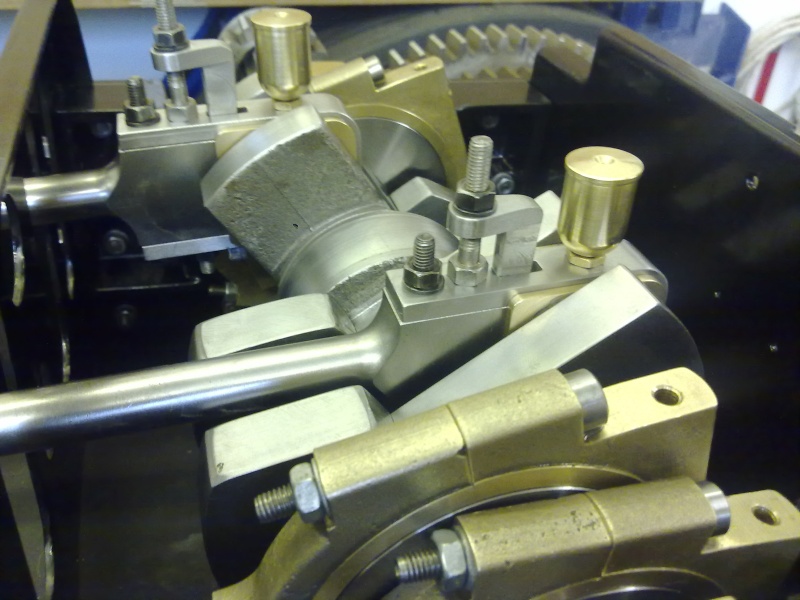
One of the problems encountered was that my crankshaft had been machined undersize on the HP side, the gap between the webs was 0.5mm to narrow. Steve swapped this for another one so I spent another evening polishing out the machining marks and then lapped it in. I had previously reported shimming up my RH bearing to get the crank running correctly. after more careful assessment of the job and the crank setting, I removed two of the three packing pieces to leave me around 0.3mmm up. I tried without this 0.3mm and the drive gears seemed tight so I am right in my assumption that this beraring housing was slightly low. The top clamp would not touch the top of the bearing to hold it in place but with the packing in it does plus the gear meshing is snug.
I also lapped in the big end bearings plus the eccentric straps using the Timesaver compound and it works a treat. Once the crank was back in with the eccentrics on and the connecting rods it turned beutifully - that is until it was connected to the crossheads - trying to move both pistons with rings on while trying to turn ther crank by hand is still hard work due to the resistance in the bores, but smooth.

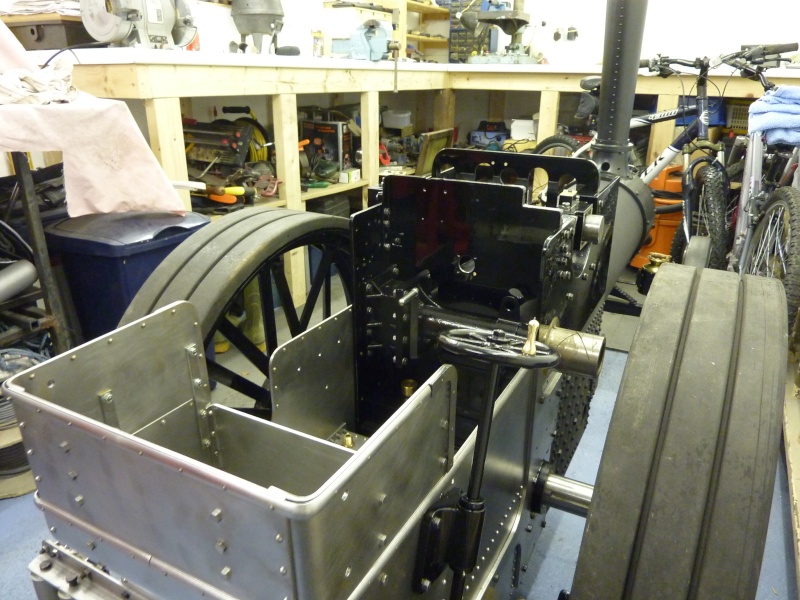
As I mentioned I have been getting on with the belly tank too, I still have the end panels to fit but I put the belly tank on the engine so I could take the measurements for the front bracket as my boiler had the holes in a certain place based on a particular boiler batch, this I was aware of when I collected my boiler and I told Steve it was fine. This info was sent to STW and a modified bracket was ready for me last week when I picked up kit 23.
A lot of fun was had getting the steering chain shaft through the bearings as there was some missalignment but after some tweaking by hand plus some lapping compound I got it through both bearings and it turns so sweetly. The engine certainly looks bigger with the tank in place and the proportions look good even without the rear wheels on at this stage.


Steering wheel was fitted last week too along with the worm and wheel but unfortunately these part turned out not to be a matched pair and would not run properly being very rough as the angle of each was not matched so the start of the worm was hitting the side of the wheel gear tooth rather than running on the centerline. It turned out to be one part for the agricultural engine and one for the road loco (different suppliers). These were swapped last week while I was at STW and the matched pair run very smoothly now. So, sterering chains also went on for first time just to check everything. At the chain shaft end I ended up putting the fixing bolt though the third chain link rather than the end one. This along with setting the adjusters at the axle end so that no threads through the locking nuts resulting in free play of around half a turn of the steering wheel. Hopefully it will be fine for on the road and still have enough slack in the chains to allow for rough/uneven ground etc..


I will be back soon to upload more photos from the drive gear fitting plus the differential assembly. I have been buying the odd extra kit when money allowed and I am now catching up to those at the front of the queue and hope to be up to date with them by April - only two kits behind!
Roll on the summer months
Last edited by bjwlancashire on Sat 03 Mar 2012, 12:06 pm; edited 1 time in total
bjwlancashire- Number of posts : 938
Location : Mellor, Lancashire
Registration date : 2010-09-07

Graeme81- Number of posts : 178
Location : Ireland
Registration date : 2009-05-25
Page 3 of 17 • 1, 2, 3, 4 ... 10 ... 17 ![]()
» DCC road loco
» Road Loco wagon
» Andy's 4"dcc road loco
» New Batch 4" DCC Road Loco