
New Batch 4" DCC Road Loco
Page 1 of 2 • 1, 2 ![]()

New Batch 4" DCC Road Loco
![]() BurrellSimplicity Tue 18 Jun 2019, 2:31 pm
BurrellSimplicity Tue 18 Jun 2019, 2:31 pm
well we are playing catch up, as we arrived late to the new DCC batch party
This is a project for my Dad as he's a retired model Engineer but getting lazy in his old age!
The front wheels are completed along with the smoke box. we have done some modifications to the smoke box, we re-welded the smoke box seam as it was cracked. I added weld to the inner smoke box seam and sealed around the front and rear ring with Foliac paste, this will stop any water from starting rust.
The tube was not contacting the front ring at the top were there is no rivet due to the chimney saddle. This was leaving a gap for air to enter and was not good. we drilled a 6mm hole on the mill through both tube and ring and added a counter sink bolt and nut, it pulled it together and there is now no gap, the chimney base then covers this bolt head up. Surprised STW don't do this anyway!
there also really is no need for the 2 counter sunk bolts just above the perch bracket, the so called dummy holes for the front perch bolts are actually drilled through so we added a proper bolt to these. the counter sunk bolts had there heads welded over and then smoothed.
I have ordered a nickel plating kit to give it a try out on the smoke box handles..
The smoke box is now ready to paint after a good going over with some emery cloth.

Tender is underway so i hope to update as we go. we have a lot of kits to catch up on.!
BurrellSimplicity- Number of posts : 74
Location : Scotland
Registration date : 2019-04-29
Re: New Batch 4" DCC Road Loco
![]() JayBee Tue 18 Jun 2019, 7:18 pm
JayBee Tue 18 Jun 2019, 7:18 pm
I have been very pleased with my Nickel plating kit, just make sure you follow the instructions and the results come out well.
John
JayBee- Number of posts : 104
Location : Cumbria UK
Registration date : 2015-11-23
Re: New Batch 4" DCC Road Loco
![]() the governer Tue 25 Jun 2019, 8:45 pm
the governer Tue 25 Jun 2019, 8:45 pm

the governer- Number of posts : 69
Age : 68
Location : dorset
Registration date : 2013-10-06
Re: New Batch 4" DCC Road Loco
![]() Steve Traill Tue 25 Jun 2019, 10:23 pm
Steve Traill Tue 25 Jun 2019, 10:23 pm
Also I used Poplar wood as insulation (as I had some) so then used the ceramic insulation in other areas. One was between the smokebox door and the baffle plate. It stops the hot gasses getting behind the plate & heating up the door & then turning the brass all colours. I sealed it around the edges with high modulus silicone so it's easy to brush clean. Makes the smokebox door brass work pretty low maintenance now.

Steve Traill- Number of posts : 800
Age : 67
Location : Illogan Redruth Cornwall
Registration date : 2008-06-29
Re: New Batch 4" DCC Road Loco
![]() BurrellSimplicity Mon 01 Jul 2019, 1:06 pm
BurrellSimplicity Mon 01 Jul 2019, 1:06 pm
I have got the smoke box painted now and will be putting all the bots together over the next week or so. I have started sanded out the spinning marks from the chimney top to get it polished up also.
hope to have some picks soon..
BurrellSimplicity- Number of posts : 74
Location : Scotland
Registration date : 2019-04-29
Painting & Polishing.
![]() BurrellSimplicity Tue 09 Jul 2019, 12:51 pm
BurrellSimplicity Tue 09 Jul 2019, 12:51 pm
It would appear that Plasticoat have changed their Woodstove paint. It's no longer as shiny as it used to be but still gives a better finish than the BBQ version.
Preparing to paint the front wheels, axle, spring and Perch Bracket. 2K paint is on order along with some Upoxy Super Etch Primer
still messing about with the gold for the lining but i think i'll be going for proper leaf.
Front names rings polished up ready to paint. the smoke box door handles are Stainless and came up a treat on the polisher.
Chimney top still not quit finished polishing yet and needs a little more buffer time. then the chimney can be put together and painted..


BurrellSimplicity- Number of posts : 74
Location : Scotland
Registration date : 2019-04-29
Re: New Batch 4" DCC Road Loco
![]() BurrellSimplicity Thu 01 Aug 2019, 12:57 pm
BurrellSimplicity Thu 01 Aug 2019, 12:57 pm

Close enough I think to Lord Nelson. it not quite as dark but once it's all got lined out it should be grand!!
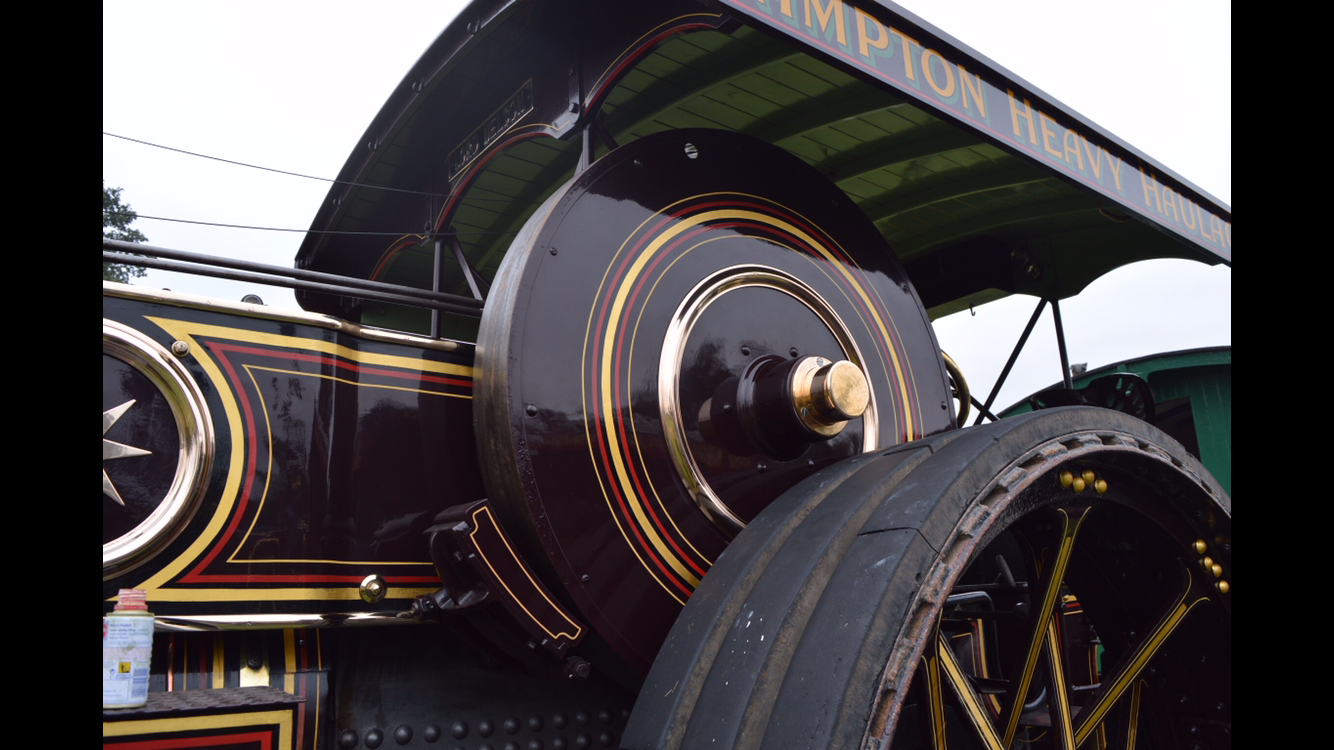
Lord Nelson Perch Bracket with no lining!

BurrellSimplicity- Number of posts : 74
Location : Scotland
Registration date : 2019-04-29
Re: New Batch 4" DCC Road Loco
![]() Midwest Steam Fri 02 Aug 2019, 4:45 pm
Midwest Steam Fri 02 Aug 2019, 4:45 pm

Midwest Steam- Number of posts : 137
Location : MO, USA
Registration date : 2018-09-19
Re: New Batch 4" DCC Road Loco
![]() BurrellSimplicity Mon 05 Aug 2019, 1:29 pm
BurrellSimplicity Mon 05 Aug 2019, 1:29 pm
The front fork was lined, I’m using GWR cream for inner lines as it’s not yellow on Lord Nelson.
Lining is all done free hand, except the 2k black that is masked and sprayed.

The font axle was set out using 3mm and 2 mm tapes to get the right spacing and the masking done for the 2k black.
This was then sprayed and left to cure for a few hours. The black was rubbed back with wet and dry 800. The black went on a little thick and I learnt that I can do a thinner coat on the rest of the engine.
The red and cream lines were then lined freehand and have been left to dry.
Now I need to add the gold but I will be having a little test run first on a piece of metal I have sprayed up (seen below next to fork). This will hopefully let me check that putting the gold on over the masking is going to work and will give me crisp edges. I will then test the 2k clear coat over it all. If all goes well I will do the same to front axle.


BurrellSimplicity- Number of posts : 74
Location : Scotland
Registration date : 2019-04-29
Re: New Batch 4" DCC Road Loco
![]() BurrellSimplicity Fri 09 Aug 2019, 3:29 pm
BurrellSimplicity Fri 09 Aug 2019, 3:29 pm
I had previously sprayed up a colour check card with base colour. This was rubbed down and then some very quick enamel lines added.
I trimmed my 24k gold to give me a strip to lay down. A small area was masked off for the gold size.
I’m using tinted 1 hour size and it’s at the right tack around 20-30 mins once applied with a fairly light coat.
The gold went down well and was pressed into the corners of the mask with piece of card with the backing tissue over the gold to protect it. I then removed the masking and let the size dry. A light burnish was then added with a squirrel hair brush.


I added a few more test pieces one was with a thickish layer of size. This was not good as it did not dry when the gold was added and was why I wanted to test it.
This was left to dry over night and the next day I 2k clear coated it. I sprayed a light mist first and let flash off for a minute then added a fairly heavy top coat. I was pleased there was no reaction between the enamel or the gold size, apart from the over thick size that had not dried.
Having prepared the front fork and spring for clear coat by rubbing down with 1500 wet and dry these were both cleared.
They came out well so I can now gild the front axle and carry on with the rest of the engine.
Spraying the front wheels is next on the list along with tender and brake gear we have just received in the latest kit.

BurrellSimplicity- Number of posts : 74
Location : Scotland
Registration date : 2019-04-29
Re: New Batch 4" DCC Road Loco
![]() BurrellSimplicity Mon 12 Aug 2019, 6:06 pm
BurrellSimplicity Mon 12 Aug 2019, 6:06 pm
All in all very pleased with it, using the tinted size made life easy as it’s already coloured, although a thick coat is not used or it fails to dry.
I found that any holes I could put a dab of size on then add the gold to patch but I didn’t have many to be honest.
Other side will be done then cleared to protect.
I also found that my water trap was not working properly as i wondered why i got small bumps in my 2K clear test piece. this was water getting sprayed out with the paint.. i have new water trap now so it should be ok!

BurrellSimplicity- Number of posts : 74
Location : Scotland
Registration date : 2019-04-29
Re: New Batch 4" DCC Road Loco
![]() Steve Traill Mon 12 Aug 2019, 8:39 pm
Steve Traill Mon 12 Aug 2019, 8:39 pm
Steve Traill- Number of posts : 800
Age : 67
Location : Illogan Redruth Cornwall
Registration date : 2008-06-29
Re: New Batch 4" DCC Road Loco
![]() BurrellSimplicity Fri 16 Aug 2019, 12:25 pm
BurrellSimplicity Fri 16 Aug 2019, 12:25 pm
not had much time this week but hope to get the front axle in clear this weekend..
BurrellSimplicity- Number of posts : 74
Location : Scotland
Registration date : 2019-04-29
Re: New Batch 4" DCC Road Loco
![]() BurrellSimplicity Mon 23 Sep 2019, 1:43 pm
BurrellSimplicity Mon 23 Sep 2019, 1:43 pm


One rear wheel is underway on the mill, unfortunately I’ve done my back in lifting my machine vice so have not got much further than this. The tender has been etch primed though.
Here I’m checking the wheel for run out, the brake band will also be machined concentric to hub so the brakes are not intermittent when on the road.

BurrellSimplicity- Number of posts : 74
Location : Scotland
Registration date : 2019-04-29
Re: New Batch 4" DCC Road Loco
![]() milford59 Mon 23 Sep 2019, 6:47 pm
milford59 Mon 23 Sep 2019, 6:47 pm
milford59- Number of posts : 307
Location : Milford on Sea
Registration date : 2019-05-19
Re: New Batch 4" DCC Road Loco
![]() JayBee Tue 24 Sep 2019, 8:20 pm
JayBee Tue 24 Sep 2019, 8:20 pm
Keep it up.
JayBee- Number of posts : 104
Location : Cumbria UK
Registration date : 2015-11-23
Re: New Batch 4" DCC Road Loco
![]() BurrellSimplicity Thu 26 Sep 2019, 1:14 pm
BurrellSimplicity Thu 26 Sep 2019, 1:14 pm
I think the only thing i will be changing in my process is using an airbrush to spray on the gold Size as using a brush can give thick and thin areas and it can vary the drying time of the size if not careful!
BurrellSimplicity- Number of posts : 74
Location : Scotland
Registration date : 2019-04-29
mainly primer!
![]() BurrellSimplicity Mon 18 Nov 2019, 9:05 am
BurrellSimplicity Mon 18 Nov 2019, 9:05 am
I have managed to get most parts into primer now!
I've had nothing but trouble with the rear wheels! we had to send one wheel back as it had bad damage to the outer rim face that was irreparable. well it was, but it would have involved welding and that would have ruined the tires so it was sent back. Credit to STW they organized the pickup and drop off of the wheels with no hassle..
We received the new wheel that had no damage but also had no weld fillet where the T ring meets the wheel on the outer face. not a problem we thought as we can just fill it as most people do. The wheel was built up and the fillet of filler was added, the wheel was then sprayed with etch primer. the next day I noticed oil staining around the center of the filler fillet coming through the primer. I left it for a day and even more was coming through, this was happening due the wheel not having any weld in this area, and the wheels are machined with coolant that contains oil. This oil had seeped into the join between the T ring and the rim and the filler had acted like a sponge and pulled it out. The filler had to be ripped out and done again but this time I ran a small fillet of pink grip to seal the join before adding more filler.. this seems to have worked.
This was not the last i would see of the oil seepage! it's appeared around a few rivets in the rim and between the brake band and rear T ring. considering the wheel was given a degrees it's evident that stuff seeps in where it cant be cleaned and will only come out when primers and paints go on. As I'm sure you know this is a bad thing to happen and when I have very expensive 24K gold going onto the wheel I would hate to have a paint failure! So I'm taking my time with the wheels and making sure all the oil has dispersed into the primer before rubbing it back to metal, cleaning and priming again.
It's a nightmare really but I'm not sure if STW can do anything about it other than dipping the wheels in cleaner once machined!! so watch up builders pay attention to your filler as it could be a disaster creating fish eyes or flaking paint!
The wheel is now on my milling machine getting the brake bands machined! lets put it this way the wheel is a bit egg shaped and I've taken 1/16 off already with still more to go!! I'm glad I'm doing this as the brakes would have been horrendous on the road if left!
The belly tank kit is also nearly finished so I hope to get that into etch primer over the next few weeks.
wheel with new filler added..

Front wheel and brake handle in etch primer

The toolbox uses horrible bolts to hold the hinges and lid catch on with. These were replaced with proper rivets!


Tender also in etch Primer

Brake gear and tender parts in etch


Size comparison between a 4" Tender and a 6" Tender and 6" belly tank!!

Last edited by BurrellSimplicity on Mon 18 May 2020, 4:49 pm; edited 3 times in total
BurrellSimplicity- Number of posts : 74
Location : Scotland
Registration date : 2019-04-29
Re: New Batch 4" DCC Road Loco
![]() LiveSteam Mon 18 Nov 2019, 8:42 pm
LiveSteam Mon 18 Nov 2019, 8:42 pm
BurrellSimplicity wrote:
STW.... for the road loco's it would be good if you could part assemble the wheel rims with the hub and then machine the brake bands it would sort out a pretty bad problem with the wheels and brakes.. after all it's a Road Loco and most builder will use on the road so would want none intermittent braking!
Just a thought but isnt the wheel brake more hand brake than an actual road brake, all my braking is always done on the reverser I'd say 99.9% of the time, in fact my wheel/band brake (on the agri) didnt actually work for 2 seasons
From memory the road loco's also have a flywheel brake as well, so a slight egg shaped wheel rim shouldnt really be an issue I'd think as you wouldnt actually be applying it while moving.
LiveSteam- Number of posts : 788
Location : Hampshire
Registration date : 2013-09-08
Re: New Batch 4" DCC Road Loco
![]() BurrellSimplicity Mon 18 Nov 2019, 10:00 pm
BurrellSimplicity Mon 18 Nov 2019, 10:00 pm
BurrellSimplicity- Number of posts : 74
Location : Scotland
Registration date : 2019-04-29
Re: New Batch 4" DCC Road Loco
![]() LiveSteam Tue 19 Nov 2019, 7:42 pm
LiveSteam Tue 19 Nov 2019, 7:42 pm
BurrellSimplicity wrote:It depends how much road traveling you do and what roads you travel but I’ve always used my brake on the my Agri and leave the reverser for steep down hills and emergencies but it is the last resort and I never go past mid gear!! Braking on the reverser you end up putting a lot of strain through the motion and crank. The reverser is effectively stopping the valve gear but the wheels and weight of the engine are fighting against it. It can lead to A bent crank and thats something you really don’t want! I believe a Roadloco has suffered a bent crank from this very action although it was done in an Emergancy situation. The fly wheel brakes are effective but the most effective are the wheel brakes, that’s why Burrell used them as your braking on a bigger diameter and creating a larger stopping force. Using wheel brakes that are so far out and intermittent also puts strain on the brake gear. I haven’t checked my other wheel for run out of the brake band but considering the wheels are machined I’m surprised they are so far out and I’m having to machine so much off! I don’t know what the answer is but I guess the only way is for the wheel to put together with the hub and the band machined. This could be done by other methods also with some clever thinking.
Interesting how folks do things differently, Yes Lynn bent her crank I seem to remember on her showmans from memory, doing an emergency stop on the reverser, but then I cant see you'd be able to wind the wheel brake on quick enough in this situation anyway.
I tend to brake completely the other way, shut the reg, open the drains and bring the reverser slowly to the mid position is normally enough to retard the engine in most descents, bar a couple of really steep ones I've done and then I've only found I needed to move past the mid position to the reverse position in pulses and have never felt the motion is under any extra strain (certainly less than when I've been on the Dyno
Maybe I'm just not going as fast as everyone else
LiveSteam- Number of posts : 788
Location : Hampshire
Registration date : 2013-09-08
Re: New Batch 4" DCC Road Loco
![]() BurrellSimplicity Tue 19 Nov 2019, 10:28 pm
BurrellSimplicity Tue 19 Nov 2019, 10:28 pm
BurrellSimplicity- Number of posts : 74
Location : Scotland
Registration date : 2019-04-29
Re: New Batch 4" DCC Road Loco
![]() lynnr Wed 20 Nov 2019, 10:23 am
lynnr Wed 20 Nov 2019, 10:23 am
I also have oil tolerant brake lining on the wooden wheel brake blocks. The flywheel brake is very effective but again you need time to wind it on so can be used in normal hill descending activity easily.

lynnr- Number of posts : 3242
Age : 56
Location : Highland, 4inch showman
Registration date : 2010-08-06
Re: New Batch 4" DCC Road Loco
![]() BurrellSimplicity Wed 20 Nov 2019, 10:42 am
BurrellSimplicity Wed 20 Nov 2019, 10:42 am
I'm looking at maybe replacing my blocks with steel and then have the brake lining bonded on.. I'm not sure what the wood is STW supply but I think changing to steel would stop any crushing that might happen when the brakes are applied hard. I'll probably try the wood first with brake lining then upgrade at a later date if need be.
on the 6" I drive the flywheel brake is made to contact to the flywheel lightly before the hill, then it's only a turn to get it on full if needed.
BurrellSimplicity- Number of posts : 74
Location : Scotland
Registration date : 2019-04-29
Re: New Batch 4" DCC Road Loco
![]() lynnr Wed 20 Nov 2019, 11:12 am
lynnr Wed 20 Nov 2019, 11:12 am
The brakes are Poplar so very resilient. I have had my brakes locked solid and there is no "crush" at all.
I would stay with the wood and do as I have and bond the liner on the wood. I also secured the liners with brass screws.
My engine is one of the high millage engine with over 1200 road miles so far and countless miles on rally fields. All local routes are hilly with the best climb being 1:5 so both brakes are well used.
lynnr- Number of posts : 3242
Age : 56
Location : Highland, 4inch showman
Registration date : 2010-08-06
Page 1 of 2 • 1, 2 ![]()