Today's progress
+9
hudmut
Tony King
IanL
Tim Watson
Kevster
mick 100
Robfishman
lynnr
simonbos
13 posters
Page 2 of 3
Page 2 of 3 •  1, 2, 3
 More progress
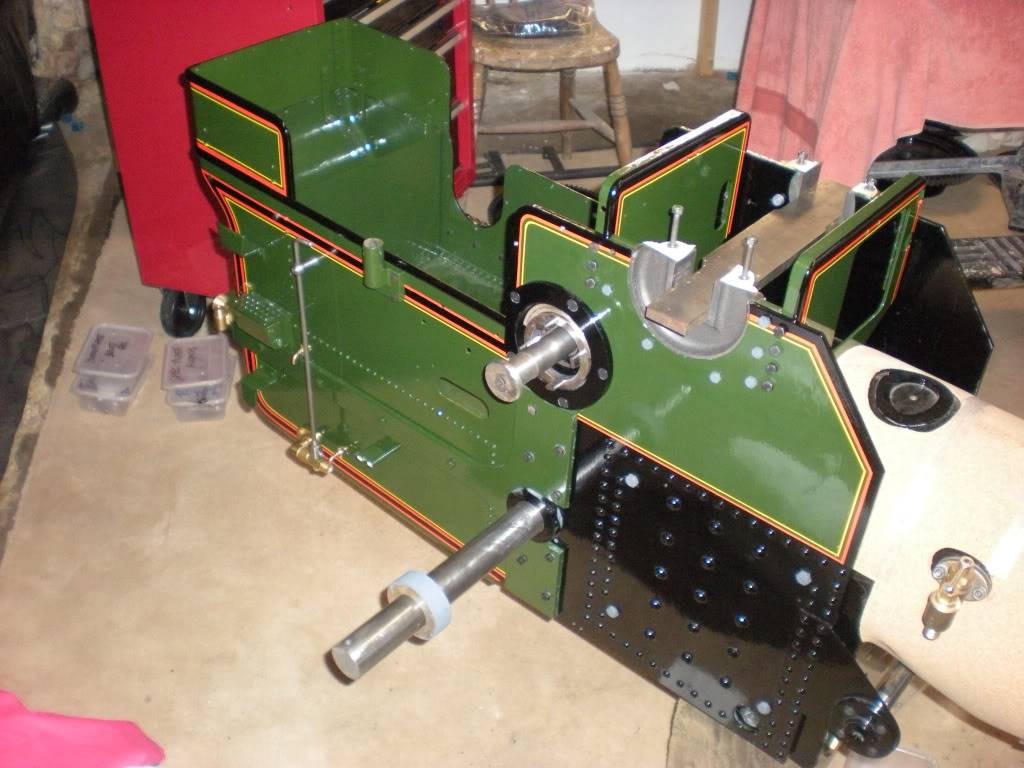
Have finally been kicked out of wife's utility room and am now completing the build in a makeshift workshop at the farm. Managed to get the boiler painted this weekend - looking forward to bolting other bits on so that it begins to look like a traction engine soon


simonbos- Number of posts : 76
Location : essex
Registration date : 2012-09-20
 Lining
Have now got bits back from being lined. In the end I relented and got Rob Cooper to line them for me and what a wonderful job he has done. I did try to do the lining myself but quickly came to realise that it wasn't a job for me - I would have ruined the engine! Am now busy bolting everything together - will post more photos as I proceed.

simonbos- Number of posts : 76
Location : essex
Registration date : 2012-09-20
 Re: Today's progress
Tender bolted to horn plates

simonbos- Number of posts : 76
Location : essex
Registration date : 2012-09-20
 Re: Today's progress
Looking very nice and somewhat familiar. It takes courage and strength to say I can not do it and need help to do it well.
Well done Simon.
Well done Simon.

lynnr- Number of posts : 3242
Age : 56
Location : Highland, 4inch showman
Registration date : 2010-08-06
 Re: Today's progress
Love the colour scheme, another wonderful engine coming together!!
Regards,
Tony
Regards,
Tony
Tony King- Number of posts : 856
Age : 69
Location : scotland
Registration date : 2008-10-31
 Re: Today's progress
Looks wonderful, the great thing about seeing other builds is the great colour combinations. Your lining looks great and I don't blame you for getting someone to do it for you. It's very time consuming and not as easy as it's make to look by those who can.
 Today's progress
Hi all
Had a successful day today - now beginning to look like a traction engine. Keep solving one problem only to run into another one. Latest one is the left hand final drive gear/winch pulley hits on the small Allen bolt that holds up the rear of the ash pan which won't allow the sprocket to go on far enough - any ideas how I solve this one? Also how have people fixed the end of the winch rope to the winch drum - I see there is a 6m tapped hole to use - presume I've got to make a small bracket to grip the end of the rope. Any ideas greatly received. Thanks,
Simon

simonbos- Number of posts : 76
Location : essex
Registration date : 2012-09-20
 Re: Today's progress
The winch wire can be fitted with a "thimble" then this is held on by a bolt and washer.
Not sure about your problem bolt. How about a picture it may help?
Not sure about your problem bolt. How about a picture it may help?

lynnr- Number of posts : 3242
Age : 56
Location : Highland, 4inch showman
Registration date : 2010-08-06
 Re: Today's progress
Rob
I keep thinking I'm getting near the end but there's still a lot of parts on the bench to fit. There's also a lot of little jobs to tidy up like painting bolt heads/nuts etc.which will all take many hours. Then the real fun will begin when I light a fire in her - I expect there will be steam and water coming from all sorts of places it shouldn't!
Lynn - I'll try and take a photo of the problem bolt tomorrow a.m.
Do I need to put a loop in the copper lubricator pipe than goes from front of lubricator to top of cylinder block? - the pipe looks rather short to get a full coil in. If so I presume its best to coil it around a rod or similar. Thanks again. Simon
simonbos- Number of posts : 76
Location : essex
Registration date : 2012-09-20
 Re: Today's progress
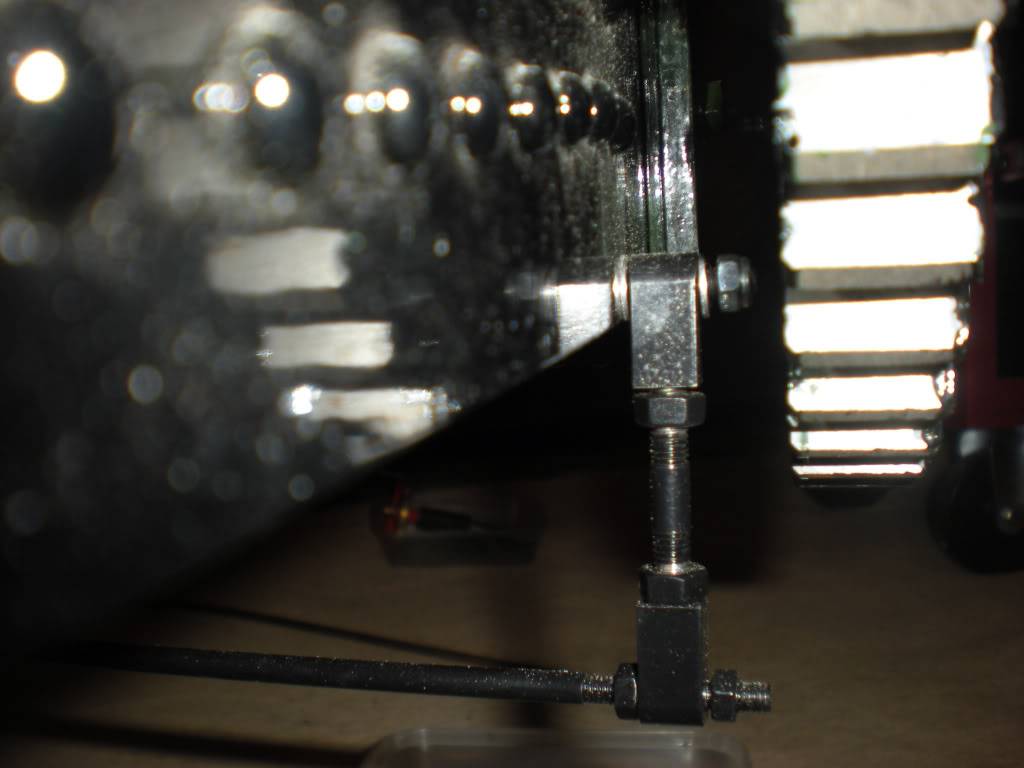
Picture of problem Allen bolt which is in the way of allowing left hand final drive sprocket from going on far enough

Last edited by simonbos on Sun 08 Dec 2013, 12:31 pm; edited 1 time in total (Reason for editing : photo ok - not cropped)
simonbos- Number of posts : 76
Location : essex
Registration date : 2012-09-20
 Re: Today's progress
What on earth is that arrangement holding up?? Looks very Heath Robinson to me...  and certainly not right.
 Re: Today's progress
highpressure
The linkage holds up rear of ashpan. Had a word with Steve today and he suggested using a countersunk allen bolt -easy - problem solved!
The linkage holds up rear of ashpan. Had a word with Steve today and he suggested using a countersunk allen bolt -easy - problem solved!
simonbos- Number of posts : 76
Location : essex
Registration date : 2012-09-20
 Re: Today's progress
Your engine is looking splendid simon,
Kev
Kev

Kevster- Number of posts : 424
Location : Hertfordshire 4 inch; DCC road loco
Registration date : 2011-01-27
 Re: Today's progress
Hi all
Am now getting to the stage where I want to try running the engine on air - I am keen to sort as many leaks/problems out before I get to lighting a fire. Please could someone tell me how I go about this.
Thanks,
Simon
Am now getting to the stage where I want to try running the engine on air - I am keen to sort as many leaks/problems out before I get to lighting a fire. Please could someone tell me how I go about this.
Thanks,
Simon
simonbos- Number of posts : 76
Location : essex
Registration date : 2012-09-20
 Re: Today's progress
Hi Simon
You can run on air for a short while but don't run for too long as the cylinders are not being lubricated by steam oil.
The way I did it was using the "spare" port on the block, I have a siren in it but a standard compressor fitting will also screw in. This will allow pressurization of the complete steam cycle. You may get air leaks where you will not get steam as the system is completely cold and nothing has expanded etc.
Triple check your valve timing and phase so you do not get a piston trying to go forward while the other is trying to go backwards. The valves again will act differently on cold non expanding air over steam. Don't worry too much about precise timing either as yet again the boiler is cold and has not grown in length changing the valve events slightly.
You can do a phased by leaving off the LP chest cover. So it will just vent the air out the side. This will also show any let by in the starter button.
And always before adding pressure. Walk the motion through 2 complete revolutions to confirm all is free and will not bind up.

lynnr- Number of posts : 3242
Age : 56
Location : Highland, 4inch showman
Registration date : 2010-08-06
 Re: Today's progress
Thanks Lynn
My engine is the single cylinder agricultural. There is a threaded hole which looks like 1/4" BSP on the temporary safety valve blanking plate above the regulator - can I attach the airline here?
I have set the timing up as per the instructions.
Thanks,
Simon
My engine is the single cylinder agricultural. There is a threaded hole which looks like 1/4" BSP on the temporary safety valve blanking plate above the regulator - can I attach the airline here?
I have set the timing up as per the instructions.
Thanks,
Simon
simonbos- Number of posts : 76
Location : essex
Registration date : 2012-09-20
 Re: Today's progress
That is 1/4" BSP which should be a standard airline fitting. Good luck, its exciting to see it all move for the first time. Then get a fire in it.
 Re: Today's progress
Hi all
Today's problem: The glass tube for the water gauge is a bit too long - what is the best thing to cut it with? I tried my dremel with a thin cutting disc but that wouldn't touch it. Also what holds the ashpan pins in place? - am presuming friction as they are a tight fit.
Thanks,
Simon
Today's problem: The glass tube for the water gauge is a bit too long - what is the best thing to cut it with? I tried my dremel with a thin cutting disc but that wouldn't touch it. Also what holds the ashpan pins in place? - am presuming friction as they are a tight fit.
Thanks,
Simon
simonbos- Number of posts : 76
Location : essex
Registration date : 2012-09-20
 Re: Today's progress
Simon,
you can get little diamond coated cutting discs for the dremel ,thats what i have used, i think i got them off ebay.
I just scored around the glass then snapped off in a rag
when cutting use some water to keep the dust down I read somewhere the dust can be harmful if breathed in, its a good idea anyway.
hope that helps
Kev

Kevster- Number of posts : 424
Location : Hertfordshire 4 inch; DCC road loco
Registration date : 2011-01-27
 Re: Today's progress
hi Simon - you can use a needle file to score a line around the glass then it will snap off cleanly if you file it nice and smoothly
Rickster- Number of posts : 267
Location : canterbury, Kent
Registration date : 2010-02-19
 Re: Today's progress
Hi all
Finally got round to running the engine on air this afternoon. Connected up airline - lot of air escaping through injector and some through the whistle. Whistle worked well but decided to take apart to cure leak - put back together to find that it didn't work at all! Still couldn't get the motion to turn by giving the flywheel a push then suddenly occurred to me that it might help if I opened the regulator and hey presto away she went! How stupid can I be! Regulator worked very well. Ticked over like a dream then I saw that the water pump was causing the top corner of the hornplate to flex - something must be out of line. So back to workshop, took off water pump rod, all looked lined up ok but decided to turn it 180 degrees, put back together and what a difference! The engine has had a tight spot since it was assembled which has been niggling me - since turning the pump rod it now turns over without any resistance - am assuming the holes on the rod must be slightly off centre.
Still have to cure injector leak - does anybody have any ideas why this should leak - am reluctant to take apart until I've spoken to Steve as this came as one assembled unit.
I have hit the stainless ball in the whistle gently to see if it seats better - won't know if I've been successful until I try the airline again tomorrow.
Have come home feeling it's been a successful day - it's a great feeling to finally see and hear it all turning over after all these months of assembling bits.

simonbos- Number of posts : 76
Location : essex
Registration date : 2012-09-20
 Re: Today's progress
Exciting times, what a beautiful looking engine.... Very well done!!
Regards,
Tony
Regards,
Tony
Tony King- Number of posts : 856
Age : 69
Location : scotland
Registration date : 2008-10-31
 Re: Today's progress
Looking good. If the injector is leaking, it is either through the clack valve on the side of the boiler or through the steam globe valve on the manifold. Both are easy fixes.

HStannard- Number of posts : 58
Location : Rushden, Northants
Registration date : 2011-11-09
 Re: Today's progress
Also air leaks are much worse without steam many of these will go if you fill it up and light a fire. I wouldnt be able to hold back at ths point, personally I didnt bother with air just went for straight to steam!!! Even then early leaks will gradually disappear as things seal up as time goes on.
Page 2 of 3 •  1, 2, 3
 Similar topics
» More progress
» Thetford Works (Cornwall)
» 09/10/10 progress
» Lynn Robinson. Showman Scenic
» Presedential Candidate??
» Thetford Works (Cornwall)
» 09/10/10 progress
» Lynn Robinson. Showman Scenic
» Presedential Candidate??
Page 2 of 3
Permissions in this forum:
You cannot reply to topics in this forum