
IanL Road Loco
Page 4 of 9 •  1, 2, 3, 4, 5, 6, 7, 8, 9
 ![]()
Re: IanL Road Loco
![]() IanL Mon 16 Apr 2012, 6:54 pm
IanL Mon 16 Apr 2012, 6:54 pm

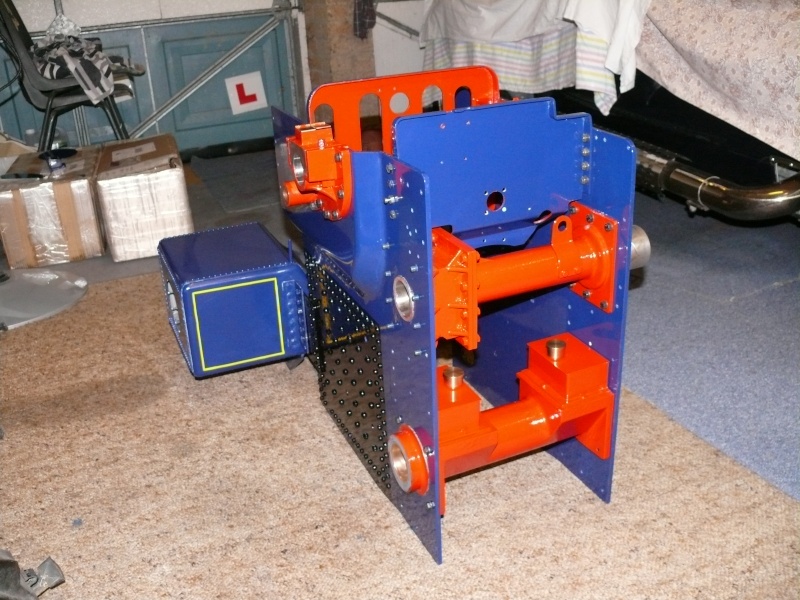
Not a great picture I know
the rear axle

need to get the rear wheel out of storage, to fit the bearings to it now that I have the rear axle.
ian

IanL- Number of posts : 437
Age : 68
Location : Nottinghamshire
Registration date : 2011-07-25
Re: IanL Road Loco
![]() lynnr Tue 17 Apr 2012, 8:07 am
lynnr Tue 17 Apr 2012, 8:07 am
Electric blue attractions. Looking very very nice.
When you are putting the axil casing into the horn plates you may need to remove the paint from the flange as the fit is very precise. I had to remove the top coats of paint but not the primer to get mine to fit. Also if it is too tight you may fracture out the paint on the hornplate and gasp chip it.

lynnr- Number of posts : 3242
Age : 55
Location : Highland, 4inch showman
Registration date : 2010-08-06
Re: IanL Road Loco
![]() Tony King Tue 17 Apr 2012, 8:40 am
Tony King Tue 17 Apr 2012, 8:40 am
Agree totally with Lynn's comments............ That's going to be one very noticeable engine. Paint finish looks excellent, well done!!
Regards,
Tony
Tony King- Number of posts : 856
Age : 68
Location : scotland
Registration date : 2008-10-31
Re: IanL Road Loco
![]() IanL Tue 17 Apr 2012, 2:03 pm
IanL Tue 17 Apr 2012, 2:03 pm
The axle tube only has under coat on the mating faces although in the photo it does look the same as the enamel top coat. I knew I may need to remove some of the paint on the flange, but will probably use a new modelling knife blade to cut off the offending paint, this seems to work well on some of the other areas I have tried to keep paint off.
The paint is all brushed flatted between each coat of undercoat and top coat the final coat flatted with 1500 wet with soap, then used a Meguiars DA polisher with spot disc initially using an orange disc with T cut to even G3 then T cut finally using Auto glym resin polish. My plan is then to use the high gloss resin finish after the polish.
The belly tank has worked out OK so far but still need to add the pinstripes so not used the resin polish yet.
Ian
IanL- Number of posts : 437
Age : 68
Location : Nottinghamshire
Registration date : 2011-07-25
Re: IanL Road Loco
![]() IanL Mon 23 Apr 2012, 9:07 am
IanL Mon 23 Apr 2012, 9:07 am

another view of the hornplates

Last edited by IanL on Tue 28 Aug 2012, 4:23 pm; edited 1 time in total
IanL- Number of posts : 437
Age : 68
Location : Nottinghamshire
Registration date : 2011-07-25
Re: IanL Road Loco
![]() Robfishman Mon 23 Apr 2012, 10:32 pm
Robfishman Mon 23 Apr 2012, 10:32 pm
To begin with I couldn't get on with the Beugler but once I got the paint mix right it's worked ok. I think I prefer the lining tape though as I get a nice crisp edge. Also as I'm on dark blue and a couple of coats are needed for good coverage on all lining colours to stop the blue grinning through, I found the pen really hard work for multiple coats. The down side though is it takes hours to lay the tape, but with the pen it's obviously much quicker.
Keep up the good work though It's looking great
Robfishman- Number of posts : 1061
Age : 49
Location : Chandlers Ford Hants 4" showmans & 4" Roller
Registration date : 2010-11-26 -

Re: IanL Road Loco
![]() IanL Tue 24 Apr 2012, 7:19 am
IanL Tue 24 Apr 2012, 7:19 am
I am using one shot paint lemon yellow, in the Beugler and have not had any problems with the blue showing through. However, I have only used a thick line so far which seems to lay down a good amount of paint , the challenge is making sure the pen stays at a right angle to the panel or else you get a taper in the line. I am planning on using a narrower line on the wheels for this reason. Looking at Steve Trails lining on wheels it is possible to use the Beugler with excellent results.
Ian
Last edited by IanL on Tue 24 Apr 2012, 12:51 pm; edited 1 time in total
IanL- Number of posts : 437
Age : 68
Location : Nottinghamshire
Registration date : 2011-07-25
Re: IanL Road Loco
![]() lynnr Tue 24 Apr 2012, 10:52 am
lynnr Tue 24 Apr 2012, 10:52 am
I use the OneShot and the primrose yellow goes down in one coat and covers the red of the engine perfectly by brush or Beugler.
lynnr- Number of posts : 3242
Age : 55
Location : Highland, 4inch showman
Registration date : 2010-08-06
name rings
![]() IanL Thu 10 May 2012, 6:51 pm
IanL Thu 10 May 2012, 6:51 pm

I am sure I can live with it,
Ian
IanL- Number of posts : 437
Age : 68
Location : Nottinghamshire
Registration date : 2011-07-25
Re: IanL Road Loco
![]() Robfishman Thu 10 May 2012, 7:40 pm
Robfishman Thu 10 May 2012, 7:40 pm
I had the same problem, in my case i gave it a generous second coat of red, and while wet poped it straight in the oven on a low heat for about 40 minutes (most of my bits have been in there).
Once baked left it for a week before lightly sanding with a fine sandpaper block, then polishing with a small mop in the dremil. You have to be careful mind as it is possble to damage the paint when polishing if you slip
After a couple of weeks it goes as hard as anything and I can now polish with Silvo wadding without having an effect on the paint. I'm sure you can use Brasso wadding the same but I didn't have any at the time so used the silver polish.
Robfishman- Number of posts : 1061
Age : 49
Location : Chandlers Ford Hants 4" showmans & 4" Roller
Registration date : 2010-11-26 -
Re: IanL Road Loco
![]() Brian M Thu 10 May 2012, 8:17 pm
Brian M Thu 10 May 2012, 8:17 pm
Welcome to my world of frustration...
It will be worth it in the end, your parts are looking good.
Out of interest are you an Everton fan?????
All the best,
Brian M

Brian M- Number of posts : 261
Location : Cheshire
Registration date : 2011-01-30
Re: IanL Road Loco
![]() IanL Fri 11 May 2012, 4:42 pm
IanL Fri 11 May 2012, 4:42 pm
I gave the rings a scrub with a nail brush and washing up liquid, the red has come up looking like new but still mat!!
Having looked at Lynns pictures now she has set fire to it, it does make you wonder why we are trying to make them so perfect in the first place as I certainly do not plan on having a museum piece.
No, not an Everton fan but I do know one. who insisted on taking me to the Everton shop last time we were working in Liverpool together. an interesting address as the shop is called Everton 2 postcode is Liverpool 1
Ian
Last edited by IanL on Wed 23 May 2012, 8:25 am; edited 1 time in total
IanL- Number of posts : 437
Age : 68
Location : Nottinghamshire
Registration date : 2011-07-25
Re: IanL Road Loco
![]() Flasback Fri 11 May 2012, 9:06 pm
Flasback Fri 11 May 2012, 9:06 pm
Flasback- Number of posts : 191
Location : Cheshire
Registration date : 2011-01-30
Re: IanL Road Loco
![]() Kevster Sat 12 May 2012, 7:54 am
Kevster Sat 12 May 2012, 7:54 am
all get dirty covered in soot ash etc but I just cant help myself!
Kev

Kevster- Number of posts : 424
Location : Hertfordshire 4 inch; DCC road loco
Registration date : 2011-01-27
Re: IanL Road Loco
![]() IanL Sun 26 Aug 2012, 8:14 pm
IanL Sun 26 Aug 2012, 8:14 pm
Had a number of kits since cleading and steering still need something to hold it all together hopefully end of September I will get the boiler.
Smoke box and chimney

I have test fitted the steering worm and wheel on the bench having read all the issues that have happened before I thought this may be easier and I do not have a anything to attached it to anyway.

what I have found is that a slight notchiness at one point in the revoultion of the steering wheel I filed a small amount off the inside edge of the worm gear at each end on one thread this has completed resolved the issue. however, I have had to make sure there is a slight amount of end float on the chain shaft. if this is tight then the steering wheel will not rotate.
Locking the worm to the steering shaft I used the strap wrench which can be seen in the picture this held the worm whilst tightening the lock nut. worked a treat.
Ian
Last edited by IanL on Sun 26 Aug 2012, 8:31 pm; edited 2 times in total
IanL- Number of posts : 437
Age : 68
Location : Nottinghamshire
Registration date : 2011-07-25
Re: IanL Road Loco
![]() lynnr Sun 26 Aug 2012, 8:21 pm
lynnr Sun 26 Aug 2012, 8:21 pm
Nice to see your progress. I also found the steering chain rod bushes to be a bit tight. I placed a washer inside the end plate, in effect extending the length of the rod. I also added a shim to one end to tilt the bearing housing to allow a better movement.
lynnr- Number of posts : 3242
Age : 55
Location : Highland, 4inch showman
Registration date : 2010-08-06
Re: IanL Road Loco
![]() IanL Mon 03 Sep 2012, 2:55 pm
IanL Mon 03 Sep 2012, 2:55 pm
 .
.Ian
IanL- Number of posts : 437
Age : 68
Location : Nottinghamshire
Registration date : 2011-07-25
Re: IanL Road Loco
![]() lynnr Mon 03 Sep 2012, 3:15 pm
lynnr Mon 03 Sep 2012, 3:15 pm
While you have the perch together you may want to think about lubrication for the pivot. I had to load up my engine for Boat of Garten in July and the steering was almost solid. Turned out to be water dripping round the smokebox and getting down into the pivot. (Castle Fraser in June was WET)
After some grunt with the engine barrel on a stand and steering chains disconnected. I got it free again.
I will, this winter, be removing my perch from the smokebox and putting a spiral grove in to allow a grease nipple to lube up the perch.
lynnr- Number of posts : 3242
Age : 55
Location : Highland, 4inch showman
Registration date : 2010-08-06
Re: IanL Road Loco
![]() IanL Mon 03 Sep 2012, 4:54 pm
IanL Mon 03 Sep 2012, 4:54 pm
I have not as yet done anything about lubricating this but have read several posts on here especially Steve Trails about fitting a grease nipple. So have given some thought about trying to arrange something but nothing decided as yet.
I do like your post of Crystal turning over slowly.
Ian
IanL- Number of posts : 437
Age : 68
Location : Nottinghamshire
Registration date : 2011-07-25
Re: IanL Road Loco
![]() highpressure Mon 03 Sep 2012, 5:05 pm
highpressure Mon 03 Sep 2012, 5:05 pm
Cheers Kev.
highpressure- Number of posts : 1096
Age : 57
Location : West Sussex, 4" DCC Road Loco
Registration date : 2008-06-18 -
Re: IanL Road Loco
![]() IanL Thu 06 Sep 2012, 7:54 pm
IanL Thu 06 Sep 2012, 7:54 pm
Ian
IanL- Number of posts : 437
Age : 68
Location : Nottinghamshire
Registration date : 2011-07-25
Re: IanL Road Loco
![]() IanL Sun 21 Oct 2012, 1:48 pm
IanL Sun 21 Oct 2012, 1:48 pm
then used the engine crane at home to position it in the garage.

with it in place i was able to put on a coat of paint before heading of on holiday. then on my return I popped the smoke box on.

more to follow its getting exciting putting the bits together.
ian
IanL- Number of posts : 437
Age : 68
Location : Nottinghamshire
Registration date : 2011-07-25
Re: IanL Road Loco
![]() Robfishman Sun 21 Oct 2012, 2:59 pm
Robfishman Sun 21 Oct 2012, 2:59 pm
Robfishman- Number of posts : 1061
Age : 49
Location : Chandlers Ford Hants 4" showmans & 4" Roller
Registration date : 2010-11-26 -
Re: IanL Road Loco
![]() IanL Sun 21 Oct 2012, 4:52 pm
IanL Sun 21 Oct 2012, 4:52 pm
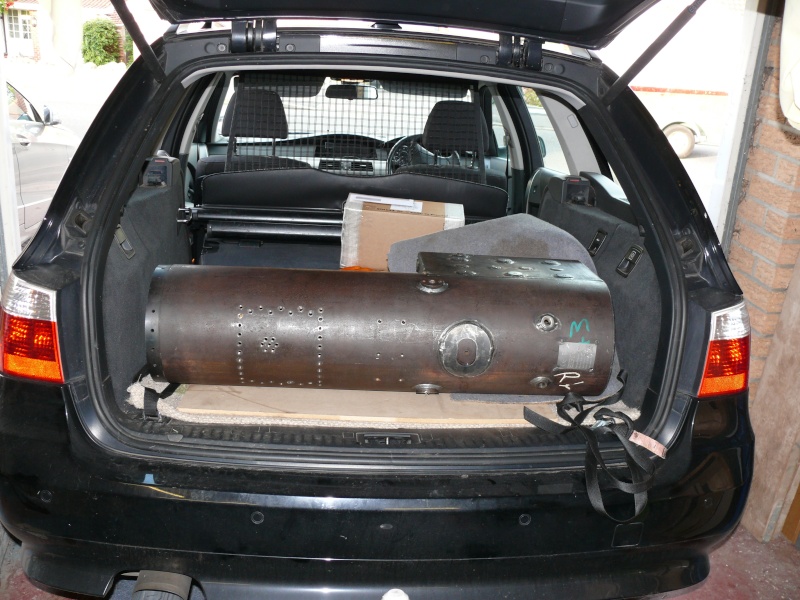
Yes it was tight as shown in the picture but plenty if room when turned for aft but needed to tie it down to stop it sliding on the roundabouts. The Beemer 5 series estate is quite roomy in the back when the seats are folded.
Ian
IanL- Number of posts : 437
Age : 68
Location : Nottinghamshire
Registration date : 2011-07-25
Re: IanL Road Loco
![]() lynnr Sun 21 Oct 2012, 5:20 pm
lynnr Sun 21 Oct 2012, 5:20 pm
The optimist says the cup is 1/2 full.
The engineer says the cup is over engineered and wasting materials.
lynnr- Number of posts : 3242
Age : 55
Location : Highland, 4inch showman
Registration date : 2010-08-06
Page 4 of 9 • 1, 2, 3, 4, 5, 6, 7, 8, 9 ![]()
» STW 2" road loco
» mikes road loco
» Burrell Road Loco Kit 30B
» Thetford Works (Cornwall)
|
|
|