
Roller build so far
Page 2 of 3 •  1, 2, 3
 ![]()
Re: Roller build so far
![]() MikeBelham Sat 09 May 2020, 2:57 pm
MikeBelham Sat 09 May 2020, 2:57 pm
Speaking of which, does the SCC kit come with a seat?, and what sort do you use?
Happy Building,
Mike
MikeBelham- Number of posts : 43
Location : Worcestershire
Registration date : 2020-05-02
Roller build so far
![]() Simon B Sat 09 May 2020, 5:35 pm
Simon B Sat 09 May 2020, 5:35 pm
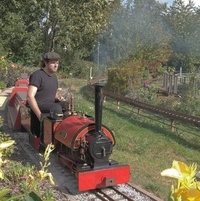
The SCC does come with a seat and foot rest, it was my final kit complete with the firing tools and firing instructions, but because of the winch rollers you tend to always bash your left shin. Also I didn't want to to cut a hole in the bottom of the coal bunker extension so modified the seat to hook on to the top with a piece of rubber so as not to damage the paint. This then made the seat to high, I felt like I was falling forward all of the time, so I cut off the loop below the seat to effectively lower it by about 3 inches. I also didn't like the way the seat just hooked on and rested on the back of the tender, I could see it really damaging the paint so once again I amended to seat to bolt into the two outer holes on the tow bracket. If you look at my thread in 'SSC build so far' I posted some pictures showing what I had done.
I'm thinking about buying a water bowser with a seat to spread the drivers weight between the rear wheel bearings and the bowser, but may just make a custom seat on a wheel that will be free to float up and down as the ground undulates. To be honest I haven't made my mind up which way to go yet, it's like you said the more bowsers and trailers you have its finding somewhere to store everything.
I hope the above helps.
Regards
Simon

Simon B- Number of posts : 161
Age : 58
Location : Egremont, Cumbria
Registration date : 2014-01-07
MikeBelham- Number of posts : 43
Location : Worcestershire
Registration date : 2020-05-02
Roller build so far
![]() Simon B Sun 17 May 2020, 4:11 pm
Simon B Sun 17 May 2020, 4:11 pm


I then refitted the steering, the shaft from the hand wheel to the worm drive lines up well and runs smoothly, but the scroll under the boiler does not quite align correctly. When the drive side is fitted and tightened up the other end is misaligned by about 1mm, and when I loosen the drive side and fit the other end and retighten everything up the steering goes very stiff indeed. The steering brackets are bolted to the hornplates which in turn are bolted to the boiler with no adjustment, have other people had this problem and if so how have you freed up the steering? Any advice would be most welcome.


Simon B- Number of posts : 161
Age : 58
Location : Egremont, Cumbria
Registration date : 2014-01-07
andysleigh- Number of posts : 20
Age : 32
Location : guildford
Registration date : 2009-02-23
Roller build so far
![]() Simon B Mon 18 May 2020, 7:33 pm
Simon B Mon 18 May 2020, 7:33 pm
First picture shows the crank before I machined the crank, the second shows the crank post machining.


I then machined the inside of the gear itself to make the recess 5mm deeper to allow the gear to slide into the recess in the bearing housing to allow the gears to be disengaged.

I still have a bit of a problem which will require more machining tomorrow, the diameter of the recess in the gear is to small to clear the bearing housing casting and is preventing the gears completely disengaging. The last photo shows that the gear can still slide another 3mm to disengage however the bearing casting is preventing it sliding far enough.

Its been a good day playing with a lathe, however rather than modifying myself I could have sent it back to STW who would have modified the parts for me.
Simon B- Number of posts : 161
Age : 58
Location : Egremont, Cumbria
Registration date : 2014-01-07
Roller build so far
![]() Simon B Tue 19 May 2020, 6:58 pm
Simon B Tue 19 May 2020, 6:58 pm


Simon B- Number of posts : 161
Age : 58
Location : Egremont, Cumbria
Registration date : 2014-01-07
Roller build so far
![]() Simon B Sat 30 May 2020, 8:13 pm
Simon B Sat 30 May 2020, 8:13 pm


Then moving on to the lubricator, which proved to be a bit fiddly to assemble, possible due to having sausage fingers but got there in the end

The steering chains were simple to fit in the end and now after removing a few burrs on the steering scroll turns easily and the steering works smoothly.


After a bit of frustration I managed to fit the reversing rod, bit of a tight squeeze to get it through the gap in the spectacle plates and past the pipework, in the end I had to put a bit of a kink in the bar to stop it rubbing in the injector pipework, but seems to fit and work properly, although full forward is at the extent of the travel when pushing the lever forward, I thought it would have been nearer the centre?? Still I'll mark up the extents of travel before I cut the slots to hold the reversing lever in the set position.

And finally test fit of one of the scrapers, these are simple to assemble and adjust.

Simon B- Number of posts : 161
Age : 58
Location : Egremont, Cumbria
Registration date : 2014-01-07
Re: Roller build so far
![]() Mark the spark Sat 30 May 2020, 10:03 pm
Mark the spark Sat 30 May 2020, 10:03 pm
Mark the spark- Number of posts : 389
Location : Edinburgh
Registration date : 2015-04-26
Roller build so far
![]() Simon B Sat 30 May 2020, 10:11 pm
Simon B Sat 30 May 2020, 10:11 pm
Thanks for the tip, I'll have a look at it tomorrow.
Did you have any difficulty lining up the piston slides and the valve slider, at the moment I get the piston and slider perfect and even slide, but the valve slider is misaligned by over a mm, I adjust the bracket to get a good valve slide but then the piston binds on the sliders, at the moment I can't seem to find a position where everything is running smoothly together!! Any advice would be more than welcome.
Cheers
Simon
Simon B- Number of posts : 161
Age : 58
Location : Egremont, Cumbria
Registration date : 2014-01-07
Re: Roller build so far
![]() Mark the spark Sat 30 May 2020, 10:21 pm
Mark the spark Sat 30 May 2020, 10:21 pm
It looks like it was cut with a guillotine and that curls the edges and makes it difficult to seal
I only got my kit mid March and with lock down I am over half way through and now despite for my boiler (it was the only thing I did not get)
My workshop is now full of sub assembles all finished and painted and I am running out of room
Mark the spark- Number of posts : 389
Location : Edinburgh
Registration date : 2015-04-26
Roller build so far
![]() Simon B Wed 24 Jun 2020, 6:05 pm
Simon B Wed 24 Jun 2020, 6:05 pm


Simon B- Number of posts : 161
Age : 58
Location : Egremont, Cumbria
Registration date : 2014-01-07
Roller build so far
![]() Simon B Wed 24 Jun 2020, 6:08 pm
Simon B Wed 24 Jun 2020, 6:08 pm


Over the next few days I'll paint and fit the motion guards, cylinder cover, cylinder drains and ash pan, then it should be ready to light a fire and see if it works
Simon B- Number of posts : 161
Age : 58
Location : Egremont, Cumbria
Registration date : 2014-01-07
Stephen Cosford likes this post
Re: Roller build so far
![]() milford59 Wed 24 Jun 2020, 6:34 pm
milford59 Wed 24 Jun 2020, 6:34 pm
milford59- Number of posts : 307
Location : Milford on Sea
Registration date : 2019-05-19

lynnr- Number of posts : 3242
Age : 55
Location : Highland, 4inch showman
Registration date : 2010-08-06
andysleigh- Number of posts : 20
Age : 32
Location : guildford
Registration date : 2009-02-23
Roller build so far
![]() Simon B Thu 25 Jun 2020, 7:40 pm
Simon B Thu 25 Jun 2020, 7:40 pm
Simon B- Number of posts : 161
Age : 58
Location : Egremont, Cumbria
Registration date : 2014-01-07
Re: Roller build so far
![]() MikeBelham Fri 26 Jun 2020, 6:09 pm
MikeBelham Fri 26 Jun 2020, 6:09 pm
Simon B wrote:Thanks everybody for your kind comments, much appreciated. Not long now before I can light a fire in it
I am a bit slow catching up with forum posts, your last photo's look superb.
MikeBelham- Number of posts : 43
Location : Worcestershire
Registration date : 2020-05-02
Roller build so far
![]() Simon B Sun 28 Jun 2020, 4:14 pm
Simon B Sun 28 Jun 2020, 4:14 pm

I then fitted the other motion guard. When I trial fitted the guard it clashed with the clack valves. In the end I removed about 5mm of metal and moved the motion guard to the inside of the hornplate, it fits well and now the valves are clear. Due to the dished hornplate on the roller I think it works well.


Simon B- Number of posts : 161
Age : 58
Location : Egremont, Cumbria
Registration date : 2014-01-07
Re: Roller build so far
![]() Mark the spark Sun 28 Jun 2020, 5:28 pm
Mark the spark Sun 28 Jun 2020, 5:28 pm
Mark the spark- Number of posts : 389
Location : Edinburgh
Registration date : 2015-04-26
Roller build so far
![]() Simon B Sun 28 Jun 2020, 10:35 pm
Simon B Sun 28 Jun 2020, 10:35 pm
I agree it should have been on the outside of the hornplate but when I tried to fit it on the outside it clashed with the clacks and the bottom of the motion guard was flexing inwards due to this clash, as the clacks cannot be moved I put the motion guard on the inside and removed about 6mm from the part which fixes to the cylinder block, as the motion guard is offset it looks OK. I don't know if others have come across this issue?
Cheers
Simon
Simon B- Number of posts : 161
Age : 58
Location : Egremont, Cumbria
Registration date : 2014-01-07
Re: Roller build so far
![]() Mark the spark Sun 28 Jun 2020, 10:50 pm
Mark the spark Sun 28 Jun 2020, 10:50 pm
Mark the spark- Number of posts : 389
Location : Edinburgh
Registration date : 2015-04-26
Re: Roller build so far
![]() Will@STW Mon 29 Jun 2020, 11:21 am
Will@STW Mon 29 Jun 2020, 11:21 am
In the pictures showing the check valves have you got them open or closed. either way we will need to alter the design to pull the motion guard back slightly as based on what you say they cannot be closed properly (unless this is unique to your engine due to differences in the boilers and cylinder blocks, which both would and wouldn't surprise me). Normally the check valve handles point to the side off the engine when open, and towards the front or back off the engine when closed, which would mean that during normal operation the motion covers would not interfere with the check valves.
The engine is looking brilliant, hope you get some videos and pictures of it in steam.
Many thanks
Will@STW

Will@STW- Number of posts : 196
Age : 26
Location : Daventry
Registration date : 2019-01-29
Roller build so far
![]() Simon B Mon 29 Jun 2020, 4:16 pm
Simon B Mon 29 Jun 2020, 4:16 pm
The clack valves are currently in the closed position which is either facing the back or front of the engine. When the clacks are open the handles face outwards so no problem as they are in the centre of the cut outs in the motion guard, but when closed the handles could not be turned through 90 degrees due to the clash with the guard.
I'm quite happy with putting the motion guard in the inside of the hornplate, it still clears the reversing lever push rod by a few mm and as its offset anyway it doesn't look odd compared to the other side.
Cheers
Simon
Simon B- Number of posts : 161
Age : 58
Location : Egremont, Cumbria
Registration date : 2014-01-07
Will@STW likes this post
Re: Roller build so far
![]() Will@STW Mon 29 Jun 2020, 4:23 pm
Will@STW Mon 29 Jun 2020, 4:23 pm
The solution will work well for your batch, however I will be looking into it as there will be people who will want it as shown on the drawing (which off course they can't without it interfering with the checkvalves when they are closed. But if anyone from this batch comes across this and isn't on the forum then yes this is the best solution.
Many thanks
Will@STW
Will@STW- Number of posts : 196
Age : 26
Location : Daventry
Registration date : 2019-01-29
Page 2 of 3 • 1, 2, 3 ![]()
» 4" roller videos
» Burrell Roller First Kit - January 2017
» Getting Ready For GDSF
» April, May, June 2019 production photos.
|
|
|