
4" SCC build so far
Page 4 of 6 •  1, 2, 3, 4, 5, 6
 ![]()
Re: 4" SCC build so far
![]() Simon B Tue 03 May 2016, 10:52 pm
Simon B Tue 03 May 2016, 10:52 pm
I started with the cross head close to the cylinder with both Pistons fitted and shimmed this until I had a sliding fit, I then went to the other end and shimmed the sliders until I had a running fit. Very fiddly and lots of trial and error. I had to cuts a few more shims from a beer can to open the gap in the slider sufficient to stop the crosshead being jammed between the slides. I then played around with the jacking screws until it slid smoothly along the full travel. Some people have removed metal but I thought it best to shim and then if things loosen up when run in I can remove some shims.
I hope the above helps?
Cheers
Simon

Simon B- Number of posts : 161
Age : 58
Location : Egremont, Cumbria
Registration date : 2014-01-07
Re: 4" SCC build so far
![]() Simon B Tue 03 May 2016, 10:57 pm
Simon B Tue 03 May 2016, 10:57 pm
Thanks for your reply, that's tomorrow nights trip into the garage sorted. The grub screws will help as the fly wheel slides easily onto the crank shaft and even with the key nearly fully home there is a bit of movement when I turn it back and forth.
Best wishes
Simon
Simon B- Number of posts : 161
Age : 58
Location : Egremont, Cumbria
Registration date : 2014-01-07
Re: 4" SCC build so far
![]() TimV Wed 04 May 2016, 8:13 am
TimV Wed 04 May 2016, 8:13 am
Lining up crosshead.
This is how i did it, not sure if it was the correct way but it seems to work
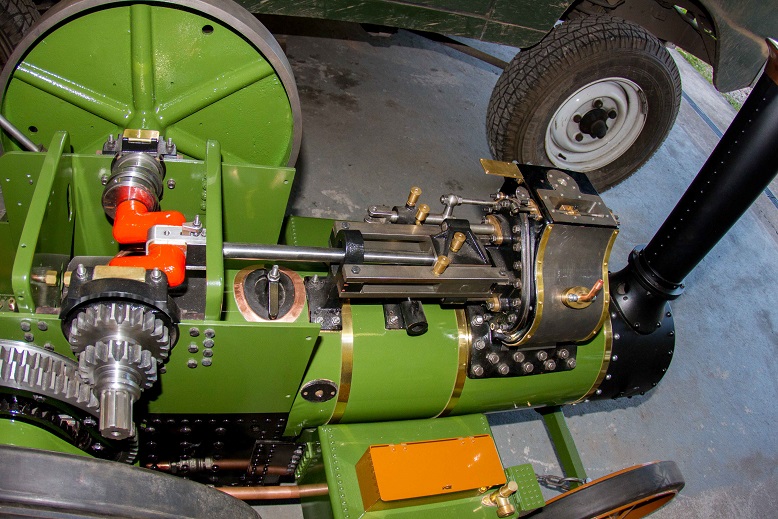
loosely fitted slide bar support with pistons fitted and screwed into crosshead, position them at front of bore then i just fitted the bottom slide bars and made sure that they were a nice fit on the bottom of crosshead, then i moved the crosshead so that the pistons were at rear of bore, then adjusted slide bar support to make the guide bars fit nicely under the crosshead in this position after this i fitted both top slide bars and made sure it moved back and forth freely had to shim it out with extra shims than were supplied as also when i lined up the bottom ones.
I then got 2 steel rules , put one across the flat surface of the regulator/safety valve face and then measured down to the tops of the slide bars at front and back with the other rule, im assuming that this face would be parallel to the bores so doing this will ensure all is running on the same angle as the cylinder is very slightly tipping back, the measurement for this worked out at about 83mm/83.5 so the guide bars are pretty square to the block.
Hope this is of help to you, its difficult to try and explain!! its easier to actually do, I spent the best part of 2 days trying to line it all up.
Good luck
Tim
TimV- Number of posts : 123
Location : Poole , Dorset
Registration date : 2014-10-09
Re: 4" SCC build so far
![]() Ian Wed 04 May 2016, 10:14 am
Ian Wed 04 May 2016, 10:14 am
Simon B wrote:Finished painting and then temporarily fitted the fly wheel. I was following the instruction when they said fit the flywheel keyway and the 6mm grub screw?? there is no 6mm grub screw or tapped hole for it to fit in, so at the moment I'm unsure how to stop the flywheel sliding on the crankshaft. Am I missing something, what have others done??
You are not missing anything the key is tapered and should lock the flywheel in place, the mentioned grub screw is a leftover from porting the instruction from the 4" agricultural instructions that we missed. If you are worried about the keys tightness put a bit of shim under it, or if you wish fit a grub screw.
Ian- Number of posts : 113
Age : 68
Location : Daventry
Registration date : 2008-06-30
Re: 4" SCC build so far
![]() Simon B Wed 04 May 2016, 11:05 am
Simon B Wed 04 May 2016, 11:05 am
I'll see how the fit is when I finally fit the flywheel and fully knock home the key, before getting my drill out and risk damaging the paint.
Cheers
Simon
Simon B- Number of posts : 161
Age : 58
Location : Egremont, Cumbria
Registration date : 2014-01-07
Re: 4" SCC build so far
![]() ChriX Wed 04 May 2016, 9:47 pm
ChriX Wed 04 May 2016, 9:47 pm

ChriX- Number of posts : 90
Age : 39
Location : Cornwall, UK
Registration date : 2012-06-22
4" SCC build so far
![]() Simon B Mon 16 May 2016, 8:20 pm
Simon B Mon 16 May 2016, 8:20 pm
Finally got around to painting the final drive guards and the rear wheels. The guards fitted well but when I tried to turn the crank everything locked up, after removing the guards the clearance between the gears and the guards is really small so I had to grind off the excess rivet bolt and thin down the nuts slightly but all fits well now

I'm not going to refit the rear near side wheel yet as I'm not sure if the flywheel needs to be removed again or not?

Also trial fitted the cylinder cladding, bit fiddly and needed to reshape the cladding a bit but I'm pleased with the final fit, more painting this week then!!
Simon B- Number of posts : 161
Age : 58
Location : Egremont, Cumbria
Registration date : 2014-01-07
4" SCC build so far
![]() Simon B Tue 24 May 2016, 6:58 pm
Simon B Tue 24 May 2016, 6:58 pm

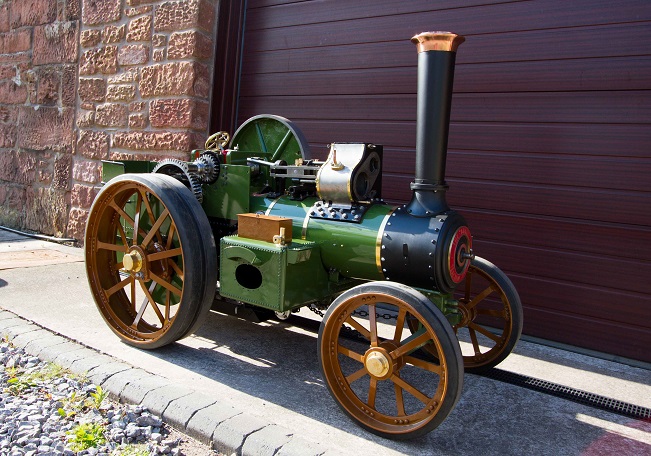
In the end I decided to fit the other rear wheel as it makes the engine mobile again.

The ash pan and damper rod are now painted and fitted so now just need to paint the steering and the cylinder cladding to get up to date, saying that it's a cracking evening in the lakes so it won't get painted tonight

Simon B- Number of posts : 161
Age : 58
Location : Egremont, Cumbria
Registration date : 2014-01-07

Kevster- Number of posts : 424
Location : Hertfordshire 4 inch; DCC road loco
Registration date : 2011-01-27
Re: 4" SCC build so far
![]() Steve Traill Tue 24 May 2016, 8:04 pm
Steve Traill Tue 24 May 2016, 8:04 pm

Steve Traill- Number of posts : 800
Age : 67
Location : Illogan Redruth Cornwall
Registration date : 2008-06-29
Re: 4" SCC build so far
![]() Simon B Tue 24 May 2016, 8:28 pm
Simon B Tue 24 May 2016, 8:28 pm
Thanks for your comments much appreciated, hopefully be in steam by the end of summer / Autumn really looking forward to that day.
Cheers
Simon
Simon B- Number of posts : 161
Age : 58
Location : Egremont, Cumbria
Registration date : 2014-01-07
Re: 4" SCC build so far
![]() LiveSteam Tue 24 May 2016, 9:19 pm
LiveSteam Tue 24 May 2016, 9:19 pm
LiveSteam- Number of posts : 777
Location : Hampshire
Registration date : 2013-09-08
4" SCC build so far
![]() Simon B Wed 15 Jun 2016, 7:28 pm
Simon B Wed 15 Jun 2016, 7:28 pm
The last few weeks I've been chemically blackening and painting bits and pieces. Tonight I refitted all of the parts, and just in time as I've just received a text from HQ another kits arriving tomorrow
Rather than paint the big end bracket, bolts and wedge I blackened them, hopefully there will be enough oil around here to prevent it going rusty in a few months

The fire doors have been refitted, before blackening them I removed a few burrs and rounded the corners off, they now operate smoothly without sticking at either end of the travel


The steering components have either been blackened or painted, now that the oilers have been fitted and oil applied to the bearings the steering is smoother with no binding.


Cylinder cladding painted an refitted, the cylinder bolts and the smoke box rivets have also been painted

I hope everybody else's builds are going well.
Simon
Simon B- Number of posts : 161
Age : 58
Location : Egremont, Cumbria
Registration date : 2014-01-07
4" SCC build so far
![]() Simon B Wed 15 Jun 2016, 7:30 pm
Simon B Wed 15 Jun 2016, 7:30 pm
Simon B- Number of posts : 161
Age : 58
Location : Egremont, Cumbria
Registration date : 2014-01-07
Steve Traill- Number of posts : 800
Age : 67
Location : Illogan Redruth Cornwall
Registration date : 2008-06-29
Re: 4" SCC build so far
![]() TimV Thu 16 Jun 2016, 8:34 am
TimV Thu 16 Jun 2016, 8:34 am
TimV- Number of posts : 123
Location : Poole , Dorset
Registration date : 2014-10-09
Re: 4" SCC build so far
![]() Steve Traill Thu 16 Jun 2016, 11:48 am
Steve Traill Thu 16 Jun 2016, 11:48 am
Steve Traill- Number of posts : 800
Age : 67
Location : Illogan Redruth Cornwall
Registration date : 2008-06-29
Re: 4" SCC build so far
![]() lynnr Thu 16 Jun 2016, 2:39 pm
lynnr Thu 16 Jun 2016, 2:39 pm
Not had much problem with crud sticking to them for 3 years now.

lynnr- Number of posts : 3242
Age : 55
Location : Highland, 4inch showman
Registration date : 2010-08-06
Re: 4" SCC build so far
![]() LiveSteam Thu 16 Jun 2016, 6:07 pm
LiveSteam Thu 16 Jun 2016, 6:07 pm
LiveSteam- Number of posts : 777
Location : Hampshire
Registration date : 2013-09-08
Re: 4" SCC build so far
![]() Steve Traill Thu 16 Jun 2016, 9:04 pm
Steve Traill Thu 16 Jun 2016, 9:04 pm
Steve Traill- Number of posts : 800
Age : 67
Location : Illogan Redruth Cornwall
Registration date : 2008-06-29
4" SCC build so far
![]() Simon B Thu 16 Jun 2016, 9:27 pm
Simon B Thu 16 Jun 2016, 9:27 pm
Thanks everybody for your advice and experiences with fire doors
Steve thanks for your advice about using 'R' clips, they will be much easier to remove and also look a lot neater than the split pins not only on the fire doors but also on the valve gear.
Lynn, I thought about oil blueing rather than chemical blacking, if the chemical finish starts to rust I'll follow your lead and oil blue next time.
Talking about finish tonight I've fitted the valve gear, I'm in two minds whether to paint it, leave it plain steel and wipe I with oil or blacken it again what have other people done?


The valve gear went together really well just needed to remove a few burrs but no lapping in required for the eccentric's, when I tightened the bolts completely they are a bit tight but I presume they will loosen off once I start to use the engine
Simon B- Number of posts : 161
Age : 58
Location : Egremont, Cumbria
Registration date : 2014-01-07
Re: 4" SCC build so far
![]() Steve Traill Thu 16 Jun 2016, 10:37 pm
Steve Traill Thu 16 Jun 2016, 10:37 pm
Steve Traill- Number of posts : 800
Age : 67
Location : Illogan Redruth Cornwall
Registration date : 2008-06-29
Re: 4" SCC build so far
![]() Simon B Thu 16 Jun 2016, 10:59 pm
Simon B Thu 16 Jun 2016, 10:59 pm
I've already bought a nickel plating kit, but will first see if I can find somebody locally who does nickel plating.
Best wishes
Simon
Simon B- Number of posts : 161
Age : 58
Location : Egremont, Cumbria
Registration date : 2014-01-07
Re: 4" SCC build so far
![]() LiveSteam Fri 17 Jun 2016, 7:13 pm
LiveSteam Fri 17 Jun 2016, 7:13 pm
Simon B wrote:
Talking about finish tonight I've fitted the valve gear, I'm in two minds whether to paint it, leave it plain steel and wipe I with oil or blacken it again what have other people done?
None of my valve gear or conrod, slides etc are plated, there are a few bits like the reversing leaver for instance and the drain valve rod is but the rest is just steel, it soon gets a layer of oil baked on it when running anyway. If I want to bling it up a bit then a little puff of WD40 and a green scratchy (you know the thing that your partner uses to wear the pattern off the plates when washing up) soon brings them up nice and shiney again.........only for them to get very quickly covered in oil again
The plated items get just as grubby. Although I have to say I go for a "working engine" look to one thats just come out of the factory, that and I hate cleaning and polishing
LiveSteam- Number of posts : 777
Location : Hampshire
Registration date : 2013-09-08
Re: 4" SCC build so far
![]() Simon B Fri 17 Jun 2016, 10:36 pm
Simon B Fri 17 Jun 2016, 10:36 pm
Thanks for your post, it's good to know that there are options, I quite like the plain steel look. I've found a nickel plating place near to where I live but will wait until I get all of the levers and other steel bits before making a final decision as if I go down the plating route it's probably best to send all the bits at once.
Best wishes
Simon
Simon B- Number of posts : 161
Age : 58
Location : Egremont, Cumbria
Registration date : 2014-01-07
Page 4 of 6 • 1, 2, 3, 4, 5, 6 ![]()
|
|
|