
4" SCC build so far
+12
Mark the spark
LiveSteam
Steve Traill
Kevster
Ian
chas12154
lynnr
Mick1020
Jim the Shovel
ChriX
TimV
Simon B
16 posters
Page 3 of 6
Page 3 of 6 •  1, 2, 3, 4, 5, 6
 ![]()


Simon B- Number of posts : 161
Age : 58
Location : Egremont, Cumbria
Registration date : 2014-01-07

Simon B- Number of posts : 161
Age : 58
Location : Egremont, Cumbria
Registration date : 2014-01-07

Simon B- Number of posts : 161
Age : 58
Location : Egremont, Cumbria
Registration date : 2014-01-07

Simon B- Number of posts : 161
Age : 58
Location : Egremont, Cumbria
Registration date : 2014-01-07
4" SCC build so far
![]() Simon B Mon 28 Mar 2016, 8:45 pm
Simon B Mon 28 Mar 2016, 8:45 pm
Hi All
Last week I painted the cladding and managed to fit it today, what a nightmare of a job, got there in the end but could have done better fitting the back piece around the fake inspection cover. The copper ring is a bit small and sits a little proud on the weld around the ring but as the boiler has been inspected and CE marked I didn't want to start grinding the weld. I suppose once the con rod and other bits have been fitted it will hopefully be hidden.
I then fitted the belly tank, although I adjusted the cladding to allow the belly tank bracket to fit the holes didn't align with the tapped holes in the boiler, in the end rather than dismantle the bracket from the belly tank and damage the paint I opened out the holes, quite pleased with the finished and fitted result but it took hours.
The paint on the cladding took a few dings but nothing that can't be easily touched up.
I then trial fitted the steering, this went together and fitted really easily. This weeks job will be to remove the steering and paint it.
Best wishes
Simon
[img]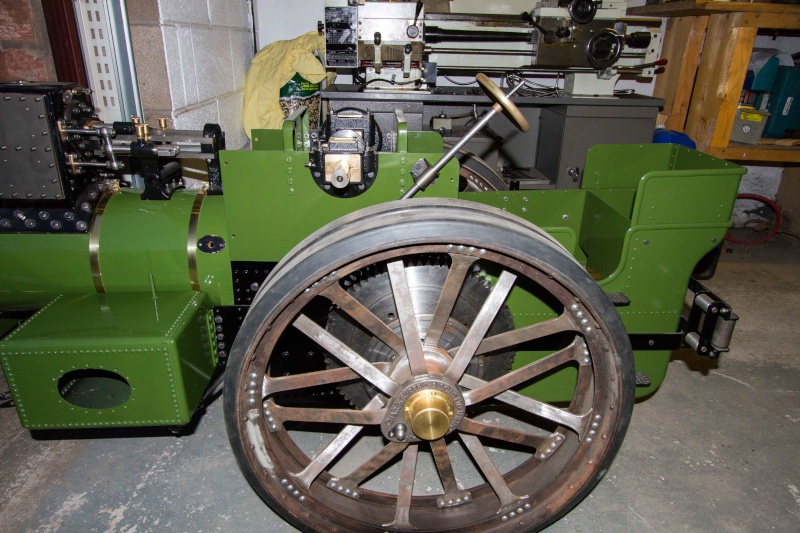 [/img]
Last week I painted the cladding and managed to fit it today, what a nightmare of a job, got there in the end but could have done better fitting the back piece around the fake inspection cover. The copper ring is a bit small and sits a little proud on the weld around the ring but as the boiler has been inspected and CE marked I didn't want to start grinding the weld. I suppose once the con rod and other bits have been fitted it will hopefully be hidden.
I then fitted the belly tank, although I adjusted the cladding to allow the belly tank bracket to fit the holes didn't align with the tapped holes in the boiler, in the end rather than dismantle the bracket from the belly tank and damage the paint I opened out the holes, quite pleased with the finished and fitted result but it took hours.
The paint on the cladding took a few dings but nothing that can't be easily touched up.
I then trial fitted the steering, this went together and fitted really easily. This weeks job will be to remove the steering and paint it.
Best wishes
Simon
[img]
[/img]
Simon B- Number of posts : 161
Age : 58
Location : Egremont, Cumbria
Registration date : 2014-01-07

Simon B- Number of posts : 161
Age : 58
Location : Egremont, Cumbria
Registration date : 2014-01-07

Simon B- Number of posts : 161
Age : 58
Location : Egremont, Cumbria
Registration date : 2014-01-07

Simon B- Number of posts : 161
Age : 58
Location : Egremont, Cumbria
Registration date : 2014-01-07

Simon B- Number of posts : 161
Age : 58
Location : Egremont, Cumbria
Registration date : 2014-01-07
Simon B- Number of posts : 161
Age : 58
Location : Egremont, Cumbria
Registration date : 2014-01-07

Simon B- Number of posts : 161
Age : 58
Location : Egremont, Cumbria
Registration date : 2014-01-07
Re: 4" SCC build so far
![]() TimV Wed 30 Mar 2016, 11:44 am
TimV Wed 30 Mar 2016, 11:44 am
Nice work Simon, I myself spent a good few hours fitting the cladding , but all sorted in the end !!
TimV- Number of posts : 123
Location : Poole , Dorset
Registration date : 2014-10-09
4" SCC build so far
![]() Simon B Sun 01 May 2016, 4:38 pm
Simon B Sun 01 May 2016, 4:38 pm
Hi All
Build and fitted the differential today, the diff went together well but the planet gears are a bit stiff at the moment. I'm reluctant to open out the bushes at the moment as I'm hoping that they will free up more when run in. Have others found the same when first assembled and put together? When fitting there is a note in the instruction that the head of on of the tender strap bolts, that bolt the tender to the hornplates may catch hence the head may need to be ground down a bit. One mine not only did the bolt catch but the top of the strap protrudes about 1mm proud of the second axle case and the inner gear also caught on this so the top had to be ground off. Easy to spot where it was catching as there is a nice circular groove in the paint. At least I knew where to grind
[img]url=https://servimg.com/view/19334950/63] [/url][/img]
Build and fitted the differential today, the diff went together well but the planet gears are a bit stiff at the moment. I'm reluctant to open out the bushes at the moment as I'm hoping that they will free up more when run in. Have others found the same when first assembled and put together? When fitting there is a note in the instruction that the head of on of the tender strap bolts, that bolt the tender to the hornplates may catch hence the head may need to be ground down a bit. One mine not only did the bolt catch but the top of the strap protrudes about 1mm proud of the second axle case and the inner gear also caught on this so the top had to be ground off. Easy to spot where it was catching as there is a nice circular groove in the paint. At least I knew where to grind
[img]url=https://servimg.com/view/19334950/63]
[/url][/img]
Simon B- Number of posts : 161
Age : 58
Location : Egremont, Cumbria
Registration date : 2014-01-07
4" SCC build so far
![]() Simon B Sun 01 May 2016, 4:46 pm
Simon B Sun 01 May 2016, 4:46 pm
Having fitted the differential I had to remove it again to fit the gears onto the main crank, refit the differential and then fit the off side final drive gear. Bit of a problem here as when the final drive gear was aligned with the diff drive gear there was a 3/16 gap between the spacer and the final drive gear. The gap was exactly the same size as the other spacer which according to the instructions and associated drawing should be fitted between the final drive gear and the rear wheel. The differential is located correctly, so I've fitted the spacer on the other side to fill out the gap, all aligns perfectly, but I'll contact HQ next week to see if there is a known issue. The second spacer is shown on the photo below between the original spacer and the final drive. Its a bit difficult to see but the O/D on the second spacer is a bit small than the original.
[img] [/img]
[img]
[/img]
Simon B- Number of posts : 161
Age : 58
Location : Egremont, Cumbria
Registration date : 2014-01-07
4" SCC build so far
![]() Simon B Sun 01 May 2016, 4:51 pm
Simon B Sun 01 May 2016, 4:51 pm
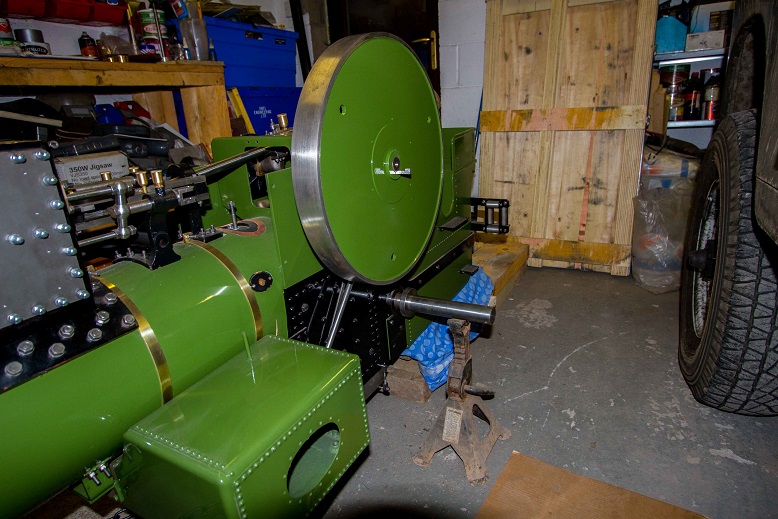
Having fitted the differential I then lapped in the main bearing and fitted the crank shaft. It turns smoothly although a little stiff at the moment, I suppose it will ease of when run in. Once the flywheel is painted and fitted it should be easier to turn the crankshaft and see if there are any issues.


Simon B- Number of posts : 161
Age : 58
Location : Egremont, Cumbria
Registration date : 2014-01-07
4" SCC build so far
![]() Simon B Sun 01 May 2016, 4:55 pm
Simon B Sun 01 May 2016, 4:55 pm
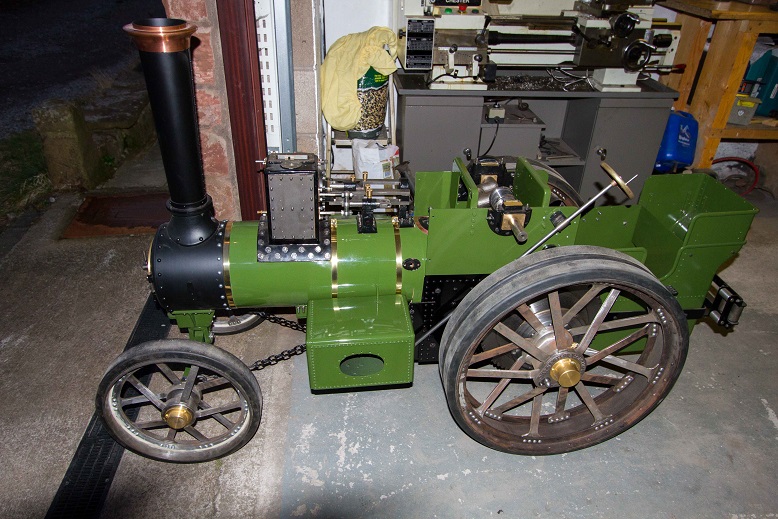
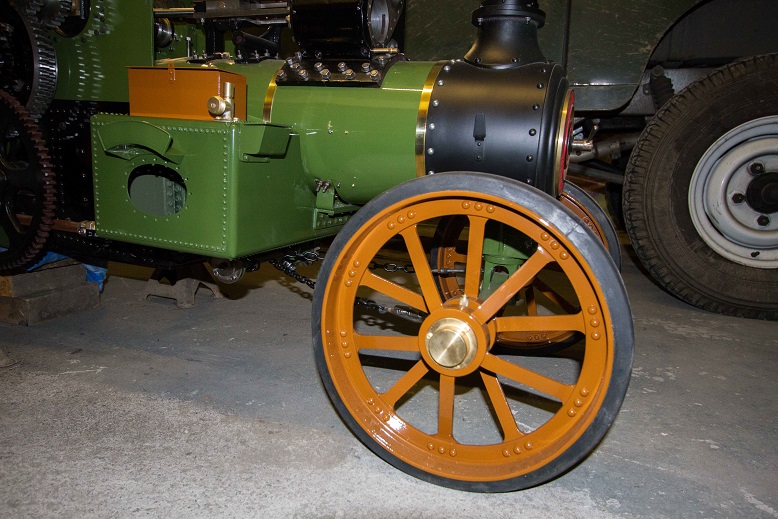
Finally built up enough confidence with the spray gun (courage) to spray the wheels. The fronts are now fitted whilst the rears have been removed to paint and fit the gears, ash pan and belly tank to tender water pipe.
Simon B- Number of posts : 161
Age : 58
Location : Egremont, Cumbria
Registration date : 2014-01-07
4" SCC Build So Far
![]() chas12154 Sun 01 May 2016, 5:10 pm
chas12154 Sun 01 May 2016, 5:10 pm
Hi Simon, fabulous pics, engine is look great. Can I ask, what colour green have you used?
Charlie
Charlie
chas12154- Number of posts : 412
Age : 63
Location : Totton, Southampton, Hampshire
Registration date : 2015-01-21
4" SCC build so far
![]() Simon B Sun 01 May 2016, 6:59 pm
Simon B Sun 01 May 2016, 6:59 pm
Hi Charlie
Doncaster green craftmaster enamel.
Cheers
Simon
Doncaster green craftmaster enamel.
Cheers
Simon
Simon B- Number of posts : 161
Age : 58
Location : Egremont, Cumbria
Registration date : 2014-01-07
4" SCC build so far
![]() Simon B Mon 02 May 2016, 9:35 pm
Simon B Mon 02 May 2016, 9:35 pm
Finished painting and then temporarily fitted the fly wheel. I was following the instruction when they said fit the flywheel keyway and the 6mm grub screw?? there is no 6mm grub screw or tapped hole for it to fit in, so at the moment I'm unsure how to stop the flywheel sliding on the crankshaft. Am I missing something, what have others done??

I then fitted the ash pan, the holes where the pins go through did not line up with the holes in the ring at the bottom of the fire box, in the end I used the side of a drill to elongate the holes then it fitted easily, and as the end of the pins faces down you cannot see that the holes have been extended.

I then fitted the ash pan, the holes where the pins go through did not line up with the holes in the ring at the bottom of the fire box, in the end I used the side of a drill to elongate the holes then it fitted easily, and as the end of the pins faces down you cannot see that the holes have been extended.
Simon B- Number of posts : 161
Age : 58
Location : Egremont, Cumbria
Registration date : 2014-01-07
Re: 4" SCC Build So Far
![]() chas12154 Tue 03 May 2016, 5:43 pm
chas12154 Tue 03 May 2016, 5:43 pm
Thanks Simon. Green looks good. I used Burrell green for mine and Burrell chocolate, for the wheels, a bit darker than the green you have used.
Charlie
Charlie
chas12154- Number of posts : 412
Age : 63
Location : Totton, Southampton, Hampshire
Registration date : 2015-01-21
Re: 4" SCC build so far
![]() TimV Tue 03 May 2016, 6:06 pm
TimV Tue 03 May 2016, 6:06 pm
Hi Simon. Good to see your progress, your engine is looking great.
As to your comment regarding final drive spacer, I also moved small spacer to inside of final drive it should be fine. As with flywheel I had to drill and tap two 6mm holes on inside of boss at 120 degrees to the keyway I.e. equal 3rds. I also had to redrill the ashpan to make pins fit, as for differential I made up several shims to get it all working smoothly
Best regards
Tim
TimV- Number of posts : 123
Location : Poole , Dorset
Registration date : 2014-10-09
Re: 4" SCC build so far
![]() TimV Tue 03 May 2016, 7:49 pm
TimV Tue 03 May 2016, 7:49 pm
Also the lubricator bracket is supplied with two M4 x 8mm cap head screws, but the holes are drilled M5 in the cylinder block so you will need to open out the holes in the bracket to fit M5 bolts and replace the M4 ones !!
TimV- Number of posts : 123
Location : Poole , Dorset
Registration date : 2014-10-09
Re: 4" SCC build so far
![]() Simon B Tue 03 May 2016, 8:42 pm
Simon B Tue 03 May 2016, 8:42 pm
Hi Tim
Thanks for the advice on the lubricator bracket, I haven't tried to fit that yet. With the m6 holes in the flywheel did you have any problems drilling through the casting? Any tips on the best way to drill it?
Thanks again, it's good to get some feedback and that others are finding the same issues as me, I keep thinking that I've done something wrong!!
Best wishes
Simon
Simon B- Number of posts : 161
Age : 58
Location : Egremont, Cumbria
Registration date : 2014-01-07
Re: 4" SCC build so far
![]() TimV Tue 03 May 2016, 9:09 pm
TimV Tue 03 May 2016, 9:09 pm
Hi Simon.
The flywheel boss is easy to drill, I used a 5mm drill and then tapped it 6mm. You will not be able to drill them perfectly vertical if you use a hand drill as it will hit the rim of the flywheel, so they will be on a very slight angle but that is ok. I have drilled a 3mm hole through the centre of a spare 6mm grub screw so that it can be screwed into the newly tapped holes in flywheel to carefully drill a locating mark on crankshaft when all is lined up.
Cheers Tim
TimV- Number of posts : 123
Location : Poole , Dorset
Registration date : 2014-10-09
Re: 4" SCC build so far
![]() ChriX Tue 03 May 2016, 10:10 pm
ChriX Tue 03 May 2016, 10:10 pm
Coming on great Simon!
I was under the impression these holes in the flywheel hub were to provide adjustment in case it does not run 100% true rather than to stop it moving on the shaft? The key when hammered home should lock it in place well.
Whilst here, do either of yourselves have any tips on setting up the crosshead? I am having trouble even finding a starting point as it moves around so much just with the pistons on the rods. Check out this link of setting up a full size SCC; he makes a couple of discs that sit in the bore so some rod can be held central and then the crosshead aligned to these as a starting point. I'm feeling like without this I could be aligning at an angle but the piston rings would take up very small errors and I'd never know. http://www.tractiontalkforum.com/showpost.php?p=291886&postcount=28

ChriX- Number of posts : 90
Age : 39
Location : Cornwall, UK
Registration date : 2012-06-22
Page 3 of 6 • 1, 2, 3, 4, 5, 6 ![]()
Page 3 of 6
Permissions in this forum:
You cannot reply to topics in this forum|
|
|