
Lining the Burrell
4 posters
Page 1 of 1

Lining the Burrell
![]() Steve Traill Sun 11 Apr 2010, 9:27 pm
Steve Traill Sun 11 Apr 2010, 9:27 pm
Here's a few ideas on lining the wheels and tender for those who have never done it before.
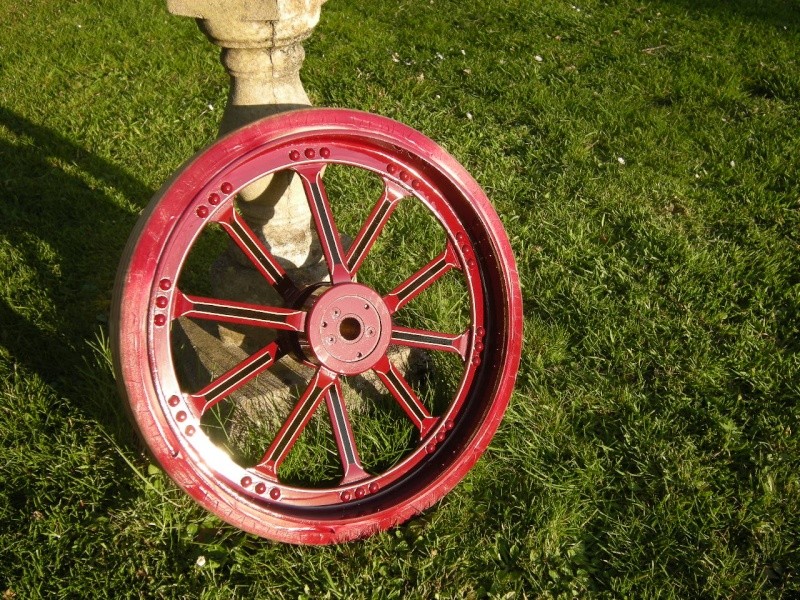
The wheel still has it's masking tape on as I'm going to spray lacquer over it all next. I used the beugler pen/wheel for everything on the wheel. To create this effect I first of all used standard masking tape at the top & bottom of each spoke to give a start & stop run off. Then with a 3/8" wheel and the side guide set centrally I did one stroke from the hub to the rim. On the front face the oiler tube needs to be removed for access. Leave this to dry overnight, if you try & do to much at once you end up washing off all of it. When this is dry the cream lining is done with the smallest wheel that Beugler do, about .8mm. Set the guide to just touch the edge of the black and I used a piece of masking tape at the rim end to give me an idea of where to finish at the edge. Without the tape it is very difficult to gauge the turning point as this bit is freehand. You find that when lining the second line on the spoke ones hand blocks the view of the first line so the tape helps to get both 'fishtails' the same. The line on the rim is the easiest, I put the wheel horizontal on a soft cloth and just rotate it whilst holding the pen, set the guide to put the line between the edge & the rivets. When it's dry, turn it over & repeat on the other side.
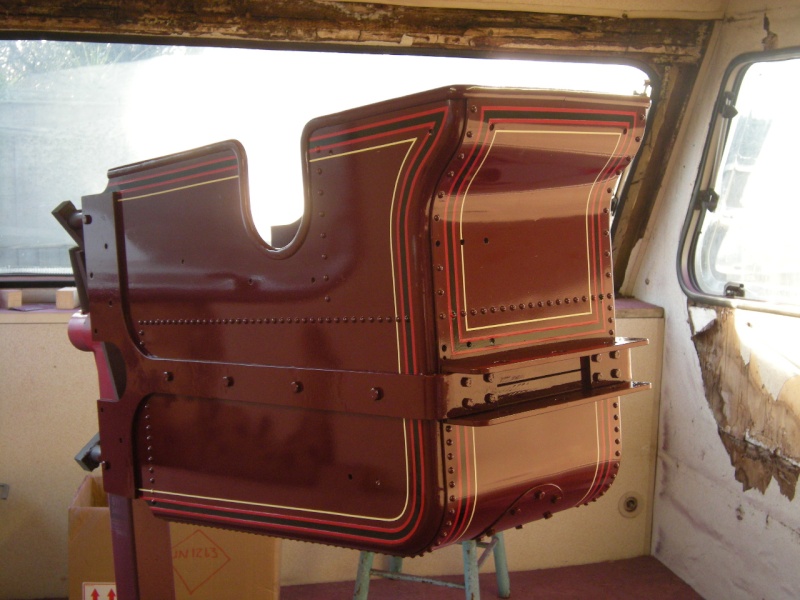
For the tender I found the beugler pen useless! I tried very hard to get a good finish but the rolled edge of the tender meant that to get straight & parallel lines was near impossible. I ended up washing it all off & walking away. Next day I used the Finesse lining tape which is time consuming but very good. To get the thick black line I used the F14 tape which is a double pinstripe however I only left the two outside lines leaving a 8mm black line. When this was dry (48hrs) I used the F9 to give a 3mm line in red either side of the black. The thin cream line is F11 which is 1.58mm and at the time the thinest one I could get however on the American website they do a thinner one of 0.8mm which is F29. To keep to scale the size should be 1mm, I am going to get some F29 for the next tender and see which looks best, I think the thinner line might just look better. When applying the tape I used a sharp scalpel and some very pointed tweezers which grip well on the end. The tape is put on in one piece & then you peel back the top clear layer to leave two brown layers on the tender giving you the stripe. They recommend that you leave the tape over long & stretch the end to seperate the two layers, I tried this & it didn't work! I then tried a scalpel to seperate the two layers but that was tricky, what worked best was the sharp tweezers just scratch away at a corner & it seems to peel up. This can then be pulled with the tweezers to leave the two brown layers on the tender. Bends are done by stretching the tape and up to a point work well. Very tight bends tend to either narrow the line or leave a thrupenny bit effect (showing my age there!) The curves on the tender are ok though. Corners are done by over lapping one layer on another and mitre the joint with the scalpel, peel away the bits you don't want. Next when all the lining tape is on I applied two coats of red & cream enamel, the first coat because the crimson lake is dark ended up showing through (grinning). The second coat was applied about 30 minutes after the first coat and then the masking tape is removed immediately. This again is tricky but the pointed tweezers managed to lift the corners ok & then I could grab the end and pull it off. Care is needed as the masking tape has a life of it's own & springs up to either wrap itself around your hand or some part of the tender, it's still covered in wet paint! If there are any little areas that the paint has bled through or if you have smudged a bit it's best to leave it until it's all dry & then either cut the thick paint away & over paint or just touch up as necessary. Hope this is of some interest to you and if anyone has a better way of doing it or any useful wrinkles I'll be glad to hear them.
The wheel still has it's masking tape on as I'm going to spray lacquer over it all next. I used the beugler pen/wheel for everything on the wheel. To create this effect I first of all used standard masking tape at the top & bottom of each spoke to give a start & stop run off. Then with a 3/8" wheel and the side guide set centrally I did one stroke from the hub to the rim. On the front face the oiler tube needs to be removed for access. Leave this to dry overnight, if you try & do to much at once you end up washing off all of it. When this is dry the cream lining is done with the smallest wheel that Beugler do, about .8mm. Set the guide to just touch the edge of the black and I used a piece of masking tape at the rim end to give me an idea of where to finish at the edge. Without the tape it is very difficult to gauge the turning point as this bit is freehand. You find that when lining the second line on the spoke ones hand blocks the view of the first line so the tape helps to get both 'fishtails' the same. The line on the rim is the easiest, I put the wheel horizontal on a soft cloth and just rotate it whilst holding the pen, set the guide to put the line between the edge & the rivets. When it's dry, turn it over & repeat on the other side.
For the tender I found the beugler pen useless! I tried very hard to get a good finish but the rolled edge of the tender meant that to get straight & parallel lines was near impossible. I ended up washing it all off & walking away. Next day I used the Finesse lining tape which is time consuming but very good. To get the thick black line I used the F14 tape which is a double pinstripe however I only left the two outside lines leaving a 8mm black line. When this was dry (48hrs) I used the F9 to give a 3mm line in red either side of the black. The thin cream line is F11 which is 1.58mm and at the time the thinest one I could get however on the American website they do a thinner one of 0.8mm which is F29. To keep to scale the size should be 1mm, I am going to get some F29 for the next tender and see which looks best, I think the thinner line might just look better. When applying the tape I used a sharp scalpel and some very pointed tweezers which grip well on the end. The tape is put on in one piece & then you peel back the top clear layer to leave two brown layers on the tender giving you the stripe. They recommend that you leave the tape over long & stretch the end to seperate the two layers, I tried this & it didn't work! I then tried a scalpel to seperate the two layers but that was tricky, what worked best was the sharp tweezers just scratch away at a corner & it seems to peel up. This can then be pulled with the tweezers to leave the two brown layers on the tender. Bends are done by stretching the tape and up to a point work well. Very tight bends tend to either narrow the line or leave a thrupenny bit effect (showing my age there!) The curves on the tender are ok though. Corners are done by over lapping one layer on another and mitre the joint with the scalpel, peel away the bits you don't want. Next when all the lining tape is on I applied two coats of red & cream enamel, the first coat because the crimson lake is dark ended up showing through (grinning). The second coat was applied about 30 minutes after the first coat and then the masking tape is removed immediately. This again is tricky but the pointed tweezers managed to lift the corners ok & then I could grab the end and pull it off. Care is needed as the masking tape has a life of it's own & springs up to either wrap itself around your hand or some part of the tender, it's still covered in wet paint! If there are any little areas that the paint has bled through or if you have smudged a bit it's best to leave it until it's all dry & then either cut the thick paint away & over paint or just touch up as necessary. Hope this is of some interest to you and if anyone has a better way of doing it or any useful wrinkles I'll be glad to hear them.

Steve Traill- Number of posts : 800
Age : 67
Location : Illogan Redruth Cornwall
Registration date : 2008-06-29
Lining the Burrell
![]() Rickster Mon 12 Apr 2010, 7:53 pm
Rickster Mon 12 Apr 2010, 7:53 pm
Hi Steve,
I found this really helpful - i will have to pluck up the courage and do mine pretty soon. A question though, I masked my wheels up as you have, now I can't get the tape off the rubber tyres without leaving half behind - the adhesive seems to really tacky - any ideas how I can get it off/clean up the tyres ?
Tender looks superb by the way.
Cheers
Rick
Rickster- Number of posts : 267
Location : canterbury, Kent
Registration date : 2010-02-19
Re: Lining the Burrell
![]() highpressure Mon 12 Apr 2010, 8:33 pm
highpressure Mon 12 Apr 2010, 8:33 pm
Hi Steve,
That tender looks really sharp and I also use the Finesse tapes which are available in the UK from www.pinstripinguk.com The thinest one they do is F55 which is 1/64 or 0.38 mm which is what I use for the inner line. What is the actual size of the complete set of lines on the full size then to scale down correctly?
Having said that the really thin line doesnt look at all bad as it makes it very delicate which I quite like.
Cheers Kev.
highpressure- Number of posts : 1096
Age : 57
Location : West Sussex, 4" DCC Road Loco
Registration date : 2008-06-18 -

Line thickness
![]() Steve Traill Mon 12 Apr 2010, 10:31 pm
Steve Traill Mon 12 Apr 2010, 10:31 pm
According to the Burrell Style book the line thickness is as below:
Wheels: Spokes, 7/8" black line down the centre, flanked by a 1/8" yellow line
Tender: 1" black line flanked either side by a 3/8" red line & then a 1" gap and a 1/8" yellow line
I make a 1/8" about 3mm so a 1mm line would be ideal for the yellow, 7mm for the black and 3mm for the red.
As far as the colour of the yellow the book says it varied from a cream to a dark straw colour, I've used the standard 'Craftmaster' cream & it compliments the Crimson lake nicely.
Regards
Steve
Steve Traill- Number of posts : 800
Age : 67
Location : Illogan Redruth Cornwall
Registration date : 2008-06-29
Re: Lining the Burrell
![]() Tim Watson Fri 16 Apr 2010, 2:14 am
Tim Watson Fri 16 Apr 2010, 2:14 am
Steve & Kev
"As far as the colour of the yellow the book says it varied from a cream to a dark straw colour"
Actually, the Burrell Style book describes 1/8" yellow lines as yellow lines, with white lines as the alternate. Important to remember that white in those days was actually off-white, compared to nowadays i.e. cream. The "cream to dark straw colour" refers to the colour of showman's wheels.
Richard Wilcox (livery expert RLS), in correspondance me with me regarding the showmans liveries, describes the yellow as 'lemon chrome yellow - 3/32" wide'. so the 1/32" F29 Finess tape would be spot on for this size.
Tim

Tim Watson- Number of posts : 585
Location : Herts
Registration date : 2008-07-02
Re: Lining the Burrell
![]() highpressure Thu 22 Apr 2010, 7:00 pm
highpressure Thu 22 Apr 2010, 7:00 pm
Thought I'd mention something I use which helps to ensure the lining is really crisp. After reading Julia's website for the construction of the SC I purchased a rubbing out tool along with the lining tapes and one shot paints. It is the shape and length of a pencil with a shaped rubber tip on each end and allows you to clean up and "push" wet paint around when you remove the tape to clean up edges and stray bits here and there. It has certainly made the few little bits on my stuff go away and has been very useful. From www.pinstripinguk.com it is called a "wipe out tool" and whilst it may seem a bit dear it is worth the cost.
highpressure- Number of posts : 1096
Age : 57
Location : West Sussex, 4" DCC Road Loco
Registration date : 2008-06-18 -
» Lining the 2" Burrell
» Today's progress
» Frederick SRL(S)
» Couple of pictures of burrell in build
» Lynn Robinson 4" water bowser
» Today's progress
» Frederick SRL(S)
» Couple of pictures of burrell in build
» Lynn Robinson 4" water bowser
Page 1 of 1
Permissions in this forum:
You cannot reply to topics in this forum|
|
|