Bill's 6" Foden SWB Lorry
+23
phil gomez
hartshaulage
ejparrott
highpressure
SSGR
mikero
atomenter
Hecter
martinj
iain
Brian M
Steam Traction World
Tony King
Tim Watson
HStannard
Dan
lynnr
bjwlancashire
MrStationHouse
hippy dave
IanL
Robfishman
burrell1
27 posters
Page 4 of 7
Page 4 of 7 •  1, 2, 3, 4, 5, 6, 7
 Rear brake drum
When I fitted the friction material to my brake drum I had no problems at all except for holding it into place whilst the glue set. To do this I used a number of small clamps which did the job. I hope that everything goes OK for you.


burrell1- Number of posts : 156
Location : Clacton, Essex
Registration date : 2008-06-19
 Re: Bill's 6" Foden SWB Lorry
Did it not feel like it was gonna snap though? like when you bends ours it will bend but gets to a point and feels like its gonna snap. also had some bother with the part of the brake that fits around the axle not fitting properly -_-
Hecter- Number of posts : 50
Age : 30
Location : Luton
Registration date : 2013-02-13
 Fitting the water tank
Although I have had my water tank sealed and painted for some time I have not managed to arrange help in fitting it. I was also a bit concerned about how to fit it but having spoken to Ian at the Banbury Rally he did give me some good advice. He said that I would need to lift the front of the chassis in order to slide the tank in. I decided to jack the front axle up and to place wooden blocks under the front wheels. The wooden blocks were about 4” square and this proved to give enough clearance. I placed a blanket underneath the chassis in order to cushion the water tank and to give a surface on which to slide the tank. I then put a blanket over the rear axle and covered the diff and brake drum in order to stop them damaging the paint. I loosely bolted the front support plates together but did not fit them at this stage as I thought that they may get in the way. With the assistance of my apprentice we then manoeuvred the tank under the chassis and up onto the rear axle. We then moved the tank gently into place. I was surprised how easy the job was too achieved and we only managed to put a half inch scratch in the tank paintwork. With the rear of the tank in place we lifted the front of the tank and then kept it in place with a trolley jack. I was then able to bolt the front supports to the chassis/handbrake support and then attached them to the front of the tank. I hope that this helps anyone who has not already fitted their thank.


burrell1- Number of posts : 156
Location : Clacton, Essex
Registration date : 2008-06-19
 Kit 14 Smoke box and chimney
When I collected my kit 14 this afternoon I was surprised as to how heavy the smoke box and the base of the chimney were. I have so far only had the chance to un-pack the boxes and to check the parts but I am planning to sit down this evening in order to be able to read the instructions. As our last “kit” was a deposit for the cylinder block it feels like a long time ago since we last had something to build. It now looks like we have got quite a bit of work to do in order to prepare this kit ready for painting. Unfortunately my kit is going to have to wait, as I am off to a steam rally this week-end with my traction engine. One interesting thought is, if I have got my calculations correct, we are already nearly at the half way point with our build. The lorry build consists of 30 kits but 3 of these kits are deposits, which leaves 27 kits. The half way point it therefore 13 1/2 kits and we are on kit 13 not counting the two deposits we have already made.
Bill

Bill

burrell1- Number of posts : 156
Location : Clacton, Essex
Registration date : 2008-06-19
 Smoke box and chimney
I have at last completed and painted the smoke box and chimney for my Foden lorry. Before I started painting it I wasn’t certain if I should use mat or gloss paint but now that it is painted I am glad that I decided on gloss. In the instructions Steve said that fitting the Foden badge would be a bit of a fiddle, as we needed to fit the baffle plate at the rear of the smoke box door prior to painting and this did not leave much room for the badges nuts and washers. Thankfully when the time came to fit the badge it went on quite easily. All we need now is a boiler to fit the smoke box onto.
Bill

Bill

burrell1- Number of posts : 156
Location : Clacton, Essex
Registration date : 2008-06-19
 Re: Bill's 6" Foden SWB Lorry
looks good. I'm going for gloss too :-)
Want to make some mods to my chimney though. Its not particularly round and its hard work getting the top to fit at all. Got a plan though to make the top easily removable for cleaning.
Want to make some mods to my chimney though. Its not particularly round and its hard work getting the top to fit at all. Got a plan though to make the top easily removable for cleaning.
iain- Number of posts : 172
Location : Lincoln
Registration date : 2012-09-11
elwood-59 likes this post
 Cylinder block
I have now collected the replacement cylinder block for my Foden lorry from the factory and have only two comments to make, it is very heavy and it is a fantastic piece of engineering. This kit does not consist of many parts and due to the quality of the work it does not require very much cleaning up before painting. (The pictures of the cylinder block were taken before any cleaning took place) It seems a shame that the cylinder block will be hidden under a cover when the lorry is completed. Having cleaned the surface of the casing, the first task that I completed was to fit the transfer port cover to the underside of the cylinder block. This cover will not be seen when the cylinder block is fitted to the boiler but the heads of the bolts had to be reduced so that they did not protrude above the curve of the saddle. The two remaining tasks were very much more important and needs more time spent on them. The first was to remove the burrs from the valve faces and then to improve the faces without causing any dishing to the surfaces. I spent quite a bit of time on the last task, which was to polish the regulator face plate before fitting it.


burrell1- Number of posts : 156
Location : Clacton, Essex
Registration date : 2008-06-19
 Re: Bill's 6" Foden SWB Lorry
Your right it looks lovely, and quite a lump. I can see why machining them took such a long time.
 Kit 18
The factory has managed to dispatch kit 18 to us before the Christmas holiday. This kit contains a large number of parts which will need cleaning and painting but when this has been completed we will have some parts to bolt onto the chassis for a change. The kit contains the horn plates, cab floor and front mudguards. The kit also contains the back plate with the gear change assembly. I have made a start on cleaning the parts to-day and formularising myself with the parts and fittings. The only thing in the instructions that concerned me is that the top bracket for the mudguards will be using the same hole in the chassis which we used to attach the bump stops. This will require the removal of one nut and bolt from each side of the chassis used to secure the bump stops. The fitting of the bump stops was a real challenge and the advice at the time was to turn the chassis over to fit them, which is no longer an option. Whilst mentioning the mudguards, Steve is planning to supply an option of elaborate replacement mudguards at an extra cost. These mudguards will have a rolled edge and beading. I have already e-mailed Steve and put my name down for a set.
Bill

Horn plates, Back plate and cab floors. Also on the left is part of the front mudguards.

Bill

Horn plates, Back plate and cab floors. Also on the left is part of the front mudguards.

burrell1- Number of posts : 156
Location : Clacton, Essex
Registration date : 2008-06-19
 Front mudguard supports
As I was worried about having to replace two of the bolts for the bumper stops, in order to attach the front mudguard supports, I decided to prioritise this job. The reason for my concern was that we had problems fitting these bolt originally. Having already painted the support I decided to have a go at fitting them this morning. In the end the task turned out to be very straight forward and only took me about five minutes. By using the longer bolts it was possible to get the nut onto the end of the bolt and to start turning it by hand prior to using a small socket set to complete the task. I also replace the nut with a stainless steel one as it would be impossible to fully paint it when fitted and I did not want it start leaking rust in the future. I would suggest that for the new builders who have yet to fit the bumper stops, that they consider using longer bolts, if they are not supplied, as this may make the task a lot easier.
Bill

Bill

burrell1- Number of posts : 156
Location : Clacton, Essex
Registration date : 2008-06-19
 Kit 17 Cylinder Accessories
Kit 17 the cylinder accessories arrived this morning. I think that this kit must be the smallest and lightest one we have received to date. This is because the kit contains a large number of small items which when fitted will complete the cylinder block assembly. Unfortunately we are still waiting for a company to supply the piston rings, which will prevent use completing the dry assembly. However we still have plenty to do whilst we wait. With the instructions Steve gave details of a company with a supply of Coats of Arms for the chimneys of our Fodens. I have telephoned Barry Boyce from Yorkshire Model Engineering Supplies and place an order for one. When I receive it I will post a photo on the forum.
Bill


Bill


burrell1- Number of posts : 156
Location : Clacton, Essex
Registration date : 2008-06-19
 Foden Badge
Hi Guys
I have attached a pic of the Foden Badge that I bought from Barry at Pickering a couple of years ago. At that time he was trying to get them with a bit more finer detail in them.
Regards
Tom

I have attached a pic of the Foden Badge that I bought from Barry at Pickering a couple of years ago. At that time he was trying to get them with a bit more finer detail in them.
Regards
Tom


atomenter- Number of posts : 178
Location : NORTH EAST SCOTLAND
Registration date : 2008-06-26
 Re: Bill's 6" Foden SWB Lorry
Barrys contact details are:
Barry Boyce
Yorkshire Model Engineering Supplies
2 Canterbury Drive
Sutton
Hull
Yorkshire
HU8 9US
Business Phone Number: 01482 786 534
Regards
Steve
Barry Boyce
Yorkshire Model Engineering Supplies
2 Canterbury Drive
Sutton
Hull
Yorkshire
HU8 9US
Business Phone Number: 01482 786 534
Regards
Steve
 Coat of Arms
My Coat of Arms arrived in the post this morning, which was not bad as I only ordered them less than 24 hours ago. I have not polished then up yet but they already look very good. They cosy £60 plus £3 post and package but I think that they are worth it as they will give my lorry that something extra.
Bill

Bill

burrell1- Number of posts : 156
Location : Clacton, Essex
Registration date : 2008-06-19
 Re: Bill's 6" Foden SWB Lorry
Is that the six-inch version Bill?
Mike
Mike

mikero- Number of posts : 261
Location : Brighton
Registration date : 2011-07-19
 Foden Badge
Hi there
There is a lot more detail on this badge than the one I bought for the 41/2" . All it needs now is a bit of colour to save polishing!!

Regards
Tom
There is a lot more detail on this badge than the one I bought for the 41/2" . All it needs now is a bit of colour to save polishing!!

Regards
Tom

atomenter- Number of posts : 178
Location : NORTH EAST SCOTLAND
Registration date : 2008-06-26
 Coat of Arms
Hi Mike
Yes that is the 6 inch version, I have not seen the 4 1/2 inch version yet.
Bill
Yes that is the 6 inch version, I have not seen the 4 1/2 inch version yet.
Bill
burrell1- Number of posts : 156
Location : Clacton, Essex
Registration date : 2008-06-19
 Coat of Arms
This morning I have given my Coat of Arms a quick polish to see what it is going to look like. Unfortunately the attached picture does not do it justice as it looks much better than in the picture. I am now going to give some thought as to how I am going to mount it on the chimney.
Bill

Bill

burrell1- Number of posts : 156
Location : Clacton, Essex
Registration date : 2008-06-19
 Progress with Kit 18
As I spent the last month enjoying living in a hot country I have got a bit behind with my lorry build, as I couldn’t take it on the plane with me. For those of you not building a 6” Foden we received kit 18 prior to kit 17, which has just arrived. I have still not completed the painting of the boiler horn plates but everything else is ready to go. I have this morning fitted the cab floors which are the first parts to have my chosen body work colour of dark gloss green painted on them. For our northern builders they may be interest to know that the colour is Highland Railway 1912 – 1921 dark green.
Bill

Bill

burrell1- Number of posts : 156
Location : Clacton, Essex
Registration date : 2008-06-19
 Kit 17 progress
I have had quite a good time this week working on Kit17 of my Foden lorry. I have managed to fit the regulator assemble and the slide value assembles. I have also managed to clean up all the other parts ready for painting. I am planning to start the painting next week. The hope is that the piston rings and pistons will then be delivered at the end of February and can be fitted.
Bill


Bill


burrell1- Number of posts : 156
Location : Clacton, Essex
Registration date : 2008-06-19
 Re: Bill's 6" Foden SWB Lorry
That's one seriously impressive cylinder assembly!
Tim
Tim

Tim Watson- Number of posts : 585
Location : Herts
Registration date : 2008-07-02
 Cylinder block
I have now completed the task of painting the accessories for my Foden cylinder block which came with the last kit and I am looking forward to the next kit arriving. Although we will be unable to permanently fit these parts onto the cylinder block until it has been attached to the boiler, I decided to fit them now just to see what they will look like. I think that the words large and impressive come to mind. It seems a bit of a shame that when the lorry is completed the cylinder block will be hidden away under a cowling. We have not yet been informed what your next kit will be but I expect that all the Foden builders are hoping that the boilers will arrive soon.
Bill


Bill


burrell1- Number of posts : 156
Location : Clacton, Essex
Registration date : 2008-06-19
 Re: Bill's 6" Foden SWB Lorry
Looks great Bill.
John
John

SSGR- Number of posts : 88
Age : 59
Location : North Yorkshire
Registration date : 2012-05-14
 kit 21 - The Crankshalf
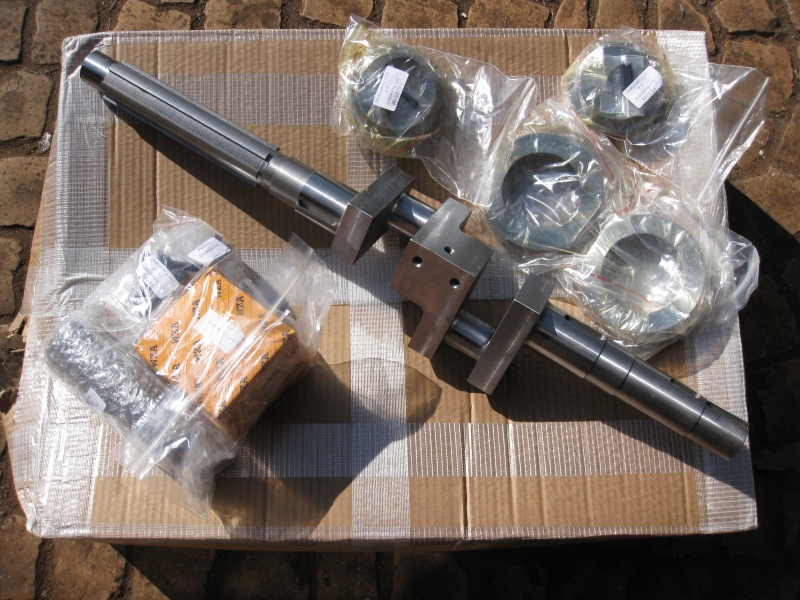
Kit number 21 for my Foden lorry arrived this morning. I have not as yet had the time to play with it but the crankshaft looks really good. I will spend this afternoon having a read at the instructions. This kit consists of only eight parts but one of these is the crankshaft which is a superb bit of machining. In the introduction to this kit Steve points out that the crankshaft is one of the key components of our engines and that time and care should be taken over fitting it correctly along with the eccentrics. He also said that the engine will be relatively high revving, at between 400 and 500 rpm.
Bill

Bill

burrell1- Number of posts : 156
Location : Clacton, Essex
Registration date : 2008-06-19
 Re: Bill's 6" Foden SWB Lorry
The stuff these guys produce is first rate!! The quality and attention to detail is really excellent, no wonder I get really angry when punters knock STW and kit builds in general!! 

 My general reply these days is "Show me your efforts and have a better finish or FO". It very interesting to see the other builds and the various componenets that go into them, as a contiuning user of the forum you get to learn a lot more about other steam driven stuff too.
It would be really something if we could get as many engines together again in a few years to see the vast amount of machining and effort that has gone into them.
It would be really something if we could get as many engines together again in a few years to see the vast amount of machining and effort that has gone into them.
Page 4 of 7 •  1, 2, 3, 4, 5, 6, 7
 Similar topics
» 6" foden lorry
» Foden Lorry kit 27
» 4.5" Foden SWB lorry
» 6" Foden lorry kits
» The Engine Shed. Photo gallery.
» Foden Lorry kit 27
» 4.5" Foden SWB lorry
» 6" Foden lorry kits
» The Engine Shed. Photo gallery.
Page 4 of 7
Permissions in this forum:
You cannot reply to topics in this forum