
Road Loco - 'Blackbeard'
Page 10 of 17 •  1 ... 6 ... 9, 10, 11 ... 13 ... 17
 ![]()
Re: Road Loco - 'Blackbeard'
![]() ejparrott Wed 27 Feb 2013, 1:25 pm
ejparrott Wed 27 Feb 2013, 1:25 pm
ejparrott- Number of posts : 118
Location : Rugby
Registration date : 2012-09-27
Re: Road Loco - 'Blackbeard'
![]() IanL Wed 27 Feb 2013, 6:57 pm
IanL Wed 27 Feb 2013, 6:57 pm
Ian

IanL- Number of posts : 437
Age : 68
Location : Nottinghamshire
Registration date : 2011-07-25
Re: Road Loco - 'Blackbeard'
![]() Steam Traction World Thu 28 Feb 2013, 8:57 am
Steam Traction World Thu 28 Feb 2013, 8:57 am
This is the second failure we’ve had following field trials and they’ve both suffered problems in the same area. That is, between the exhaust and main steam inlet cores. I had chance to have a good look at the first failure and surprisingly the material thickness between the two cores was quite thick. There was also no indication that any of the cores had broken during casting. I’ve raised the issue with the foundry but even they have not been able to offer an explanation.
We give every cylinder a thorough examination before we start machining it as there’s over ten hours of machining in every block, let a lone the set up time. Included in this examination is an extensive prodding and poking around every core primarily to dislodge any remaining core sand. Both failures are quite visible now. I’m sure we would have seen this on our inspection, or at least we should have done. All I can conclude is that there may have been some crud present that obscured the fault from view. Perhaps the steaming/pressure dislodged it? To be honest though, I wouldn’t have predicted any problems in this area of the block, I expected them to be at the other end which is the highest point when they’re cast.
Without trying to diminish the impact on Brian personally, to some extent these sorts of problems are to be expected. With some 29 cores in each block it represents a very complicated casting indeed. That’s partly why we cut the first few casting up and why we pressure impregnate each casting after they’re machined. We initially investigated various forms of NDT such as ultrasound and x-ray but neither of these processes seemed particularly helpful because of the cylinders internal construction. They were very expensive as well.
For future production, we’re going to pressure test the main steam passage to the regulator chamber. This may not eliminate all potential internal problems but it would have found the problem in both Brian’s and the previous case.
Finally, I just want to comment on Brian’s observations on the use of Foliac. DON’T SKRIMP ON IT, particularly on the boiler to cylinder jointing. I would rather deal any mess it creates rather than have to take the block off because of inadequate application. Again I speak from personal experience.
Regards
Steve
Steam Traction World- Admin
- Number of posts : 946
Location : Daventry UK
Registration date : 2008-06-18 -

Re: Road Loco - 'Blackbeard'
![]() ejparrott Thu 28 Feb 2013, 1:20 pm
ejparrott Thu 28 Feb 2013, 1:20 pm
ejparrott- Number of posts : 118
Location : Rugby
Registration date : 2012-09-27
Re: Road Loco - 'Blackbeard'
![]() bjwlancashire Thu 28 Feb 2013, 5:03 pm
bjwlancashire Thu 28 Feb 2013, 5:03 pm
Brian

bjwlancashire- Number of posts : 938
Location : Mellor, Lancashire
Registration date : 2010-09-07
Still making progress
![]() bjwlancashire Fri 01 Mar 2013, 6:23 pm
bjwlancashire Fri 01 Mar 2013, 6:23 pm
Hope to get the fabric on the roof tonight and get some primer on the wood....


bjwlancashire- Number of posts : 938
Location : Mellor, Lancashire
Registration date : 2010-09-07
Re: Road Loco - 'Blackbeard'
![]() Tony King Fri 01 Mar 2013, 6:51 pm
Tony King Fri 01 Mar 2013, 6:51 pm
Hopefully you'll be able to run your engine safely with all the mods you're doing, without taking the roof off as Kev (Highpressure) is doing.... be interesting to see how you get on, (keep the pics coming!!) as I'm determined to be able to use the Showmans with it's roof in place on the highway!!
Regards,
Tony
Tony King- Number of posts : 856
Age : 68
Location : scotland
Registration date : 2008-10-31
Re: Road Loco - 'Blackbeard'
![]() bjwlancashire Fri 01 Mar 2013, 7:58 pm
bjwlancashire Fri 01 Mar 2013, 7:58 pm
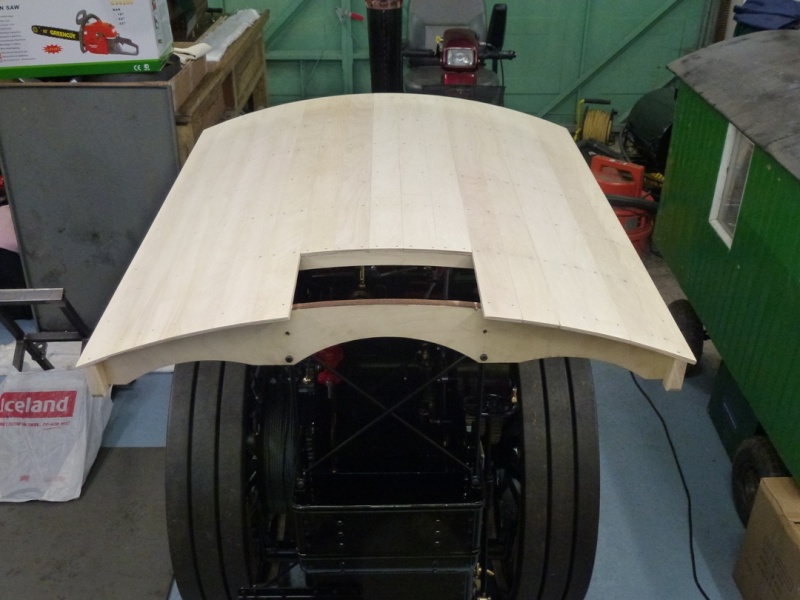
Thats why I want to keep it on, it looks a beast. I think it will be painted white now although I had thought about satin or matt black. Underneath may be varnished but the the cross braces are only made from plywood and the edges show this - plus they are burnt from the cutting process. Otherwise, it might be grey.
The regulator extension is a realtively easy thing to do once the seat frame is on and easy to make removable. The main thing is the fact that an extension rod will run over the top of the coal bunker so some thought will have to be given to how to fire on the go and getting the coal in without the roof on can be challenging - maybe a chute would work.
When Tim and I were discussing this he was thinking of taking a new rod from the end of the regulator rod near the cylinder and running it up high at the rear of the canopy to enable you to still be able reach between the rear canopy supports on the showmans engine, the road loco has the cross braces so firing would have to be done by reaching around. A sharper bend on the shovel may help as the angle of attack currently means it slopes forward quite a lot and the coal falls off if your not careful, even just stood by the engine with the roof off.
Brian
PS: Hope to see Brian Morgan's engine at the Manchester show this weekend, looking forward to that.
bjwlancashire- Number of posts : 938
Location : Mellor, Lancashire
Registration date : 2010-09-07
Re: Road Loco - 'Blackbeard'
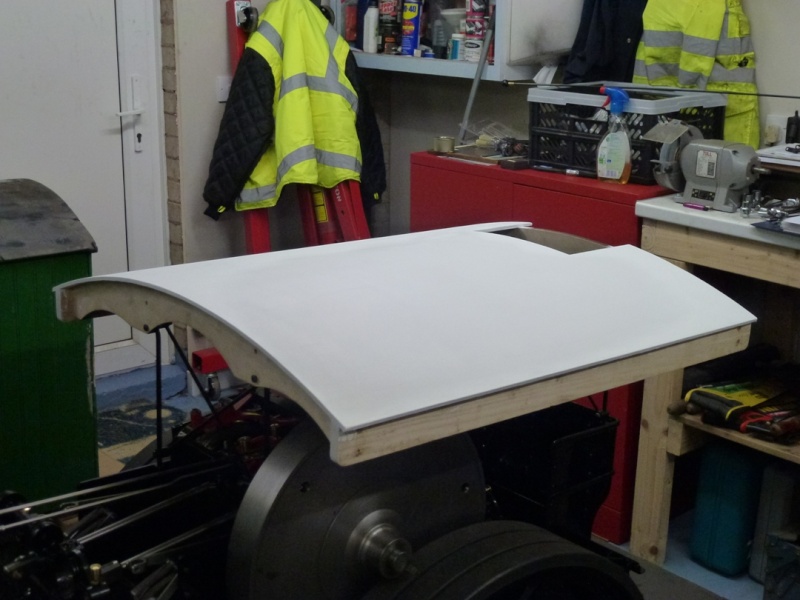
![]() bjwlancashire Thu 14 Mar 2013, 5:37 am
bjwlancashire Thu 14 Mar 2013, 5:37 am
A liberal application of PVA as used for sealing various materials.

Calico pulled tight and laid ontop (after my wife kindly ironed it after doing my shirts for the following week's business trips).


Edges wrapped after adding yet more PVA
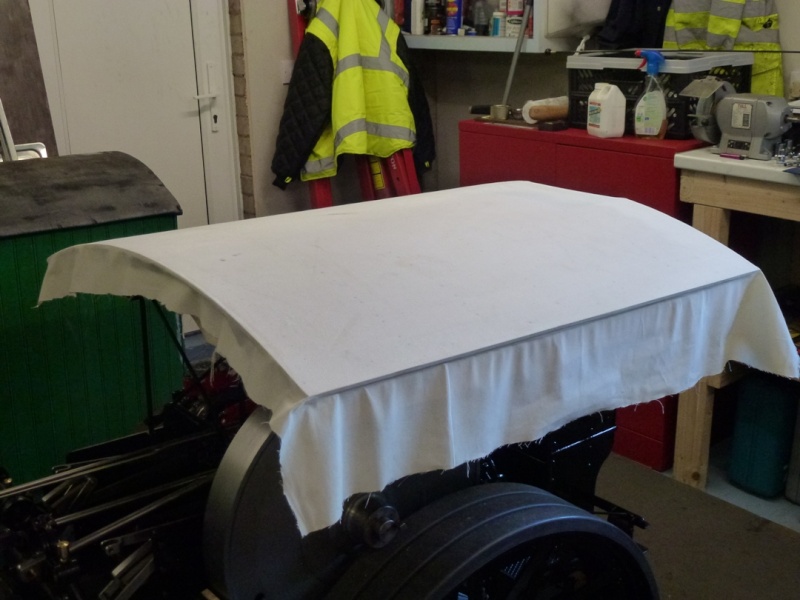
Two good coats of primer. Need to curve and trim to length the rain beading, prime it and fit it before starting to paint the roof black.

bjwlancashire- Number of posts : 938
Location : Mellor, Lancashire
Registration date : 2010-09-07
Re: Road Loco - 'Blackbeard'
![]() IanL Thu 14 Mar 2013, 8:33 am
IanL Thu 14 Mar 2013, 8:33 am
Looking very good, I note you are planning on painting the roof black, this will get very hot in the sunshine,( well it may this year) it will make the beer warm. On a friends narrow boat he repainted his boat roof cream prior to that it as dark green and it was too hot to touch on a sunny day, now you can lean on it without burning your arm.
Ian
Last edited by IanL on Thu 14 Mar 2013, 8:52 pm; edited 1 time in total
IanL- Number of posts : 437
Age : 68
Location : Nottinghamshire
Registration date : 2011-07-25
Re: Road Loco - 'Blackbeard'
![]() Tony King Thu 14 Mar 2013, 8:36 am
Tony King Thu 14 Mar 2013, 8:36 am
Hopefully won't be long before "we Showman's people" are receiving great long lengths of wood for our roof's
Are you making a panel to fit the cut out in your roof or leaving as is? It actually looks OK with the "cut out" !!
Be interested to see your mods to the controls when you get round to it too!
Regards,
Tony
Tony King- Number of posts : 856
Age : 68
Location : scotland
Registration date : 2008-10-31
Re: Road Loco - 'Blackbeard'
![]() bjwlancashire Fri 15 Mar 2013, 2:42 am
bjwlancashire Fri 15 Mar 2013, 2:42 am
Whan I sat on the seat with the roof all white after applying the PVA it was blinding and as I hope to keep the roof on then I decided I wanted to reduce the glare from it. Dont forget , only the showmans engines are used as leaning posts
Tony
The Calico material is inlcuded with the kit. The hole will be filled with a small roof piece made from the five short pieces I cut off the end of the planks. They were cut accuratelty with a razor saw to ensure the minimum amount of waste from cutting. I got an additional roof cross member from STW which I will cut into two short lenghts for use with the off cuts to make a mini roof section. Once covered with Calico it shoud be a snug fit. I just need to put a narrow strip of wood )say 3mm x 6mm) on the rear of the visible cross member so that the front of the removeable peice has somewhere to sit. I did it this way rather than try to fit the planks only halfway accross the cross member and have the pins coming out of the side.
Just for your info I intend to varnish the underside of the roof after polishing the wood.
Cheers
Brian
bjwlancashire- Number of posts : 938
Location : Mellor, Lancashire
Registration date : 2010-09-07
Re: Road Loco - 'Blackbeard'
![]() mikero Fri 15 Mar 2013, 1:55 pm
mikero Fri 15 Mar 2013, 1:55 pm
From my experience a bright white roof becomes a dull oily-grey roof within minutes of lighting the fire.
Mike
mikero- Number of posts : 261
Location : Brighton
Registration date : 2011-07-19
Re: Road Loco - 'Blackbeard'
![]() ejparrott Fri 15 Mar 2013, 4:55 pm
ejparrott Fri 15 Mar 2013, 4:55 pm
ejparrott- Number of posts : 118
Location : Rugby
Registration date : 2012-09-27
Re: Road Loco - 'Blackbeard'
![]() highpressure Fri 15 Mar 2013, 7:11 pm
highpressure Fri 15 Mar 2013, 7:11 pm
highpressure- Number of posts : 1096
Age : 57
Location : West Sussex, 4" DCC Road Loco
Registration date : 2008-06-18 -
Re: Road Loco - 'Blackbeard'
![]() Flasback Fri 15 Mar 2013, 8:32 pm
Flasback Fri 15 Mar 2013, 8:32 pm
Chetwode Arms
Street Lane
Lower Whitley
Cheshire
Wa4 4EN
if not you are.........
Flasback- Number of posts : 191
Location : Cheshire
Registration date : 2011-01-30
Re: Road Loco - 'Blackbeard'
![]() bjwlancashire Sat 16 Mar 2013, 2:49 pm
bjwlancashire Sat 16 Mar 2013, 2:49 pm
Cheers
Brian
bjwlancashire- Number of posts : 938
Location : Mellor, Lancashire
Registration date : 2010-09-07
Re: Road Loco - 'Blackbeard'
![]() Steam Traction World Sun 17 Mar 2013, 2:58 pm
Steam Traction World Sun 17 Mar 2013, 2:58 pm
You'll be pleased to know that the big machine was repaired at the end of last week so as soon as we've machined the boilers that are scheduled on next the replacement blocks will be on as the next priority.
Dean
Steam Traction World- Admin
- Number of posts : 946
Location : Daventry UK
Registration date : 2008-06-18 -
Re: Road Loco - 'Blackbeard'
![]() bjwlancashire Sun 17 Mar 2013, 4:19 pm
bjwlancashire Sun 17 Mar 2013, 4:19 pm
Thanks for the update, that is excellent news, just make sure you keep putting 50p in the meter so it can keep running.
Brian
bjwlancashire- Number of posts : 938
Location : Mellor, Lancashire
Registration date : 2010-09-07

Robfishman- Number of posts : 1061
Age : 49
Location : Chandlers Ford Hants 4" showmans & 4" Roller
Registration date : 2010-11-26 -
Roof and seat frame progress
![]() bjwlancashire Mon 25 Mar 2013, 4:20 pm
bjwlancashire Mon 25 Mar 2013, 4:20 pm
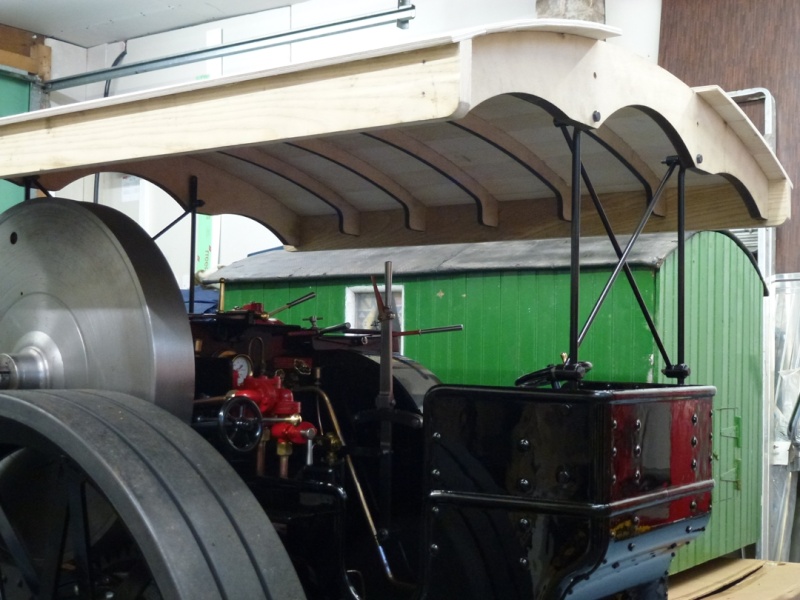
However, A little more progress on the roof as the insert for the cutout is currently being made - the frame was made using an additional cross member STW provided for me to cut up. A 6mm square piece of wood was also glued/pinned to the back edge of the roof cross brace that forms one side of the opening to form a ledge for the ends of the planks to sit on once they are fixed to the frame.
Roof has a now had a coat of black bitumen paint on it too, another one to go.


I have also been working on the seat frame modifications I felt were necessary, the photos show the part prior to weldiing. There is an extra mounting bracket with a square tube spacer to prevent the seat from tipping sideways and give a more robust fix into the drawbar.
Additonally there is an additional steel angle to be welded over the part that hangs over the tender back. This will spread the load to the tender sides to prevent the flex that is evident in the tender rear panel when you put load onto the existing seat frame design, especially if your going to have a two seater unit. The step between the provided mounting face and the extended angle above it will ensure all surfaces are touching at the same time. I will also make pads from cork sheet with holes cut in to clear the rivets.
The other piece you can see is the pivot for the extended regulator. The piece in the photo needs turning down at the end before welding but you can see the idea - more to follow.


Last edited by bjwlancashire on Thu 31 Oct 2013, 6:28 pm; edited 1 time in total
bjwlancashire- Number of posts : 938
Location : Mellor, Lancashire
Registration date : 2010-09-07
Re: Road Loco - 'Blackbeard'
![]() ejparrott Mon 25 Mar 2013, 5:03 pm
ejparrott Mon 25 Mar 2013, 5:03 pm
Super work sir!
ejparrott- Number of posts : 118
Location : Rugby
Registration date : 2012-09-27
Re: Road Loco - 'Blackbeard'
![]() Tony King Mon 25 Mar 2013, 7:12 pm
Tony King Mon 25 Mar 2013, 7:12 pm
Regards,
Tony
Tony King- Number of posts : 856
Age : 68
Location : scotland
Registration date : 2008-10-31
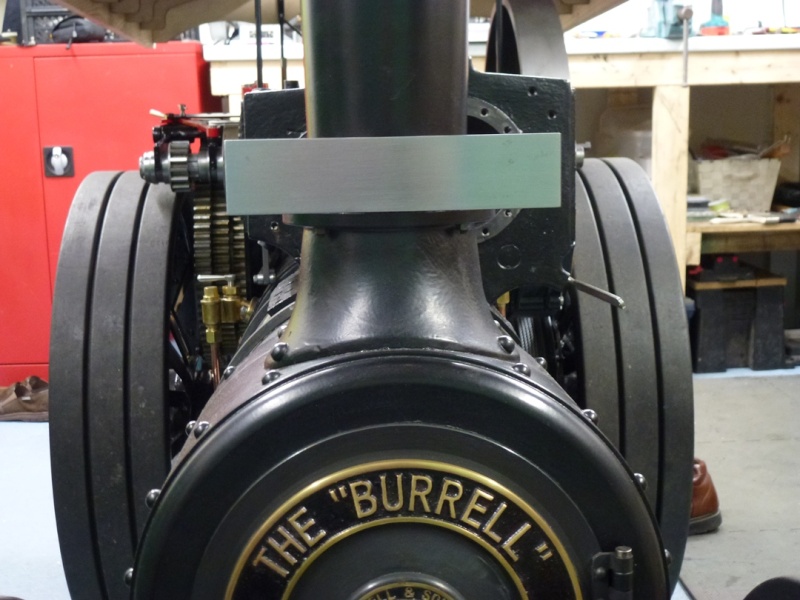
Fornt Number Plate Bracket
![]() bjwlancashire Wed 03 Apr 2013, 8:13 pm
bjwlancashire Wed 03 Apr 2013, 8:13 pm
bjwlancashire- Number of posts : 938
Location : Mellor, Lancashire
Registration date : 2010-09-07
Re: Road Loco - 'Blackbeard'
![]() bjwlancashire Thu 04 Apr 2013, 9:32 pm
bjwlancashire Thu 04 Apr 2013, 9:32 pm


bjwlancashire- Number of posts : 938
Location : Mellor, Lancashire
Registration date : 2010-09-07
Page 10 of 17 • 1 ... 6 ... 9, 10, 11 ... 13 ... 17 ![]()
» STW 2" road loco
» Kit 30B - The Road Loco Roof
» Thetford Works (Cornwall)
» Showman vs RL
|
|
|