
Rob & Tash Showmans
Page 4 of 21 •  1, 2, 3, 4, 5 ... 12 ... 21
 ![]()
Re: Rob & Tash Showmans
![]() Robfishman Tue 27 Mar 2012, 9:23 pm
Robfishman Tue 27 Mar 2012, 9:23 pm
IanL wrote:Rob and Lynn,
GOLD LEAF !!
OK I give in
Ian
Can't be difficult.....famous last words there. It is possible to buy it on a roll in a couple of widths so it may actually be easier than it looks.
Ok I know it's a bit extravagant and not really necessary and arguably a bit OTT but should look great against the ex mayor blue we are using. I think the imitation gold paint would just not look as good.
Last edited by Robfishman on Tue 27 Mar 2012, 10:29 pm; edited 1 time in total

Robfishman- Number of posts : 1061
Age : 49
Location : Chandlers Ford Hants 4" showmans & 4" Roller
Registration date : 2010-11-26 -

Re: Rob & Tash Showmans
![]() Robfishman Tue 27 Mar 2012, 10:12 pm
Robfishman Tue 27 Mar 2012, 10:12 pm
Gold leaf - http://www.stonehouses.co.uk/product_list.php?id=914
Imitation Gold Leaf - http://www.stonehouses.co.uk/product_list.php?id=926
Robfishman- Number of posts : 1061
Age : 49
Location : Chandlers Ford Hants 4" showmans & 4" Roller
Registration date : 2010-11-26 -
Re: Rob & Tash Showmans
![]() Robfishman Thu 29 Mar 2012, 9:09 pm
Robfishman Thu 29 Mar 2012, 9:09 pm
Robfishman- Number of posts : 1061
Age : 49
Location : Chandlers Ford Hants 4" showmans & 4" Roller
Registration date : 2010-11-26 -
Re: Rob & Tash Showmans
![]() Robfishman Sun 01 Apr 2012, 10:18 pm
Robfishman Sun 01 Apr 2012, 10:18 pm
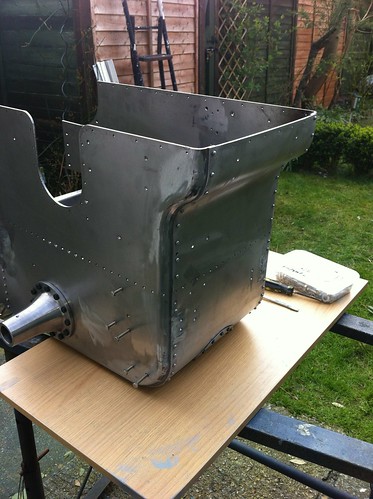
Has anyone else had this problem, or can anyone see where we have gone wrong?

Umm. by Robert R&N, on Flickr
For information if I take the top off and fit the front plate (as I did the first time) the top plate runs up hill, and although the holes at the back line up by the time you get to the front they are way off suggesting the front plate may be to big?
Last edited by Robfishman on Mon 02 Apr 2012, 7:13 am; edited 1 time in total (Reason for editing : Image link corrected.)
Robfishman- Number of posts : 1061
Age : 49
Location : Chandlers Ford Hants 4" showmans & 4" Roller
Registration date : 2010-11-26 -
Re: Rob & Tash Showmans
![]() IanL Sun 01 Apr 2012, 10:47 pm
IanL Sun 01 Apr 2012, 10:47 pm
When I built my tender I put the top in last, but did initially put it all together using a number of bradawls to hold the various pieces together Clecos would have been better but I do not have any. Just as with the belly tank I found the front panel did not have particularly square edges. The other issue I found was the bottom corners of the front panel needed a bit of persuasion to fit in tightly, it was these corners that really lifted my front panel. Even after working on these corners I did find that the top panel still needed the front few holes running a drill bit through but certainly no more than quarter a hole.
Looking at your picture have the sides of the tender bulged slightly, also are the lower corners of the sides and base slightly less than 90degrees ie. they may need easing down. These two changes could help gain a little extra space of or the front panel.
I did find the tender a real challenge to get the panels to meet where they should.
Good luck
Ian

IanL- Number of posts : 437
Age : 68
Location : Nottinghamshire
Registration date : 2011-07-25
Re: Rob & Tash Showmans
![]() Robfishman Mon 02 Apr 2012, 7:10 am
Robfishman Mon 02 Apr 2012, 7:10 am
I'll have another look at it this evening.
Robfishman- Number of posts : 1061
Age : 49
Location : Chandlers Ford Hants 4" showmans & 4" Roller
Registration date : 2010-11-26 -
Re: Rob & Tash Showmans
![]() lynnr Mon 02 Apr 2012, 8:20 am
lynnr Mon 02 Apr 2012, 8:20 am
I did not have any problem. I put the tender floor in fully and the bottom. Then effectively press fitted the front panel using sash clamps. Everything was very tight but all lined up once the panel was in. No holes drilled.

lynnr- Number of posts : 3242
Age : 55
Location : Highland, 4inch showman
Registration date : 2010-08-06
Re: Rob & Tash Showmans
![]() IanL Mon 02 Apr 2012, 8:29 am
IanL Mon 02 Apr 2012, 8:29 am
I think the variation in fit is probably due to the bends on the panels springing slightly after being bent. I had a really tough time with the top rear corners as the right hand side panel curved inwards on the top edge even with cramps and using a persuader I had too accept a non perfect fit. It is only noticeable when placing the tender extension on top as that was perfect and is slightly wider 3mm than my tender top. Nobody will probably notice but I know it is there!!!
Ian
IanL- Number of posts : 437
Age : 68
Location : Nottinghamshire
Registration date : 2011-07-25
Tender bottom
![]() Steve Traill Mon 02 Apr 2012, 11:59 am
Steve Traill Mon 02 Apr 2012, 11:59 am
I think looking at the pictures there is a slight overbend on the bottom of the tender sides. This pulls out when all the rivet bolts are tightened up. I've built three tenders and put the tops (floor) in last and they've all fitted perfectly with a sharpened 4" masonry nail used as a hole locator. Generally when fitting the rivet bolts I start in the middle of a run and work out either side then any slight discrepancy is minimised.

Steve Traill- Number of posts : 800
Age : 67
Location : Illogan Redruth Cornwall
Registration date : 2008-06-29
Re: Rob & Tash Showmans
![]() Robfishman Mon 02 Apr 2012, 8:54 pm
Robfishman Mon 02 Apr 2012, 8:54 pm
Robfishman- Number of posts : 1061
Age : 49
Location : Chandlers Ford Hants 4" showmans & 4" Roller
Registration date : 2010-11-26 -
Re: Rob & Tash Showmans
![]() Robfishman Mon 02 Apr 2012, 11:00 pm
Robfishman Mon 02 Apr 2012, 11:00 pm
The curves in the side panels was caused by the width of the front panel being slightly wider than the gap between the two side. When I put it together this time I fitted the front panel before the base, and found while everything else lines up the holes in the base are 1/4 of a hole out to that in the side panels on both sides at the front and get better alignment further back.
As you all spotted this was causing a bow to the sides meaning the front panel would not fit and none of the holes were lining up.
Thanks for yor info on the top section Ian, mine was exactly the same now though I have lined the top section up and will sort the rest of the holes back out. Looking over the holes several need to be drilled out as they are between 1/4 and half a hole off.
Another few hours work and it will be ready for paint.
Robfishman- Number of posts : 1061
Age : 49
Location : Chandlers Ford Hants 4" showmans & 4" Roller
Registration date : 2010-11-26 -
Re: Rob & Tash Showmans
![]() Robfishman Wed 04 Apr 2012, 10:53 pm
Robfishman Wed 04 Apr 2012, 10:53 pm
This leads me to a question, should I seal the break tube at this stage or is it easier if left till after the breaking system is fitted?
Once sealed I'll fit the top and be ready for paint by Friday. Photo's to follow.
Robfishman- Number of posts : 1061
Age : 49
Location : Chandlers Ford Hants 4" showmans & 4" Roller
Registration date : 2010-11-26 -
Re: Rob & Tash Showmans
![]() lynnr Thu 05 Apr 2012, 6:44 am
lynnr Thu 05 Apr 2012, 6:44 am
Fit and seal as there is no requirement to remove again. I fitted mine. Sealed up to the 1/2 inch before the rivets. Done the front panel to the flange. Bolted up then run seal round the joint to finish.
lynnr- Number of posts : 3242
Age : 55
Location : Highland, 4inch showman
Registration date : 2010-08-06
Robfishman- Number of posts : 1061
Age : 49
Location : Chandlers Ford Hants 4" showmans & 4" Roller
Registration date : 2010-11-26 -
Re: Rob & Tash Showmans
![]() IanL Thu 05 Apr 2012, 8:13 am
IanL Thu 05 Apr 2012, 8:13 am
Ian
IanL- Number of posts : 437
Age : 68
Location : Nottinghamshire
Registration date : 2011-07-25
Re: Rob & Tash Showmans
![]() lynnr Thu 05 Apr 2012, 8:29 am
lynnr Thu 05 Apr 2012, 8:29 am
IanL wrote:I did as Lynn, but remember to seal up all the threaded areas to stop the sealant getting into them.
Ian
Blob of candle wax in the threads. Works very well.
lynnr- Number of posts : 3242
Age : 55
Location : Highland, 4inch showman
Registration date : 2010-08-06
Re: Rob & Tash Showmans
![]() Robfishman Mon 09 Apr 2012, 3:28 pm
Robfishman Mon 09 Apr 2012, 3:28 pm

Tender by Robert R&N, on Flickr

Tender by Robert R&N, on Flickr
Tender by Robert R&N, on Flickr
What a great job STW have done to make sure this all lined up....not yet rounded these off yet.

Tender by Robert R&N, on Flickr
Inside the tender tank...

Tender by Robert R&N, on Flickr
Now in primer ready for basecoat...the outside will be the Ex-Mayor blue and inside red..,..

Tender by Robert R&N, on Flickr

Tender by Robert R&N, on Flickr
Ive still got some rubbing down to do on the beading...
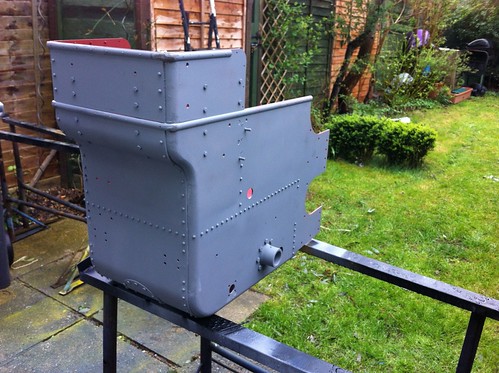
Tender by Robert R&N, on Flickr
First top coat of red enamel applied to check the colour...

Tender by Robert R&N, on Flickr

Tender by Robert R&N, on Flickr
A bit more work to do to tidy up a few joints and when we get a nice day will apply the base coats.
Robfishman- Number of posts : 1061
Age : 49
Location : Chandlers Ford Hants 4" showmans & 4" Roller
Registration date : 2010-11-26 -
Re: Rob & Tash Showmans
![]() lynnr Mon 09 Apr 2012, 3:41 pm
lynnr Mon 09 Apr 2012, 3:41 pm
Nice progress. Glad you got the front panel sorted.
Leave the inspection cover unsealed until total build finish as your hand will be in there a few times before then.
Have you made a dipstick? before you move too far into paint.
lynnr- Number of posts : 3242
Age : 55
Location : Highland, 4inch showman
Registration date : 2010-08-06
Re: Rob & Tash Showmans
![]() Robfishman Mon 09 Apr 2012, 4:21 pm
Robfishman Mon 09 Apr 2012, 4:21 pm
lynnr wrote:Hi Rob
Nice progress. Glad you got the front panel sorted.
Leave the inspection cover unsealed until total build finish as your hand will be in there a few times before then.
Have you made a dipstick? before you move too far into paint.
Thanks Lynn it was a bit of a pig but yes we got there in the end.
Thanks also for the reminder, no dip stick yet but I have the tube and fittings ready to make one in the workshop and it now next on the list. Also our try cocks have been moved to the other side of the tank and will be operational. The old holes have been sealed filled, and the new will be drilled once they arrive to check the size of the holes needed, should be here during next week I hope.
Robfishman- Number of posts : 1061
Age : 49
Location : Chandlers Ford Hants 4" showmans & 4" Roller
Registration date : 2010-11-26 -
Re: Rob & Tash Showmans
![]() lynnr Mon 09 Apr 2012, 4:24 pm
lynnr Mon 09 Apr 2012, 4:24 pm
I am also looking at replacing mine with something better looking. It is the only part of the engine I am not happy (very happy) with.
lynnr- Number of posts : 3242
Age : 55
Location : Highland, 4inch showman
Registration date : 2010-08-06
Re: Rob & Tash Showmans
![]() Robfishman Mon 09 Apr 2012, 4:55 pm
Robfishman Mon 09 Apr 2012, 4:55 pm
http://www.heritagesteamsupplies.co.uk/Heritage-Steam-Supplies/Gauge-&-Test-Cocks/Bent-Nose-Gun-Metal-Cock/p-297-373-506/
But I think they are also available from Live Steam Models from what I recall from another post...hang on and ill try and find it.
EDIT :
Found it....Nick prev posted the ones he found which look longer so may be better if they are as STW design as the water wont be going all over the breaking system.... https://traction.forumotion.com/t860-tender-try-cocks?highlight=tender When mine come ill measure them so you can check the Heritage ones before you order if they are the ones you like.
Rob
Last edited by Robfishman on Mon 09 Apr 2012, 6:22 pm; edited 2 times in total
Robfishman- Number of posts : 1061
Age : 49
Location : Chandlers Ford Hants 4" showmans & 4" Roller
Registration date : 2010-11-26 -
Re: Rob & Tash Showmans
![]() Robfishman Mon 09 Apr 2012, 5:07 pm
Robfishman Mon 09 Apr 2012, 5:07 pm

Ex-Mayor Try Cocks by Robert R&N, on Flickr
Robfishman- Number of posts : 1061
Age : 49
Location : Chandlers Ford Hants 4" showmans & 4" Roller
Registration date : 2010-11-26 -
lynnr- Number of posts : 3242
Age : 55
Location : Highland, 4inch showman
Registration date : 2010-08-06
Re: Rob & Tash Showmans
![]() Robfishman Tue 10 Apr 2012, 10:36 am
Robfishman Tue 10 Apr 2012, 10:36 am
Robfishman- Number of posts : 1061
Age : 49
Location : Chandlers Ford Hants 4" showmans & 4" Roller
Registration date : 2010-11-26 -
Horses Willies
![]() Steve Traill Tue 10 Apr 2012, 4:53 pm
Steve Traill Tue 10 Apr 2012, 4:53 pm
Steve Traill- Number of posts : 800
Age : 67
Location : Illogan Redruth Cornwall
Registration date : 2008-06-29
Page 4 of 21 • 1, 2, 3, 4, 5 ... 12 ... 21 ![]()
» Showmans kit 10
» Showmans
» October, November, December 2015 production photos...
» Lynn Robinson. Showman Scenic
|
|
|