
Ideas for the belly tank
+8
Flasback
Brian M
Tony King
craig@STW
lynnr
Tim Watson
sonick45
highpressure
12 posters
Page 1 of 1

Ideas for the belly tank
![]() highpressure Thu 21 Apr 2011, 7:40 pm
highpressure Thu 21 Apr 2011, 7:40 pm
I cant really describe adequately the disappointment felt when opening the latest kit to read that the tank brackets have to come off. I'm sure I'm not alone in facing a task which will undo countless hours of effort to get it to the state it is in now, but also because mine has been powder coated the internal threads are covered which is likely to make it nigh on impossible to undo them. I dont even want to mention the fact that it cost £100 to get the tank coated and that is also likely to be buggered and I specifically asked them to get a good coat on the inside to prevent corrosion, I suspect the whole thing will have to be redone including the lining.
I'm not going to even go any further with this for the next few weeks as I'm going away on Sunday for a family holiday but if whilst I'm away someone has a bright idea to modify the old brackets insitu either elongating the holes or something else then clearly this would help.
I know the factory move has to be done and its good news as the company is going in the right direction and needs to divorce itself from the past but at the moment this build is not causing much joy. Is the schedule likely to get back on track?? otherwise were going to be 6 months behind
highpressure- Number of posts : 1096
Age : 57
Location : West Sussex, 4" DCC Road Loco
Registration date : 2008-06-18 -

Re: Ideas for the belly tank
![]() sonick45 Thu 21 Apr 2011, 8:37 pm
sonick45 Thu 21 Apr 2011, 8:37 pm
i'm not sure what to say as i've fully coated the inside of my tank with a thick layer of rubber you can't even see the inside nuts as they are buried.
They would have to be cut out
I have also spent hours getting a good gloss coat and lined the tank so this will have to be re done too
Just to clarify is it the front bracket or the two that attach to the fire box end.
I hope there is a resolve to this nightmare.
They would have to be cut out
I have also spent hours getting a good gloss coat and lined the tank so this will have to be re done too
Just to clarify is it the front bracket or the two that attach to the fire box end.
I hope there is a resolve to this nightmare.
sonick45- Number of posts : 511
Location : Barton-Le-Clay (Beds)
Registration date : 2009-01-26
Re: Ideas for the belly tank
![]() highpressure Thu 21 Apr 2011, 10:40 pm
highpressure Thu 21 Apr 2011, 10:40 pm
It is the two brackets that hold the back of the tank to the hornplates.
Perhaps a quick straw pole will reveal how many tanks are painted and how many aren't?
Perhaps a quick straw pole will reveal how many tanks are painted and how many aren't?
highpressure- Number of posts : 1096
Age : 57
Location : West Sussex, 4" DCC Road Loco
Registration date : 2008-06-18 -
Re: Ideas for the belly tank
![]() Tim Watson Fri 22 Apr 2011, 7:29 am
Tim Watson Fri 22 Apr 2011, 7:29 am
I was about to start painting this Easter.
I don't think it will be too much of a trouble to take off and replace the bracket for those that have painted / powder coated. I would suggest taking a Stanley knife and cutting through the coating to bright metal right next to the bracket ~ this will limit any paint damage when it is removed. It might also pay to trim back any coating from the external nut and exposed bolt thread. Then undo the nuts: I suspect that the sealant / coating internally will hold the bolt head: POR15 tank sealer almost certainly would. If it doesn't, then a socket or ring spanner will have to be used. Re-sealing with some Isoflex internally will be easy and effective, as the tank has not yet been contaminated with any liquid. The visual impact will be minimal as the bracket - tank interface is not that visible.
Having kept an engine in good looking order for the last five years, despite a few knocks and scrapes, you get good at touching-in paintwork and making repairs.
Tim

Tim Watson- Number of posts : 585
Location : Herts
Registration date : 2008-07-02
What is the issue
![]() lynnr Fri 22 Apr 2011, 8:41 am
lynnr Fri 22 Apr 2011, 8:41 am
Hi All
I am a kit behind so not sure what the issue is? Can someone explain.
I am a kit behind so not sure what the issue is? Can someone explain.

lynnr- Number of posts : 3242
Age : 56
Location : Highland, 4inch showman
Registration date : 2010-08-06
Re: Ideas for the belly tank
![]() craig@STW Fri 22 Apr 2011, 9:06 am
craig@STW Fri 22 Apr 2011, 9:06 am
basically there is not enough room between boiler and belly tank for all the cladding to fit. it works fine on solidworks but in reality things are a bit different.
to solve this we have made two new rear mounting brackets to replace the originals, this drops the tank slightly to give the room needed.
unfortunately, for those that have already painted and seal the tank, this causes other issues
this has nothing to do with the factory move, in fact the move is having little or no effect on this model, it is the delay in getting the castings that has caused the problem, but then had we used the old suppliers you would have sub-standard parts. at the end of the day you will have a quality model that will give you years of pleasure, maybe even pass it on to future generations.

craig@STW- Number of posts : 1410
Location : location Location
Registration date : 2010-05-06
Belly tank brackets
![]() Tony King Fri 22 Apr 2011, 9:26 am
Tony King Fri 22 Apr 2011, 9:26 am
I haven't received my kit 16 yet, being "remote" I'll not get it till next week!!
I have painted & lined my tank & it's coated inside, so, I'm very keen NOT to remove the two rear brackets!!
Would someone try to explain why this has become nessessary?
OK, Craig has just posted an answer, so it looks like the trimming knife will have to come out, so brackets don't tear the paint or powder coating when they come off. OR the holes in the brackets will have to be elongated which won't be easy without scratching the finish on the tank. I don't think powder coating having been cut, can be easily repaired though, sorry !! (unless it could be reheated to fuse the repaired area?)
Tony
Tony King- Number of posts : 856
Age : 69
Location : scotland
Registration date : 2008-10-31
Re: Ideas for the belly tank
![]() Brian M Fri 22 Apr 2011, 9:27 am
Brian M Fri 22 Apr 2011, 9:27 am
Hi All,
I can understand people's frustration on re-doing all their hard work. However, I am way behind most other builders, so am happy to listen to/read your advice on building the engine. BUT, I would be happy wait another six months for the kits if it meant I only received high quality parts (good point well made Craig).
All the best,
Brian M
Brian M- Number of posts : 261
Location : Cheshire
Registration date : 2011-01-30
Re: Ideas for the belly tank
![]() Flasback Fri 22 Apr 2011, 10:11 am
Flasback Fri 22 Apr 2011, 10:11 am
Hi All,
Like Brian said we are behind most of you on the build and I would be upset about redoing a paint job which has taken me hours to do. But one thing I was very impressed with was the quality taken to get the parts right at STW with their supplier base, we were shown examples of rejected parts and what they have done to get the parts right. Too be fair I don't think that people are concerned about the quality of the parts but just the rework involved. I was at a fair on Sunday and was talking to a guy who built his own engine and I asked him all the usual silly questions and he said that the one most important thing was getting the quality right (he has machined a number of components himself). He mentioned that he reduced the standard of quality to get parts finished as he wanted to see it working and he is paying the price for this still 7 years after completing the build.
At the open day later this year we will be laughing at this over a beer and some food. I am sure this will not be the last rework most of us will have to do.
Dwain
Flasback- Number of posts : 191
Location : Cheshire
Registration date : 2011-01-30
Re: Ideas for the belly tank
![]() Tim Watson Fri 22 Apr 2011, 10:39 am
Tim Watson Fri 22 Apr 2011, 10:39 am
[quote= I don't think powder coating having been cut, can be easily repaired though, sorry !! (unless it could be reheated to fuse the repaired area?)
Tony[/quote]
Tony, it can. I powder coated the smokebox on my TE and it lifted horribly after the first couple of steamings because foliac got between the chimney base and the smokebox itself. This area was sanded down and the defects built up with layers of heat proof paint until they were an acceptable finish. It ran in this form for a few years until I repainted with the new chimney base. Conventional paint will key well enough to the powder coated surface to seal and look OK.
It is also worth remembering that it is normal on full size to have the bolts poking through the tank with the nuts on the outside. Then, if outside components need to be removed for maintenance, the nuts will not be rusted in place within the tank.
Tim
Tim Watson- Number of posts : 585
Location : Herts
Registration date : 2008-07-02
Re: Ideas for the belly tank
![]() Steam Traction World Fri 22 Apr 2011, 10:47 am
Steam Traction World Fri 22 Apr 2011, 10:47 am
Hi All
Well what can I say? I'm well aware of the problem that’s been caused to those that have already painted their belly tanks and I understand the annoyance and frustration that is being felt. I believe our solution of replacing the rear brackets is the best way in the long run. There are other options, such as slotting the holes in the existing brackets or those on the hornplates or even dropping the tank down by a complete hole spacing but these will be quite visible on your finished engine. I think it’s better to bear the pain now rather than having to put up with a visible compromise for the rest of the engines life.
I think there is a lesson for us to learn from this and that’s about us pulling kits forward to fill gaps caused by casting delays. If we had made the belly tanks in the originally planned order then we would have found the problem before sending them and could have prevented the problem. That doesn’t mean to say that we won’t change the order of things in the future but it does mean that we will have to very carefully consider the consequences.
Delays with castings continue to be a problem, we’re trying to reduce this by ordering well in advance but we would still prefer to put up with a delay rather than put up with an inferior product.
Regards
Steve
Steam Traction World- Admin
- Number of posts : 946
Location : Daventry UK
Registration date : 2008-06-18 -
Re: Ideas for the belly tank
![]() Graeme81 Fri 22 Apr 2011, 2:40 pm
Graeme81 Fri 22 Apr 2011, 2:40 pm
i agree with steve - its better to have to repaint now and have the engine visibly correct in the long run. maybe to avoid any similar issues in the future we should wait for the next couple of kits or atleast until the particular part being painted is completely assembled....
the quality of this model is still top class and im sure by the time its finished the rework that is due now will be hardly remembered.
the quality of this model is still top class and im sure by the time its finished the rework that is due now will be hardly remembered.

Graeme81- Number of posts : 178
Location : Ireland
Registration date : 2009-05-25
Now I remember
![]() lynnr Fri 22 Apr 2011, 3:47 pm
lynnr Fri 22 Apr 2011, 3:47 pm
Ah
Yes. That was why I have not sealed around the plates inside the tank as there was a question mark over them.
Did think the tank was very snug when put on for the pictures. Brain fart over.
And YES. I am quite happy to wait a while for Top quality over "it will do" quality.
Yes. That was why I have not sealed around the plates inside the tank as there was a question mark over them.
Did think the tank was very snug when put on for the pictures. Brain fart over.
And YES. I am quite happy to wait a while for Top quality over "it will do" quality.
lynnr- Number of posts : 3242
Age : 56
Location : Highland, 4inch showman
Registration date : 2010-08-06
Re: Ideas for the belly tank
![]() sonick45 Fri 22 Apr 2011, 7:21 pm
sonick45 Fri 22 Apr 2011, 7:21 pm
Graeme81 wrote:i agree with steve - its better to have to repaint now and have the engine visibly correct in the long run. maybe to avoid any similar issues in the future we should wait for the next couple of kits or atleast until the particular part being painted is completely assembled....
the quality of this model is still top class and im sure by the time its finished the rework that is due now will be hardly remembered.
The above rings true with me. I'm a couple of kits behind now but stupidly didn't wait and started slapping isoflex about a little to early. Lesson learnt and I'll add that considering all the complexities steve has had to overcome when designing this thing to his impeccably high standards I can only say the changes along the way are fine knowing they are for the best.
What we sometimes forget is this is the first line of engines built and you pay for been first to have one by accepting there will be small hiccups an minor changes along they way.
I can't wait to see the new gaff and enjoy putting names to
Faces from here next month.
Steve, can I just apologise for not making it up as promised
to help paint the floor.I blame one particular wedding coming up scuppering my plans.
nick
sonick45- Number of posts : 511
Location : Barton-Le-Clay (Beds)
Registration date : 2009-01-26
Belly tank mods
![]() Tony King Sat 23 Apr 2011, 10:53 am
Tony King Sat 23 Apr 2011, 10:53 am
Hi All,
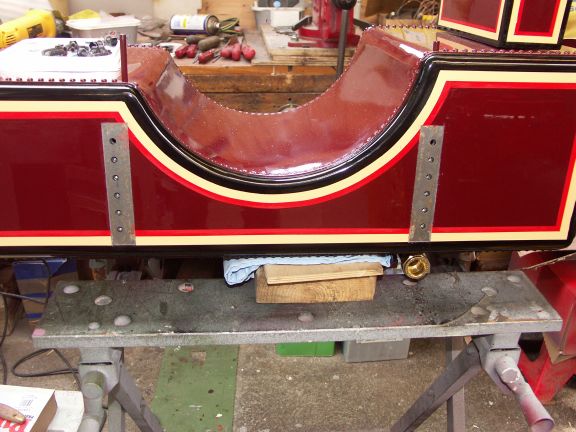
Just thought I'd bung up a few pics on the latest subject of the belly tank modifications.
I must say that after the initial shock & worries of repainting etc, the modification has taken less time to carry out than it has taken me to show what I've done on the forum!! With care this has infact been a very easy mod to carry out & STW are to be congratulated on providing a very effective solution to what could have been a serious problem!!
First using sharp knife, score to metal, so you only remove bracket from tank

Undo fixings, which for me, was very streight forward as the nuts on the inside stayed embedded in the sealent.
Then simply pull away bracket!!

Tank with old brackets removed.
Bolt head riveted into top hole of new brackets.
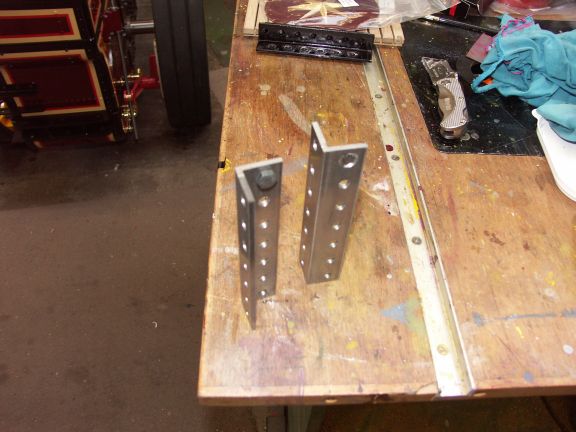
New brackets on tank.

Just maskoff the brackets & bung on the paint, reseal inside & hey presto all done, so actually no real problem at all!!
Hope all you guys out there find it as easy as I have!!
Tony
Just thought I'd bung up a few pics on the latest subject of the belly tank modifications.
I must say that after the initial shock & worries of repainting etc, the modification has taken less time to carry out than it has taken me to show what I've done on the forum!! With care this has infact been a very easy mod to carry out & STW are to be congratulated on providing a very effective solution to what could have been a serious problem!!
First using sharp knife, score to metal, so you only remove bracket from tank
Undo fixings, which for me, was very streight forward as the nuts on the inside stayed embedded in the sealent.
Then simply pull away bracket!!
Tank with old brackets removed.
Bolt head riveted into top hole of new brackets.
New brackets on tank.
Just maskoff the brackets & bung on the paint, reseal inside & hey presto all done, so actually no real problem at all!!
Hope all you guys out there find it as easy as I have!!
Tony
Tony King- Number of posts : 856
Age : 69
Location : scotland
Registration date : 2008-10-31
Re: Ideas for the belly tank
![]() craig@STW Sat 23 Apr 2011, 2:53 pm
craig@STW Sat 23 Apr 2011, 2:53 pm
thank you for that Tony. i think that will help to ease people's concerns.
craig@STW- Number of posts : 1410
Location : location Location
Registration date : 2010-05-06
Re: Ideas for the belly tank
![]() bjwlancashire Thu 28 Apr 2011, 12:30 am
bjwlancashire Thu 28 Apr 2011, 12:30 am
Just been "out of contact" for last couple of weeks due to business travel and and a weeks holiday (including Riverside Leisure rally near Southport) and seen this while catching up on things. I have the tank kit but have not started it yet and I wondered why I had two brackets in the post when we got home.
Just remember, if you are building an engine from scratch you will find errors in the drawings along the way and if you do not find them straight away it can cause a lot more pain than this. Take a look on the Traction talk forum under the models section and there is a lot of information on certain drawings including the 6" version of the Burrell Road Loco. the fact we are able to paint as we go speaks volumes for the level of accuracy already in the design.
I do feel sorry for all of you who have painted the tanks as there are some superb paint jobs out there but the excellent explanation and demonstration by Tony on his model must surely give some reassurance that this can be overcome - great post Tony.
Brian

bjwlancashire- Number of posts : 938
Location : Mellor, Lancashire
Registration date : 2010-09-07
Re: Ideas for the belly tank
![]() Tim Pennett Sat 30 Apr 2011, 9:44 pm
Tim Pennett Sat 30 Apr 2011, 9:44 pm
Dear All,
I’m new to the forum, but have been reading it for sometime and I am building the Road Loco variant (although I haven’t unpacked anything yet!).
As we are progressing with the assembly obviously more complications will arise. Without bringing more doom and gloom, but lowering the Belly Tank will throw out the alignment of the steering rod and the mounting at the top on the hornplate, Not a major issue but one to consider, also has the balance pipe between the Tender and the Belly Tank been effected by this drop.
When I made the former for the Belly Tanks on our Showman’s I increased the radius by a good inch and a half to accommodate the lagging, even this was a little tight on fitting and getting the steering worm and housing in the correct location took a bit of ‘playing with’.
Hope this is of some help,
Regards,
Tim

Tim Pennett- Number of posts : 36
Location : North Yorkshire
Registration date : 2011-04-30
» Kit 17 Belly Tank
» belly tank construction
» Belly tank
» Cylinder block and cleading & Steering
» belly tank & steering
» belly tank construction
» Belly tank
» Cylinder block and cleading & Steering
» belly tank & steering
Page 1 of 1
Permissions in this forum:
You cannot reply to topics in this forum