
That thin red line......
4 posters
Page 1 of 1

That thin red line......
![]() sonick45 Thu 18 Nov 2010, 7:46 pm
sonick45 Thu 18 Nov 2010, 7:46 pm
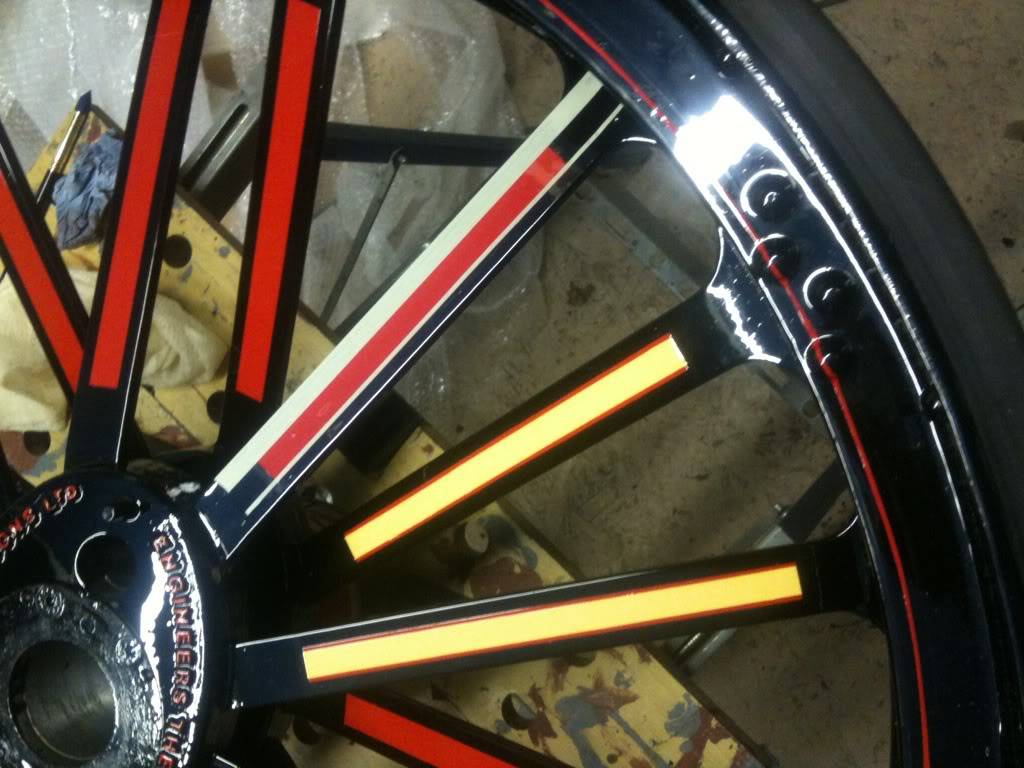
For those of us that have chosen to paint our engines using the Presidents scheme the thin red lie around the rims was easy on the fronts but the rears are a slightly different story.. Unfortunately the rivet heads are closer to the edge than on the original and the red line will need to flow over these making it a lot harder to paint.
I have decided to tackle this line first and use pin-striping tape as with all my other lines.
It's still work in progress but i think this will be the easiest way using the lining tape technique.
I plan to tape over the heads once the lines in between have dried. This will give me a much greater chance of getting the line straight.. I hope.
sonick45- Number of posts : 511
Location : Barton-Le-Clay (Beds)
Registration date : 2009-01-26
Looking good
![]() lynnr Fri 19 Nov 2010, 9:15 am
lynnr Fri 19 Nov 2010, 9:15 am
Looking good there. I am still trying to swallow the little brave pill and start my lining. Hope to get going on mine this weekend.

lynnr- Number of posts : 3242
Age : 55
Location : Highland, 4inch showman
Registration date : 2010-08-06
Re: That thin red line......
![]() sonick45 Sat 20 Nov 2010, 9:36 pm
sonick45 Sat 20 Nov 2010, 9:36 pm
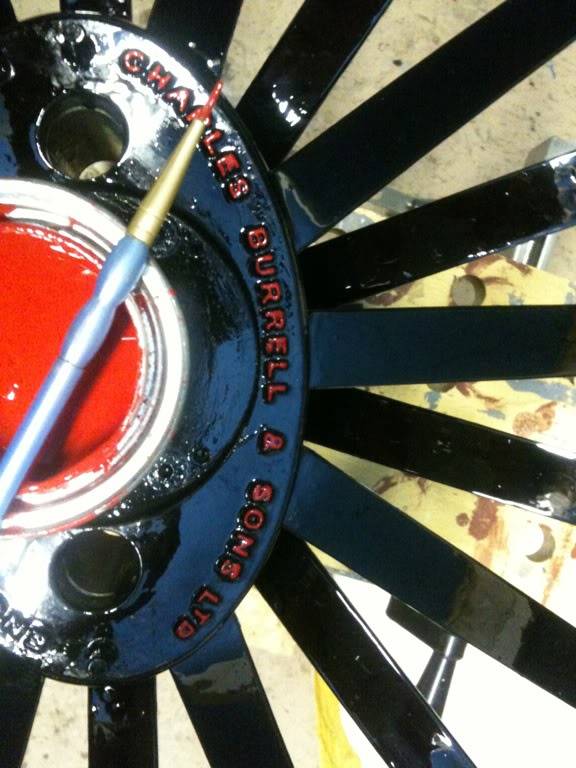
Started tackling the hub lettering tonight.
Had a little bleeding over but noting a touch of black wont cure..
All in all really pleased with the finish..


Had a little bleeding over but noting a touch of black wont cure..
All in all really pleased with the finish..
sonick45- Number of posts : 511
Location : Barton-Le-Clay (Beds)
Registration date : 2009-01-26
Cool
![]() lynnr Sun 21 Nov 2010, 9:28 am
lynnr Sun 21 Nov 2010, 9:28 am
I am just about to do my second wheel hub letter painting. Got the main yellow of the pinstripping done yesterday on both rear wheels. I will post shortly. I am not following a real world paint scheme but if I think it looks good I do it.
lynnr- Number of posts : 3242
Age : 55
Location : Highland, 4inch showman
Registration date : 2010-08-06
That "OTHER" thin red line....
![]() highpressure Mon 22 Nov 2010, 7:19 pm
highpressure Mon 22 Nov 2010, 7:19 pm
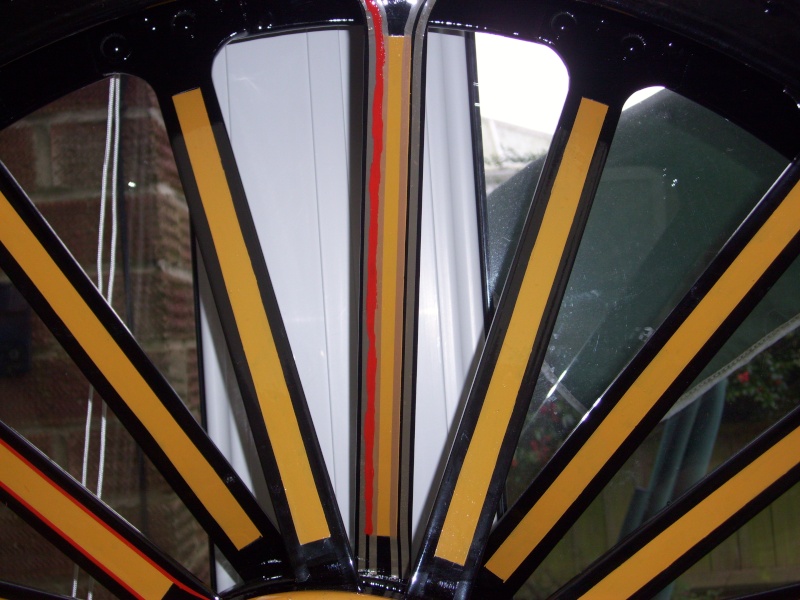
I had been building up enthusiasm to tackle this one.. the thin line that flanks the outside of the gold on each spoke. As there are 20 spokes on each wheel it is certainly a labour of love, and having done the previous 4" it is quite a struggle getting to the top and bottom of the spokes as you just cant get your hand in. But this time I decided to do a couple at a time rather than tape up the whole lot and hit it all in one go and it is certainly making it much easier to cope with. Also the wheel doesnt seem as deep as the earlier engine meaning it is possible to get to the outer ends of the spokes. The inner end is a different story and requires a very fine brush and steady hand to finish the "fish tail" ends. As you can see the lining tape is applied and then the ends are manually brought together to taper the line to a fine point, and I'm very pleased with the result.
I will have soon run out of things to line again..... You dont want to stand still round here for too long or you might get lined yourself

I will have soon run out of things to line again.....
highpressure- Number of posts : 1096
Age : 57
Location : West Sussex, 4" DCC Road Loco
Registration date : 2008-06-18 -

Re: That thin red line......
![]() sonick45 Mon 22 Nov 2010, 8:25 pm
sonick45 Mon 22 Nov 2010, 8:25 pm
Highpressure your wheels are looking amazing .
It's interesting to see all the different techniques people have to lining.
I see you have put down the yellow first then bordering with red.
I plan to do exactly the opposite red first followed by yellow inlay finishing with the fish tails last.
Having seen how you are doing the fish tails I may do the same as it will help with tapering the ends.
Nick
sonick45- Number of posts : 511
Location : Barton-Le-Clay (Beds)
Registration date : 2009-01-26
Re: That thin red line......
![]() highpressure Mon 22 Nov 2010, 9:23 pm
highpressure Mon 22 Nov 2010, 9:23 pm
Hi Rick,
Thanks it makes the effort and troublesome bits worthwhile. We all seem to be making a good job though. What I have done is put the tape on with just a slight bend in the end , then once the top bit is off just tease back the last few cms and then just run them together. It takes a couple of trys to get it right but it can be done with patience. Tonight I did all the spokes that finish on the outside of the hub. Ths inside ones are more tricky but the best thing I have in the kit is the rub out tool which allows me to clean up any rough edges or bits where the panit creeps under the tape, well worth buying. I wasnt aiming to make a show stopper but having paid a lot ao attention to detail I am really pleased witht he final result and certainly hope to turn a few heads, It just makes waiting for the boiler all the more difficult because when it all hangs together it will give a good idea of how it will all look when finished. Roll on February
Regards Kev.
highpressure- Number of posts : 1096
Age : 57
Location : West Sussex, 4" DCC Road Loco
Registration date : 2008-06-18 -
Re: That thin red line......
![]() sonick45 Mon 22 Nov 2010, 9:35 pm
sonick45 Mon 22 Nov 2010, 9:35 pm
Rick!!
Did you mean Nick?
I agree the wipe out tool is a must and i have used it to great effect.
I don't think my finish on the black is as smooth as yours as i've stuck to traditional techniques of brushing on and then cutting it back repeating 3-4 times.. it takes a while to get used to seeing your hard work sanded away time and again but the finish has real character. You know every little blemish and dimple and the effort that went into making them...
i'm gong to have a few trial runs with our fish tail technique or may stick with making a template as before and using Frisk film. Measn every tail is identical and uniform.
I wish i was getting a boiler in February but i've fallen a little behind.
Need to win the lottery.
sonick45- Number of posts : 511
Location : Barton-Le-Clay (Beds)
Registration date : 2009-01-26
Re: That thin red line......
![]() sonick45 Sun 28 Nov 2010, 9:02 pm
sonick45 Sun 28 Nov 2010, 9:02 pm
been spurred on by seeing Kev's wheels i've continued to line the rears.
This is my progress as of tonight.
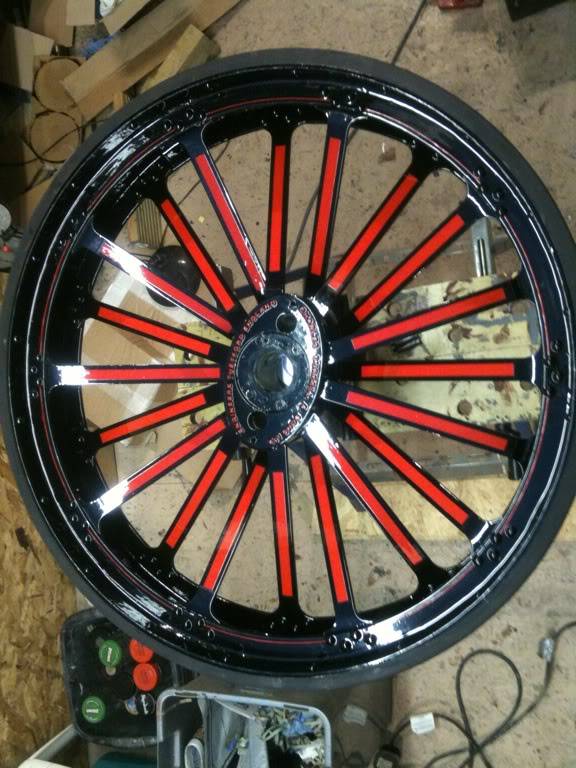


The thin line over the rivet heads were fiddly and although up close they aren't 100% perfect when you step back they look really good as they sweep over the bumps.
This is my progress as of tonight.
The thin line over the rivet heads were fiddly and although up close they aren't 100% perfect when you step back they look really good as they sweep over the bumps.
sonick45- Number of posts : 511
Location : Barton-Le-Clay (Beds)
Registration date : 2009-01-26
Re: That thin red line......
![]() hughb Wed 01 Dec 2010, 9:54 pm
hughb Wed 01 Dec 2010, 9:54 pm
Hi guys
Well When I first read this I thort yous guys have gone mad


Then as It unfolded just been at the beers
NOW it must be just me in the wrong .IF I was wereing a hat I would take if off to you all...
WELL DONE AND THANKS FOR THE PICS 
Well When I first read this I thort yous guys have gone mad
Then as It unfolded just been at the beers
NOW it must be just me in the wrong .IF I was wereing a hat I would take if off to you all...
WELL DONE AND THANKS FOR THE PICS
hughb- Number of posts : 575
Age : 54
Location : hertfordshire
Registration date : 2009-03-13
Re: That thin red line......
![]() sonick45 Fri 03 Dec 2010, 4:12 pm
sonick45 Fri 03 Dec 2010, 4:12 pm
slow but steady progress.
Finished the inside lines on the hub and made a start on the fish tails.


Finished the inside lines on the hub and made a start on the fish tails.
sonick45- Number of posts : 511
Location : Barton-Le-Clay (Beds)
Registration date : 2009-01-26
lynnr- Number of posts : 3242
Age : 55
Location : Highland, 4inch showman
Registration date : 2010-08-06
Re: That thin red line......
![]() sonick45 Sat 04 Dec 2010, 8:35 am
sonick45 Sat 04 Dec 2010, 8:35 am
lynnr wrote:Hi
Looking really good! Are you just using tape?
Yes and plastic masking sheets with a cutting compass for the fish tails.
sonick45- Number of posts : 511
Location : Barton-Le-Clay (Beds)
Registration date : 2009-01-26
Page 1 of 1
Permissions in this forum:
You cannot reply to topics in this forum|
|
|