
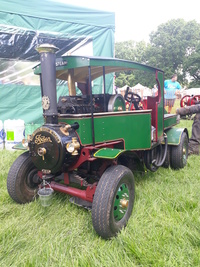
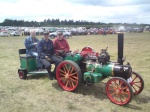
Cumbrian 4" Showman
Page 1 of 4 • 1, 2, 3, 4 ![]()

Cumbrian 4" Showman
![]() JayBee Wed 17 Feb 2016, 8:15 pm
JayBee Wed 17 Feb 2016, 8:15 pm

My background is in engineering and I have done a little model engineering but this will be a challenge. I am planning to document my probably slow progress to adding another 4" Showman's to the line up of excellent engines already out there.

This is not the first bit to get done but having painted the smokebox it really felt that there was some progress. Paint is Barbecue satin black and I will be Nickel plating the exposed steel parts. The puzzle with the plating is that I have not found anything to indicate how to judge the thickness of the plating or how much is required to provide corrosion protection. Also, If anyone has comments on an optimum size for photos I would appreciate yoiur comments these are very much as they came from the camera.
John
Last edited by JayBee on Wed 17 Feb 2016, 9:40 pm; edited 1 time in total
JayBee- Number of posts : 104
Location : Cumbria UK
Registration date : 2015-11-23
Re: Cumbrian 4" Showman
![]() lynnr Wed 17 Feb 2016, 8:35 pm
lynnr Wed 17 Feb 2016, 8:35 pm
And welcome aboard the Showman train.
First photo size. Resize to 800 pixels wide by however much tall. Normally done by linking aspect ratio when resizing. This economises on bandwidth needed and online storage space. Also makes the pictures less attractive to pinching without loosing forum view ability.
Nickel plating. Not very thick needed as long as solid coating. I normally went for 60 mins at a mild fizz 12v 1A with the frost kit.

lynnr- Number of posts : 3242
Age : 56
Location : Highland, 4inch showman
Registration date : 2010-08-06
Re: Cumbrian 4" Showman
![]() JayBee Wed 17 Feb 2016, 9:09 pm
JayBee Wed 17 Feb 2016, 9:09 pm
Thanks for the advice I wondered if the photos needed to be a little smaller.
I am using the Frost power supply and there is no fizzing, are you using your own power supply? I have just been plating some more parts but next time I will check the current. I suspect my plating is going at a slower pace.
John
JayBee- Number of posts : 104
Location : Cumbria UK
Registration date : 2015-11-23
Re: Cumbrian 4" Showman
![]() lynnr Wed 17 Feb 2016, 9:24 pm
lynnr Wed 17 Feb 2016, 9:24 pm
lynnr- Number of posts : 3242
Age : 56
Location : Highland, 4inch showman
Registration date : 2010-08-06
Re: Cumbrian 4" Showman
![]() JayBee Wed 17 Feb 2016, 9:32 pm
JayBee Wed 17 Feb 2016, 9:32 pm
JayBee- Number of posts : 104
Location : Cumbria UK
Registration date : 2015-11-23
Re: Cumbrian 4" Showman
![]() lynnr Wed 17 Feb 2016, 9:58 pm
lynnr Wed 17 Feb 2016, 9:58 pm
lynnr- Number of posts : 3242
Age : 56
Location : Highland, 4inch showman
Registration date : 2010-08-06
Re: Cumbrian 4" Showman
![]() JayBee Sun 21 Feb 2016, 7:19 pm
JayBee Sun 21 Feb 2016, 7:19 pm

And first painting of colour coat. Delighted with the gloss but I guess there will be chips and dings as the build progresses.

I've also been busy with another batch of plating. Thought I would get some of these done ready for assembly later.

Last edited by JayBee on Fri 10 Feb 2017, 8:10 pm; edited 1 time in total
JayBee- Number of posts : 104
Location : Cumbria UK
Registration date : 2015-11-23
Re: Cumbrian 4" Showman
![]() JayBee Wed 02 Mar 2016, 7:54 pm
JayBee Wed 02 Mar 2016, 7:54 pm

JayBee- Number of posts : 104
Location : Cumbria UK
Registration date : 2015-11-23
Re: Cumbrian 4" Showman
![]() JayBee Fri 10 Feb 2017, 8:26 pm
JayBee Fri 10 Feb 2017, 8:26 pm
After letting the sealant harden off I filled the tender with water to check everything. No leaks :-). But!
When I put a little warm air through to dry things off after the test, the POR15 peeled off in sheets.

I thought that I had done a thorough job degreasing and going over with a flap wheel. I think that my mistakes were
- Go really coarse with the sanding before coating 80 - 100 grade.
- Don't try and fill some of the larger gaps before applying the POR15. I used a liitle silicone sealant on a couple of seams. Yes I should have known silicone and paint doesn't work.
Second attempt has held and the tender not leaking. Onwards.
JayBee- Number of posts : 104
Location : Cumbria UK
Registration date : 2015-11-23
Re: Cumbrian 4" Showman
![]() hartshaulage Sat 11 Feb 2017, 4:45 pm
hartshaulage Sat 11 Feb 2017, 4:45 pm
Russ
hartshaulage- Number of posts : 231
Age : 35
Location : Ilkeston, Derbyshire
Registration date : 2014-01-22
Re: Cumbrian 4" Showman
![]() JayBee Sat 11 Feb 2017, 6:10 pm
JayBee Sat 11 Feb 2017, 6:10 pm
John
JayBee- Number of posts : 104
Location : Cumbria UK
Registration date : 2015-11-23
Re: Cumbrian 4" Showman
![]() Steve Traill Sat 11 Feb 2017, 11:22 pm
Steve Traill Sat 11 Feb 2017, 11:22 pm

Steve Traill- Number of posts : 800
Age : 67
Location : Illogan Redruth Cornwall
Registration date : 2008-06-29
Re: Cumbrian 4" Showman
![]() lynnr Sun 12 Feb 2017, 10:44 am
lynnr Sun 12 Feb 2017, 10:44 am
Make sure the brake shaft is well sealed as I had to do a touch up as water was coming out of the brake shaft oil holes. Oops.
On the tender I left the front panel off that faces the boiler. Painted everything up to a 1/8" of the bolt holes. Painted the panel right to the curved edge. Let dry. Put the panel in and bolt up. Then from the inspection hole get the brush in to shove a puddle of isoflex around to fill the final gap around the front panel. Others do the tender floor last but I found doing the end plate worked better for the painting.
On the belly tank. Put the hornplate brackets on the belly tank side (still un-assembled) bolt up on the hornplates and tighten everything up.
Now you have correct spacing for the brackets. Paint in the manner all internal surfaces up to just short of the bolt flange areas etc. let dry. I put everything other than the end panels together then painted the bolts and seams. Then put the end panels on and with a mirror inside and light. Painted round the edge to complete.
Leave the area around the balance pipe un-painted as the copper fitting will need removing to get the pipework to the tender fitted once everything else is on. Also means it is easier to remove the belly tank until final finish. Don't forget to finish.
When we got the modified belly tank brackets. I had to remove the balance pipe fitting and it took me over a hour to remove the isoflex from it. So it has stuck very very well.
My bowser tank build shows the routine well. It also is doing well.
lynnr- Number of posts : 3242
Age : 56
Location : Highland, 4inch showman
Registration date : 2010-08-06
Re: Cumbrian 4" Showman
![]() JayBee Sun 12 Feb 2017, 8:58 pm
JayBee Sun 12 Feb 2017, 8:58 pm
JayBee- Number of posts : 104
Location : Cumbria UK
Registration date : 2015-11-23
Re: Cumbrian 4" Showman
![]() JayBee Mon 13 Feb 2017, 9:01 am
JayBee Mon 13 Feb 2017, 9:01 am

Also having a go at the paint lining by hand. Who said that this would be easy. Wow, I might have to give up the drink. Photo has a lot of smears and finger prints.

After this attempt I decided to make up a test piece to see if my proposed lining work would look right in the finished state.

And then on to the real thing.


JayBee- Number of posts : 104
Location : Cumbria UK
Registration date : 2015-11-23
Re: Cumbrian 4" Showman
![]() Robfishman Mon 13 Feb 2017, 10:52 pm
Robfishman Mon 13 Feb 2017, 10:52 pm
Robfishman- Number of posts : 1061
Age : 50
Location : Chandlers Ford Hants 4" showmans & 4" Roller
Registration date : 2010-11-26 -

Re: Cumbrian 4" Showman
![]() JayBee Tue 14 Feb 2017, 8:22 am
JayBee Tue 14 Feb 2017, 8:22 am
JayBee- Number of posts : 104
Location : Cumbria UK
Registration date : 2015-11-23
Tank sealer
![]() parador Thu 16 Feb 2017, 6:05 pm
parador Thu 16 Feb 2017, 6:05 pm
POR 15
Isoflex
and Apexior No 3 (which is sold by Heritage Steam Supplies).
I would be interested in hearing the pros' and cons' for the above products as I am about to order some Apexior as it seems to have no negative reports(other than price)
Martin
parador- Number of posts : 76
Registration date : 2008-07-02
Re: Cumbrian 4" Showman
![]() TimV Thu 16 Feb 2017, 8:17 pm
TimV Thu 16 Feb 2017, 8:17 pm
TimV- Number of posts : 123
Location : Poole , Dorset
Registration date : 2014-10-09
Re: Cumbrian 4" Showman
![]() JayBee Thu 16 Feb 2017, 8:41 pm
JayBee Thu 16 Feb 2017, 8:41 pm
I went for the POR15 because I could swill it around after building the tender. As you have seen adhesion can be a problem. Both the other alternatives require brushing or spraying. Perhaps the thing would be to get parts sand blasted and then almost anything will work. Apexior is clearly suitable and is OK for potable water which is probably reflected in the cost.
On another job I have used 2 pack marine paint and that seemed to work, again suitable for immersion.
JayBee- Number of posts : 104
Location : Cumbria UK
Registration date : 2015-11-23
Re: Cumbrian 4" Showman
![]() JayBee Sun 19 Feb 2017, 7:51 pm
JayBee Sun 19 Feb 2017, 7:51 pm

I couldn't convince myself that this was going to make a great difference so just painted the rim for the second wheel. Plenty of paint still to go on.

The trickiest part seemed to be timing the clean up of the epoxy after assembling the hubs. Trying to tidy up too soon and the epoxy was still sticky and leaving it longer made it seem very hard to remove with blades and scraper.My garage is quite cold so I had to keep making repeated trips through an evening to judge the best time for this job.
I am using the Craftmaster paints and have tried brush painting but cannot get to grips with it so most of mine will be sprayed unless I improve.

Undercoat painting.

And yellow
I have also made slightly different caps for the grease points.

JayBee- Number of posts : 104
Location : Cumbria UK
Registration date : 2015-11-23
Re: Cumbrian 4" Showman
![]() parador Sun 19 Feb 2017, 10:42 pm
parador Sun 19 Feb 2017, 10:42 pm
Regards
Martin
parador- Number of posts : 76
Registration date : 2008-07-02
Re: Cumbrian 4" Showman
![]() JayBee Mon 20 Feb 2017, 7:14 pm
JayBee Mon 20 Feb 2017, 7:14 pm
John
JayBee- Number of posts : 104
Location : Cumbria UK
Registration date : 2015-11-23
Re: Cumbrian 4" Showman
![]() JayBee Sun 26 Feb 2017, 7:56 pm
JayBee Sun 26 Feb 2017, 7:56 pm

Front and backs of the wheels have the same patern apart from the extra decoration on the outside of rims. Craftmaster signwriting paints, applied by masking, striping tool and freehand to get all the lines in.

Missed a couple of rivets here.

The finished scheme and the extra detail on the outside.

Finally a coat of varnish over the lining but as yet not over the whole wheel. I have yet to decide on that.
JayBee- Number of posts : 104
Location : Cumbria UK
Registration date : 2015-11-23
Re: Cumbrian 4" Showman
![]() JayBee Sun 26 Feb 2017, 8:28 pm
JayBee Sun 26 Feb 2017, 8:28 pm

I am transfering the water level taps onto the L/H side so have blanked the existing ones and drilled new holes

Top plate put on last and the tow straps held with temporary screws untill I can fit the complete tender to the hornplates.

Finished tender in primer.

I have made a simple water level gauge which I will fit to the tender. The cork might be replaced with a float.

JayBee- Number of posts : 104
Location : Cumbria UK
Registration date : 2015-11-23
Page 1 of 4 • 1, 2, 3, 4 ![]()
» Lynn Robinson. Showman Scenic
» Showman vs RL
» Two showman get an outing
» showman's kit 3