
Regulator
Page 3 of 6 •  1, 2, 3, 4, 5, 6
 ![]()
Re: Regulator
![]() lynnr Fri 04 Oct 2013, 7:22 pm
lynnr Fri 04 Oct 2013, 7:22 pm
Excellent!
I was thinking of getting a small diamond grit honing block to run over the. Regulator block surface to get a better flat. This was after chatting with Steve aswell.

lynnr- Number of posts : 3242
Age : 55
Location : Highland, 4inch showman
Registration date : 2010-08-06
Re: Regulator
![]() highpressure Fri 04 Oct 2013, 10:06 pm
highpressure Fri 04 Oct 2013, 10:06 pm

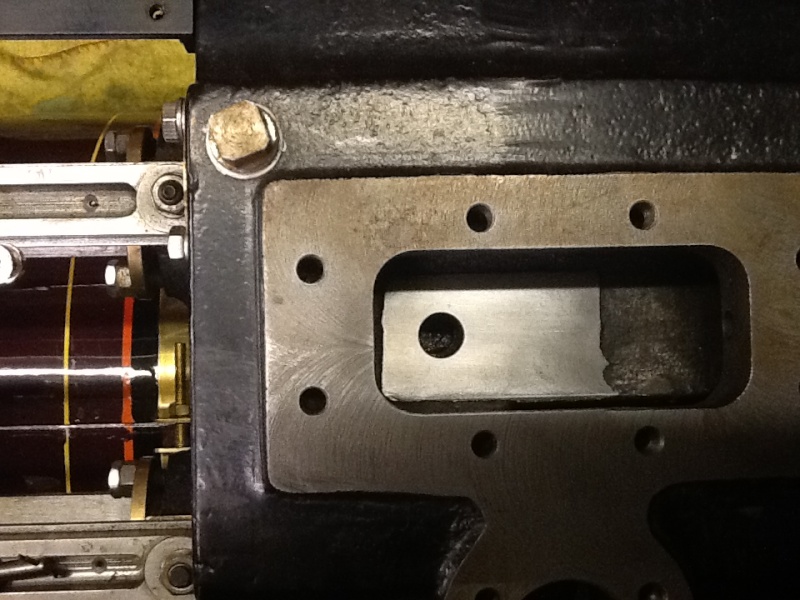
This is Andys bedplate after cleaning, mine isnt quite a clean possibly due to use, it will be interesting to see how this looks after 12 months use or how mine looks in a few months time.

highpressure- Number of posts : 1096
Age : 57
Location : West Sussex, 4" DCC Road Loco
Registration date : 2008-06-18 -

Re: Regulator
![]() lynnr Sun 06 Oct 2013, 6:08 pm
lynnr Sun 06 Oct 2013, 6:08 pm
lynnr- Number of posts : 3242
Age : 55
Location : Highland, 4inch showman
Registration date : 2010-08-06
Re: Regulator
![]() mikero Mon 07 Oct 2013, 2:00 pm
mikero Mon 07 Oct 2013, 2:00 pm
Mike


mikero- Number of posts : 261
Location : Brighton
Registration date : 2011-07-19
Re: Regulator
![]() highpressure Mon 07 Oct 2013, 6:12 pm
highpressure Mon 07 Oct 2013, 6:12 pm
highpressure- Number of posts : 1096
Age : 57
Location : West Sussex, 4" DCC Road Loco
Registration date : 2008-06-18 -
Re: Regulator
![]() Tim Watson Mon 07 Oct 2013, 8:06 pm
Tim Watson Mon 07 Oct 2013, 8:06 pm
The current stainless steel mod on Frederick shouldn't have a corrosion problem, but might - long term - have issues with the retention / seal of the steel sole plate.
As my father used to say, "those that live longest will see the most..."
Tim

Tim Watson- Number of posts : 585
Location : Herts
Registration date : 2008-07-02
Re: Regulator
![]() Steam Traction World Mon 28 Oct 2013, 4:29 pm
Steam Traction World Mon 28 Oct 2013, 4:29 pm
I have a few concerns, firstly, I don’t understand why the regulator face is deteriorating and doing so quite quickly. May be this has something to do with inadequate initial preparation but I don’t know. We will get some answers from Kevin on how his regulator performs during next season. The second concern is that I’m not sure how long the JB Weld that Tim used will stand up to the expansion and contraction of the block. If it does go however, then I guess it only needs to be re-stuck. Even if that’s an annual event then I don’t suppose that would be too bad. The last concern is about how to attach the Regulator Plate. Would everyone who wants to fit a plate be confident about drilling and threading (probably M5) their block?
Regards
Steve
Steam Traction World- Admin
- Number of posts : 946
Location : Daventry UK
Registration date : 2008-06-18 -
Re: Regulator
![]() Kevster Mon 28 Oct 2013, 4:54 pm
Kevster Mon 28 Oct 2013, 4:54 pm
maybe use the safety valve studs to hold it tightly in place
just a thought
Kev

Kevster- Number of posts : 424
Location : Hertfordshire 4 inch; DCC road loco
Registration date : 2011-01-27
Regulator valve.
![]() Capricorn1 Tue 29 Oct 2013, 1:28 pm
Capricorn1 Tue 29 Oct 2013, 1:28 pm
A good surface finish and suitable material should not give any problems, if the valve is bronze then perhaps you need a harder grade?
At blowing off presure the load on the valve will be considerble and a poor surface finish will cause friction as well as allowing steam through to the valve chest causing the engine to run with the regulator shut.
Chris.
Capricorn1- Number of posts : 119
Location : West Yorkshire.
Registration date : 2013-07-22
Re: Regulator
![]() highpressure Tue 29 Oct 2013, 6:30 pm
highpressure Tue 29 Oct 2013, 6:30 pm
These engines are sold to a great variation of builders some of which are very accomplished model engineers who simply dont have the time or patience to carry out all the machining to those of us that struggle to recognise one end of a screwdriver from the other.
I think in an ideal world the best solution would be to have a stainless plate let in to the cylinder plate but that involves removing the cylinder. I am fairly sure that Steve would have specified a correct grade for the valve, but as I have found the surface of the block can deteriorate as there is no steam oil to protect it after each run especially if there is any moisture present. I have spent a reasonable length of time "smoothing" out the block face so far but I wont know for some time how effective that will be long term and also I dont know how much more I should do to the block face? Do I continue with ever decreasing grades of wet and dry to get a polished finish or should I not have used wet and dry at all?? To be fair this is a case of trial and error to resolve this.
highpressure- Number of posts : 1096
Age : 57
Location : West Sussex, 4" DCC Road Loco
Registration date : 2008-06-18 -
Re: Regulator
![]() showman shane Wed 30 Oct 2013, 1:43 am
showman shane Wed 30 Oct 2013, 1:43 am
showman shane- Number of posts : 142
Location : Mount Maunganui New Zealand
Registration date : 2013-07-27
Regulator.
![]() Capricorn1 Wed 30 Oct 2013, 11:55 am
Capricorn1 Wed 30 Oct 2013, 11:55 am
Capricorn1- Number of posts : 119
Location : West Yorkshire.
Registration date : 2013-07-22
Re: Regulator
![]() Julia Wed 30 Oct 2013, 12:12 pm
Julia Wed 30 Oct 2013, 12:12 pm
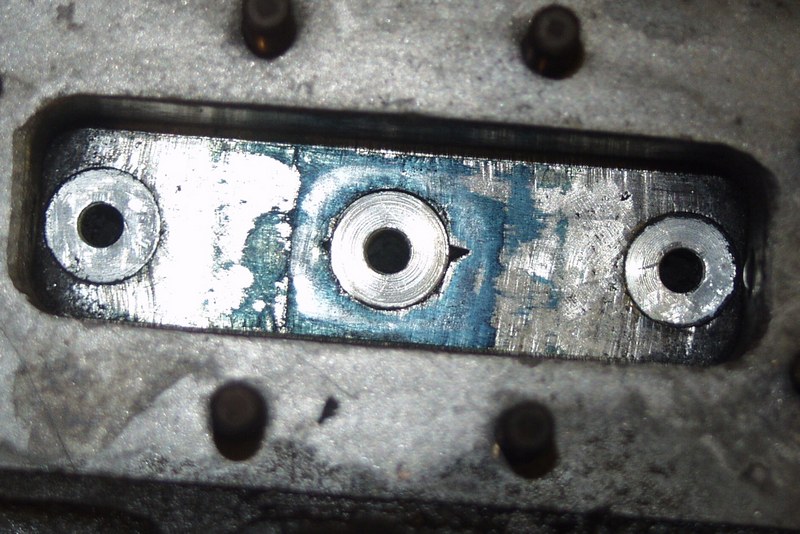
Partway though the scraping - By the looks of the picture I don't thing I am using proper blue
(Could be felt tip on port - high spots polished by dry flat block)
The eventual result looked ugly but was fairly flat (but not perfect)
The good news was it solved the problem. No need for oil, no need to polish. (Having a go with wet and dry to make it look nice can send you backwards.
6" Gold medal
I have learnt more scratch building my GMT. It is far better to get a good machined finish than try to improve a bad one with lapping compounds or wet & dry. Scraping a port flat works but it is a right pain especial when it is down in a pit.
The 6 GMT is designed with a removable bronze regulator port - oversized flanged bush. It is a stiff fit in the block and sealed with Folaic. Provides a good distortion fee seal and is removable. Like many of the 4" DCC I have had trouble with valve scoring. I assume this is casting sand breaking free. I have had to reface my valve seat twice but it was not painful. Since the port insert is sealed with Folaic I use a puller I devised to pull it out of the block. Having the port face out makes life so mush easier. The design of the face allows it to be set up in my lathe and given a light facing cut. I am paranoid over sharpening and polishing the tool and use a light cut with very fine power cross feed. I return the port face insert without further polishing.
6" Gold Medal Tractor
It is inevitable that the regulator will require some force to be moved when operating at full boiler pressure. There is a lot of force on the puck aka presure x area but what area? Is the area the outside area of the puck or the cross section of the hole going onward to the valve chest? If your regulator is dished it will certainly be the outside diameter of the puck. Worse still all that force will be on the edges of the puck. With a flat valve face the situation will be better.
PS
I would be nervous drilling and tapping for little screws in the block. Removing a broken tap would be a nightmare. Even if tapping went smoothly there is a chance that the force from the screws distorts the plate taking you back to square 1. Something along the lines used on the 6GMT would be better - oversize bush stiff fit on the regulator hole sealed with Folaic.

Julia- Number of posts : 71
Location : South East England
Registration date : 2008-06-17
Re: Regulator
![]() Tony King Wed 30 Oct 2013, 1:15 pm
Tony King Wed 30 Oct 2013, 1:15 pm
Regards,
Tony
Tony King- Number of posts : 856
Age : 68
Location : scotland
Registration date : 2008-10-31
Re: Regulator
![]() highpressure Wed 30 Oct 2013, 1:45 pm
highpressure Wed 30 Oct 2013, 1:45 pm
Secondly and worse due to my poor knowledge and skills the leftovers of the wet and dry made their way first into the HP cylinder and then the LP. Having run for over a year with silence I knew within seconds that something was not right as it slowly turned over after getting to 50, once giving it a quick blast the same scrapey unpleasant noise started in the LP. I realised pretty quick what it was and stopped running and have been extremely fortunate to have been able to remove both pistons without damaging the rings to enable them to be cleaned. Didnt really want toi get into this but it hasnt been too much of a problem and its quite nice to see how the bores are etc.
I donlike the idea of the stainless plate tapped to the block whihc is why I havent gone down this route so far, I do however like the idea from Julia of a removebale unit wedged into the block. In our case it will still result in modification of the face insitu to accomodate the port block. I am wondering weather the in the New Year it is worth removing the cylinder block altogether and having a stainless plate let in to the port face. This is a real ball ache at the moment and doesnt seem to have an end.
Be warned, dont try my fix wait until someone has a better proven solution.
highpressure- Number of posts : 1096
Age : 57
Location : West Sussex, 4" DCC Road Loco
Registration date : 2008-06-18 -
Re: Regulator
![]() Tim Watson Wed 30 Oct 2013, 6:22 pm
Tim Watson Wed 30 Oct 2013, 6:22 pm
It is not that difficult to drill the cylinder head with a Dremel type drill, using the plate as a guide (see page 9 of the Frederick thread). In the stainless steel plate the two locating holes were originally drilled to tapping size and used as a jig to drill the cylinder to that size (4BA). They were then opened up to clearance for the bolts and the plate re-ground to remove any distortions. The two bolts to hold the plate are a very passive fit and are not screwed down tight: using more bolts might increase the risk of distortions and also prevent any differential expansion of the plate. As Steve has mentioned it will rely on the good will of the JB Weld, so we'll see how it goes.
The stop valve (that is the 'correct' name for the regulator) worked very well at Old Warden. It's next trial will be at the Portsmouth Historic Dockyard at the end of November. Mark (Chop) has had his modified assembly at work all season, so maybe he could comment?
Tim
Tim Watson- Number of posts : 585
Location : Herts
Registration date : 2008-07-02
Re: Regulator
![]() MrStationHouse Thu 31 Oct 2013, 8:31 am
MrStationHouse Thu 31 Oct 2013, 8:31 am
The other thing I would think is that a mirror finish would not be ideal as it wouldn't leave any minute areas to provide lubricant.
I really like Julia's removable port, great idea.
Julia- did you scrape the Ag block in sittue in which case how did you keep the scrapings out of the steam way?
Best wishes
Simon
MrStationHouse- Number of posts : 314
Location : Malmesbury
Registration date : 2011-04-26
Re: Regulator
![]() bjwlancashire Thu 31 Oct 2013, 9:34 am
bjwlancashire Thu 31 Oct 2013, 9:34 am
I may try a round, solid regulator valve, the curve will also provide a reasonably steady opening and I think the full size regulator valves I have seen were also round - thought please.
I will remove mine at the weekend and take photos of both valve and cylinder block faces to show the condition of mine for comparison.
Brian

bjwlancashire- Number of posts : 938
Location : Mellor, Lancashire
Registration date : 2010-09-07
Re: Regulator
![]() Julia Thu 31 Oct 2013, 10:17 am
Julia Thu 31 Oct 2013, 10:17 am
Yes - If you look in the photo you will see three plugs that are a snug fit in the 2 risers and onward passage. The plugs a pushed slightly below the surface. Each is has a taped hole to enable a bolt to be inserted to give something to pull on to get them out.
I believe the DCC block is similar to the GMT in that it has cast in passage ways. As a result it will not be possible to block the passage back to the boiler. I would not be overly concerned at not being able to prevent crap going back into the boiler but it would be worthwhile to block the onward passage. The reason I am not overly concerned regarding the boiler it that it will inevitably be full of much nastier stuff and it would be a good excuse to give the boiler and riser another good pressure wash after scrapping. Also bear in mind that on a scale of 1 to 10 of nasty things, scraping are near the 1 end of the scale.
I have proper engineers blue but I found it did not work too well on the 4" Ag. The idea is that you build a fine film of blue on your fat surface and then rub the blued flat surface on the port face. The high spots pick up the blue the low spots stay metal colour. You then lightly scrap the blue away and repeat. Problem was that the restricted movement down the "pit" did not allow the blue to transfer properly.
A dodge that worked better for me was to lightly cover the port face with permanent marker pen (any colour!) and allow this to dry. Then rubbing a clean flat block, across the face to reveal the high spots where the marker is being rubbed away. (The exact opposite to conventional method with engineers blue). If you look carefully in the picture you will see I cut a moat around the side of the pit since it is impossible to work this area.
I guess with the cast in passageways access to the DCC port may be better and the port face may already be an island. In which case I would give engineers blue a try preferably with a flat block larger than the port face.
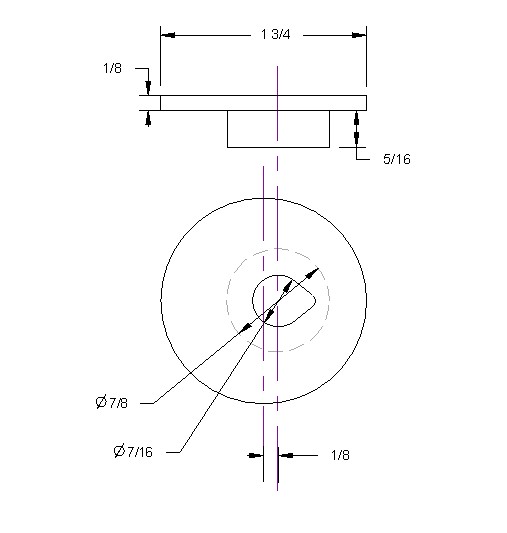
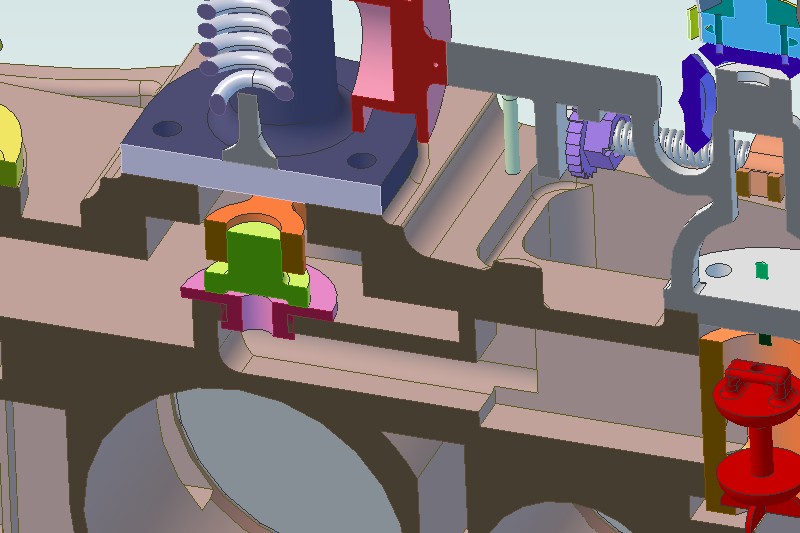
This shows the 6" GMT insert - to fit the 4 DCC it will need redesigning
As you can see the 6 GMT insert fits into a 7/8 hole in the block. This is much bigger than the existing hole in the DCC block. However I would not recommend attempting to enlarge the hole on the DCC block whilst fitted to the engine (and I would not dream of removing it either!). The hole in the block needs to have a nice bore so that the insert is griped when pushed in. If anyone wants to try this I would suggest reducing the 7/8 to what it needs to be and making the through hole as big a reasonably possible. Make the insert a push fit and seal with folac. Slightly undercut the bush where it changes diameter so that it goes home snugly into the block without the need to relieve the existing hole in the block. That way if it is a disaster the inserter can be removed and you can get back to a standard engine.
Julia- Number of posts : 71
Location : South East England
Registration date : 2008-06-17
Re: Regulator
![]() mikero Thu 31 Oct 2013, 10:28 am
mikero Thu 31 Oct 2013, 10:28 am
Mike
mikero- Number of posts : 261
Location : Brighton
Registration date : 2011-07-19
Regulator valve.
![]() Capricorn1 Thu 31 Oct 2013, 12:13 pm
Capricorn1 Thu 31 Oct 2013, 12:13 pm
Road engines run with saturated steam which contains droplets of water which will act as a lubricant.
The port face on top of the block must be flat and have a good finish, perhaps a removable seat may be one answer if there is room to allow one to be fitted, or if the underside of the valve was recessed a PTFE insert could be used, this may take up any small imperfections on the port face and would slide very easily making the regulator easier to operate and it could of course be easily replaced.
The working pressure of these engines is quite high compared to other minatures, but providing the materials used are similar to those used on full size engines there shouldn't be any problems.
Is there anyone who has NOT had any issues with their regulator?
Capricorn1- Number of posts : 119
Location : West Yorkshire.
Registration date : 2013-07-22
Re: Regulator
![]() highpressure Thu 31 Oct 2013, 4:46 pm
highpressure Thu 31 Oct 2013, 4:46 pm
Only those not in steam or so it would seemCapricorn1 wrote:
Is there anyone who has NOT had any issues with their regulator?
This afternoon I have removed the safeties to reveal a clean block face still but some considerable scoring in the valve itself, I am intending to find a pen or blue to check the block against the valve this weekend and continue with my wet and dry clean out debarcle......
highpressure- Number of posts : 1096
Age : 57
Location : West Sussex, 4" DCC Road Loco
Registration date : 2008-06-18 -
Re: Regulator
![]() Flasback Thu 31 Oct 2013, 5:54 pm
Flasback Thu 31 Oct 2013, 5:54 pm
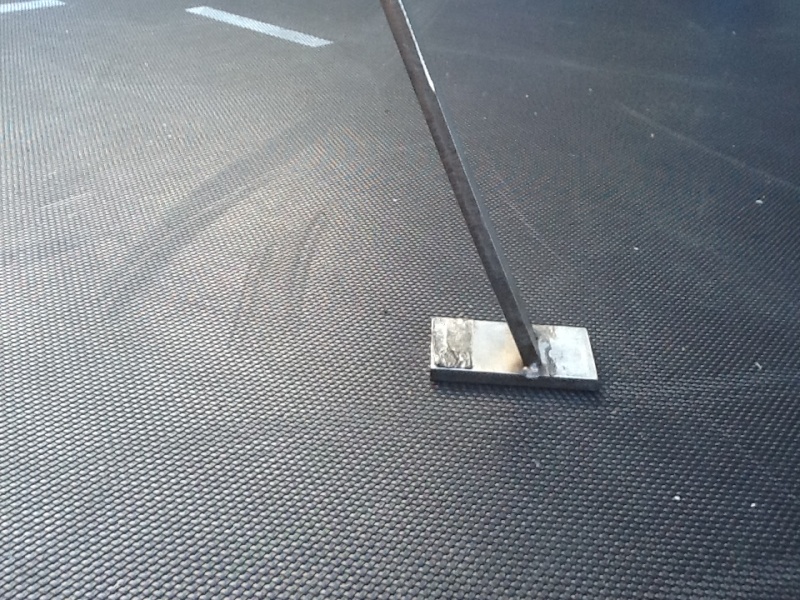
To Answer Brian's question I have stopped using the STW valve and have a round one (need to find a drawing of it but the overall ID is twice that of the port hole), I did the same as Julian, which is on page 2 of this thread. I spent several hours making sure the tool was flat prior to starting on the face in the cylinder block. Once I got the block flat I mated the regulator face to the surface of the cylinder using engineering blue to ensure no high spots (not too thick). A good point is the lapping process, don't do a linear motion, I did a figure of 8 and cycle motions to stop a concave profile occurring (and also the boredom). I used various grades of cutting compound and went finer as I went along. It is import to seal off the ports in the cylinder block to ensure you don't get cutting compound in places you don't want as Kev has mentioned. I used paper towels and washed down regular with WD40 also replacing the paper towel in the ports so I knew they were dry.
As I believe the cause of the passing is coming from more than one area I have also blanked off my starting valve as I believe the ball assembly is causing the steam to pass at that point also. Brian M was steaming at the weekend and his engine ran on, however when the starter valve was blanked off the engine did not run on or build pressure in the cylinder block to the same extent. I will put my starter valve assembly back on this weekend to see what its like but if I get run on I will blank it off again.
I have a number of issues with the engine I need to fix but the regulator is now running well and people who drive the engine always comment on the smoothness of the regulator control. I can't take credit for the design as it is one of Clive's H design.
Right off to scare a few kids.
Flasback- Number of posts : 191
Location : Cheshire
Registration date : 2011-01-30
Re: Regulator
![]() highpressure Thu 31 Oct 2013, 6:15 pm
highpressure Thu 31 Oct 2013, 6:15 pm
Dont know how you can get a figure of 8 motion in the reg chamber!! I can barely get a straight back and forth!!! Will block the input port next time though for crud prevention.
highpressure- Number of posts : 1096
Age : 57
Location : West Sussex, 4" DCC Road Loco
Registration date : 2008-06-18 -
Re: Regulator
![]() lynnr Thu 31 Oct 2013, 6:18 pm
lynnr Thu 31 Oct 2013, 6:18 pm
Remember to take the governor off and clean in there. There could be a puddle load of grits.
lynnr- Number of posts : 3242
Age : 55
Location : Highland, 4inch showman
Registration date : 2010-08-06
Page 3 of 6 • 1, 2, 3, 4, 5, 6 ![]()