
Gold leaf lining: stage by stage photos
Page 1 of 1

Gold leaf lining: stage by stage photos
![]() Tim Watson Tue 07 Aug 2012, 5:37 pm
Tim Watson Tue 07 Aug 2012, 5:37 pm
I have taken a previous thread and now inserted illustrations (made on holiday in Cornwall) to make it more understandable. I have also modified my techniques since the original posting and thought that this section of the forum would be the best place to put the modified thread.
It is important to put the lining on in the right order, the gold leaf being applied almost last.
Initial lining
1. Mark out centre of gold line with wax/chinagraph pencil (if needed).
2. Lay down 6 mm wide tape for position of gold (near an edge, use a 3mm 3M tape to gauge the distance of the 6 mm tape from the edge: it will remain afterwards, as there will be no outer red line).
3. Place Finesse 3-3-3 mm tape either side of this 6 mm tape (this will give the red lines).
4. Place Finesse 3-0.8-3 mm tape on the inside to give the yellow line 6 mm from the inner red line.
5. Use 3M 3 mm flexible blue tape where corners are needed, or there are obstructions – setting the distances to match the Finesse tape.
6. Remove original 6 mm tape.
7. Remove spacing tapes for the 3 mm red and 0.8 mm yellow lines from the Finesse tapes
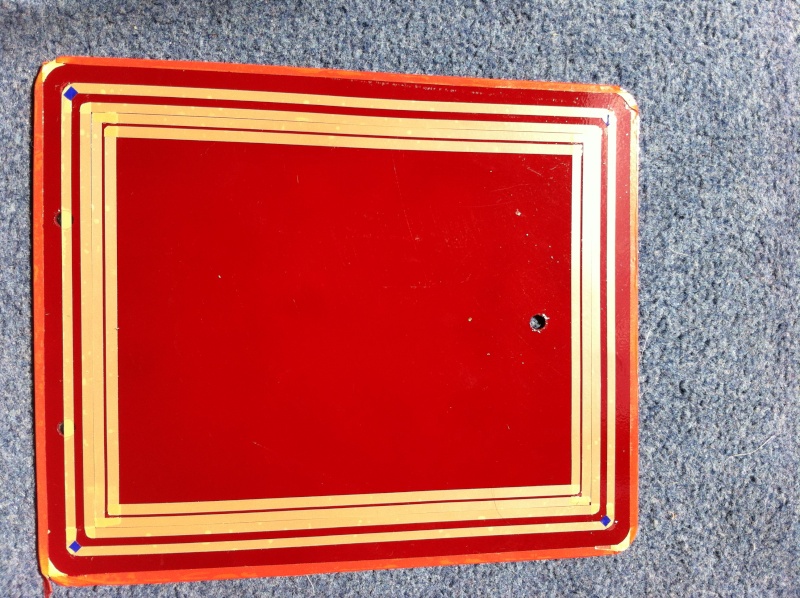
8. Paint the false gold (I now use One-Shot metallic brass - similar colour to your real gold) and the red and yellow lines in one go: use signwriting enamels. May need to put two coats on in quick succession to ensure good coverage. The false gold will give a good background to the real gold and it also makes it far easier to apply the gold size, subsequently.
9. Immediately peel off remaining tapes at a very acute angle and clean up any paint seepage with a white spirit–soaked cocktail stick: should not be an issue if tapes are well burnished down.
10. Let paint dry completely. Paint in black lines either side of the gold, with a number 4 'rigger' brush, using masking tapes if required. Ideally let the lining dry for a few days. If you don't then the last painted lines (black) will act as gold size and cause the gold leaf to stick to them.
11. Before gilding wipe over all of the lining area with degreaser to remove any adhesive residues from the tapes.

Applying gold leaf
12. Pounce (dust) all the lining area and any nearby paintwork with fine French chalk (a cotton mop with chalk inside it). This stops the gold leaf from sticking to unwanted paint surfaces.

13. Paint gold size (a slow-drying varnish) over the gold line: I use a chisel shaped brush the exact width of the gold line and deposit a series of dots, then spread these out along the line. It is important to get a nice even film of the gold size so that it dries at a consistent rate.

14. Leave to dry until tacky. Drying time will depend upon the size specification. 3-hour size gives plenty of time to paint all the lines and will be ready to gild in three hours – depending on ambient temperature. Check that it is dry by feeling with ‘tug’ on the hairs on the back of your hand: don’t check with fingertips, otherwise your fingerprint will show through the gold. The size will stay ‘open’ for many hours.
15. Take the gold leaf and apply to the line. I use lightly pressed, 23.5 ct roll-format gold leaf that is, say, 9 mm wide for use on a 6+mm painted line. The gold roll is held between the thumb and first finger of the left hand and the loose leaf end pressed onto the beginning of the line with the index finger of the right hand through the paper backing.
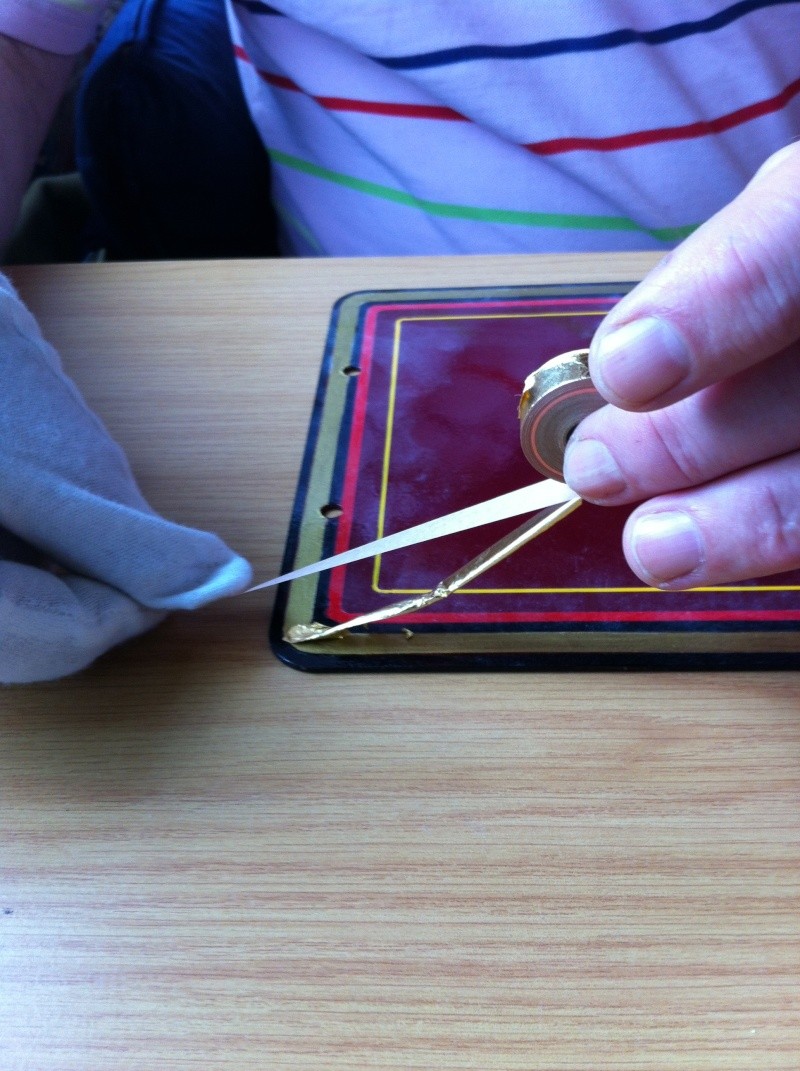
It is then unrolled along the line. Useful to have a cotton glove on the right hand to avoid touching and contaminating the gold. If the gold breaks, re-apply BUT DO NOT TOUCH THE SIZED SURFACE WITH YOUR GLOVE/HAND. Any defects will be made good with the second application.

Gently press down the paper backing.

The gold will stick to the size.
16. Next day, remove the skewings (excess gold) from the un-sized areas with a soft brush. If there are defects in the gold leaf than repeat the entire process or make minor repairs: I often use a quick drying acrylic-based size and skewings for these minor repairs.
17. Gently wash off any French chalk from the painted surfaces. The gold should now be in place, but the edges may look a little ragged.

18. Place any width tape on the edge of the red line at the border where the black lines are located.
19. Paint the 3 mm black line in the space between the red and the gold. The only edge that requires to be placed carefully is next to the gold leaf: you will probably be painting over the slightly irregular edge of the gold to neaten it up and it may need to be covered twice. Tape cannot be put on the gold to mask it, as there is a very strong chance that you will peel it off when trying to remove it. With practice the tape on the red isn’t really required, as the paint edge gives an easy margin to work to. The number 4 rigger brush has nice long bristles to hold a reasonable amount of paint and is about the correct width for the black lines.

20. Varnish all the lining at least twice.

Suppliers
I have sourced my gold leaf from ‘Gold leaf Supplies’ http://www.goldleafsupplies.co.uk/
They do a starter kit that gives you some of the bits to work with and a technique guide. Transfer leaf is more highly pressed gold, (i.e. more strongly fixed to a paper backing) presented in little books, which is a bit more robust to handle. This will be useful for the canopy lettering, but I consider that the rolls are better suited to lining, even though it is almost loose leaf. They come in different widths, but don’t think that a 6 mm roll will be suitable for a 6 mm line: you need a little bit of extra gold width to give you excess and allow for wandering.
Finesse and 3M tapes are available from Frost’s Automotive supplies. The lining paints should be of the sign-writers type.
Tim
It is important to put the lining on in the right order, the gold leaf being applied almost last.
Initial lining
1. Mark out centre of gold line with wax/chinagraph pencil (if needed).
2. Lay down 6 mm wide tape for position of gold (near an edge, use a 3mm 3M tape to gauge the distance of the 6 mm tape from the edge: it will remain afterwards, as there will be no outer red line).
3. Place Finesse 3-3-3 mm tape either side of this 6 mm tape (this will give the red lines).
4. Place Finesse 3-0.8-3 mm tape on the inside to give the yellow line 6 mm from the inner red line.
5. Use 3M 3 mm flexible blue tape where corners are needed, or there are obstructions – setting the distances to match the Finesse tape.
6. Remove original 6 mm tape.
7. Remove spacing tapes for the 3 mm red and 0.8 mm yellow lines from the Finesse tapes
8. Paint the false gold (I now use One-Shot metallic brass - similar colour to your real gold) and the red and yellow lines in one go: use signwriting enamels. May need to put two coats on in quick succession to ensure good coverage. The false gold will give a good background to the real gold and it also makes it far easier to apply the gold size, subsequently.
9. Immediately peel off remaining tapes at a very acute angle and clean up any paint seepage with a white spirit–soaked cocktail stick: should not be an issue if tapes are well burnished down.
10. Let paint dry completely. Paint in black lines either side of the gold, with a number 4 'rigger' brush, using masking tapes if required. Ideally let the lining dry for a few days. If you don't then the last painted lines (black) will act as gold size and cause the gold leaf to stick to them.
11. Before gilding wipe over all of the lining area with degreaser to remove any adhesive residues from the tapes.
Applying gold leaf
12. Pounce (dust) all the lining area and any nearby paintwork with fine French chalk (a cotton mop with chalk inside it). This stops the gold leaf from sticking to unwanted paint surfaces.
13. Paint gold size (a slow-drying varnish) over the gold line: I use a chisel shaped brush the exact width of the gold line and deposit a series of dots, then spread these out along the line. It is important to get a nice even film of the gold size so that it dries at a consistent rate.
14. Leave to dry until tacky. Drying time will depend upon the size specification. 3-hour size gives plenty of time to paint all the lines and will be ready to gild in three hours – depending on ambient temperature. Check that it is dry by feeling with ‘tug’ on the hairs on the back of your hand: don’t check with fingertips, otherwise your fingerprint will show through the gold. The size will stay ‘open’ for many hours.
15. Take the gold leaf and apply to the line. I use lightly pressed, 23.5 ct roll-format gold leaf that is, say, 9 mm wide for use on a 6+mm painted line. The gold roll is held between the thumb and first finger of the left hand and the loose leaf end pressed onto the beginning of the line with the index finger of the right hand through the paper backing.
It is then unrolled along the line. Useful to have a cotton glove on the right hand to avoid touching and contaminating the gold. If the gold breaks, re-apply BUT DO NOT TOUCH THE SIZED SURFACE WITH YOUR GLOVE/HAND. Any defects will be made good with the second application.
Gently press down the paper backing.
The gold will stick to the size.
16. Next day, remove the skewings (excess gold) from the un-sized areas with a soft brush. If there are defects in the gold leaf than repeat the entire process or make minor repairs: I often use a quick drying acrylic-based size and skewings for these minor repairs.
17. Gently wash off any French chalk from the painted surfaces. The gold should now be in place, but the edges may look a little ragged.
18. Place any width tape on the edge of the red line at the border where the black lines are located.
19. Paint the 3 mm black line in the space between the red and the gold. The only edge that requires to be placed carefully is next to the gold leaf: you will probably be painting over the slightly irregular edge of the gold to neaten it up and it may need to be covered twice. Tape cannot be put on the gold to mask it, as there is a very strong chance that you will peel it off when trying to remove it. With practice the tape on the red isn’t really required, as the paint edge gives an easy margin to work to. The number 4 rigger brush has nice long bristles to hold a reasonable amount of paint and is about the correct width for the black lines.
20. Varnish all the lining at least twice.
Suppliers
I have sourced my gold leaf from ‘Gold leaf Supplies’ http://www.goldleafsupplies.co.uk/
They do a starter kit that gives you some of the bits to work with and a technique guide. Transfer leaf is more highly pressed gold, (i.e. more strongly fixed to a paper backing) presented in little books, which is a bit more robust to handle. This will be useful for the canopy lettering, but I consider that the rolls are better suited to lining, even though it is almost loose leaf. They come in different widths, but don’t think that a 6 mm roll will be suitable for a 6 mm line: you need a little bit of extra gold width to give you excess and allow for wandering.
Finesse and 3M tapes are available from Frost’s Automotive supplies. The lining paints should be of the sign-writers type.
Tim

Tim Watson- Number of posts : 585
Location : Herts
Registration date : 2008-07-02
Roller for holding gold leaf rolls
![]() Tim Watson Wed 15 Aug 2012, 7:57 pm
Tim Watson Wed 15 Aug 2012, 7:57 pm
Commercial gold leaf suppliers make a £30 roller-dispenser for gold leaf: it's a bit like the roller you use when wallpapering.
I have made my own version, which has been vey useful for leafing the wheels, where access is a bit tight:

The device can be seen in use below:
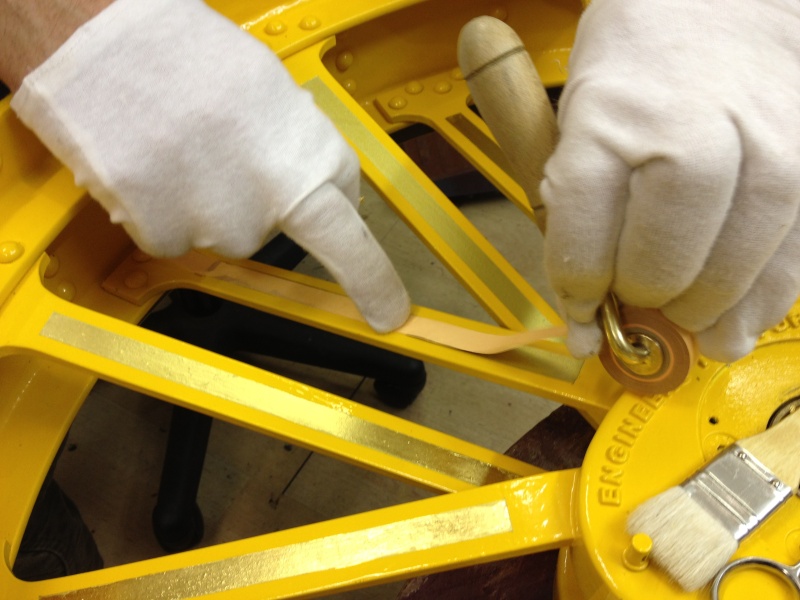
The astute amongst you will notice that the gold leaf has gone on before the other lines (green & red). This is because they will be put on using a Beugler wheel.
Incidentally, the back wheels have about £40 of gold on them!
Tim
I have made my own version, which has been vey useful for leafing the wheels, where access is a bit tight:
The device can be seen in use below:
The astute amongst you will notice that the gold leaf has gone on before the other lines (green & red). This is because they will be put on using a Beugler wheel.
Incidentally, the back wheels have about £40 of gold on them!
Tim
Tim Watson- Number of posts : 585
Location : Herts
Registration date : 2008-07-02
» Frederick SRL(S)
» Two Stage Regulator
» Leaf springs
» Painting the leaf spings
» Leaf spring too long?
» Two Stage Regulator
» Leaf springs
» Painting the leaf spings
» Leaf spring too long?
Page 1 of 1
Permissions in this forum:
You cannot reply to topics in this forum|
|
|