
Pinstriping the Tender !!!
5 posters
Page 1 of 1

Pinstriping the Tender !!!
![]() Frostie Thu 10 Feb 2011, 7:58 pm
Frostie Thu 10 Feb 2011, 7:58 pm
Yet another complete stipdown and re paint of the tender, I just dont seem to be able to get the lining on the tender correct, thats twice now that I have made a hash of the job, I have the Finesse stencil tapes, I have a Beuler wheel and the one shot paints, but still cant get a decent set of lines on the tender !!!!!
I am just about to re topcoat the Crimson lake enamel once again, then a third try to get the lining done, I think that this part is the hardest task to date on the build !!!!
I just dont understand how some of you manage to get the bends/corners as well as you have..
Any suggestions more than well received , pleease !!!
Malcolm
Frostie- Number of posts : 145
Age : 76
Location : Bodmin Cornwall
Registration date : 2010-09-10
Clean edges
![]() lynnr Fri 11 Feb 2011, 1:18 pm
lynnr Fri 11 Feb 2011, 1:18 pm
Hi
There are a couple of methods to assist with lining out.
Using the finesse tape when you come to an angle that the tape is cut and then restarted. Instead of overlapping the tape. Cut the angle and butt the tape up. This removes the problem of one tape climbing off the surface to be painted to lay over the other tape. Removing the tendency for the paint to crawl under the gap.
To get a tight turn on the tape. Hold a slight stretch to the tap as you pull it round the bend using your finger to hold the "leading edge" of the tape to the surface. Once you have the tape stretched to the curve. Lift the tape and relay in a more relaxed tension. You can get away with 2 or 3 lifts to accomplish the turn smoothly. I got the radius down to about 5mm easily with this method.
Also you can put a patch of tape at the corner and knife the curve out, you can get a set of compasses that have a blade instead of a pen holder.
When you have finished painting you need to remove the tap as soon as possible. If you leave the tape on until the paint dries out you will get a sharp / ragged / lifted edge instead of a nice finish.
You can also use a pinstriping push pen to be used as soon as the masking tape is removed (while the paint is still wet) to push any strings into the main body of the paint before it dries.
Hope this helps

lynnr- Number of posts : 3242
Age : 55
Location : Highland, 4inch showman
Registration date : 2010-08-06
Lining the tender
![]() TonyT Fri 11 Feb 2011, 3:42 pm
TonyT Fri 11 Feb 2011, 3:42 pm
Hi Malcolm
Lining the tender has to be one the most fiddley things on the engine,I took the route of masking tape,Revell enamel paint and brushes.
It took a while to get the curves to flow with the tender,and I think I used a very sharp knife to get the curve around the bottom rear of the tender.I started with the red first,then added the black on top of the red,and finally painted the yellow line.
The whole process took me about 3 nights to complete I think...drunk a few beer's since then!!!
Hope this helps and I'll send you a PM with my number as you only live up the road from me.
Tony

TonyT- Number of posts : 134
Age : 56
Location : Truro,Cornwall. (2" Burrell)
Registration date : 2008-06-17
Lining my trender
![]() Frostie Sat 12 Feb 2011, 11:32 am
Frostie Sat 12 Feb 2011, 11:32 am
Hi Lynn and Tony,
Thanks a million for youe help, the lining of the tender has been the most frustrating job to date, as I said earlier, twice I have taken the tender back to bare metal !!! I am not going to do this a third time !!
I will take my time and if it takes a week so be it, I think that the paint job on the tender either makes or breaks the machine.
Thanks for your help.
Tony I will give you a call .
On another note, I was fitting the crankshaft yesterday and noted a stiff point and slight knock at the very end of the outward stroke, after hours of cecking and re-checking the bearings alignment and the crosshead slider alignment, it turned out to be that I had over tightened the crosshead onto the piston connecting rod, thus the piston was being pulled into contact with the cylinder cover (Just), as soon as the link was undone a couple od threads the lumpiness disapeared !!! The assembly now turms as smooth as silk..
Cheers
Malcolm
Frostie- Number of posts : 145
Age : 76
Location : Bodmin Cornwall
Registration date : 2010-09-10
Re: Pinstriping the Tender !!!
![]() LilyJack Sun 13 Feb 2011, 5:08 pm
LilyJack Sun 13 Feb 2011, 5:08 pm
Bonjour, good evenin n welcome Frostie 
My lining isn't the best in the world BUT, What I did find easier (this being a learning curve as I went), was, use the stencil tape for all the straight runs, (chuck the beuller roller in the bin, personal preference, the bloody 2" is way to small to get a decent run with that wheel), and use a REALLY fine brush from a hobbyshop to paint in the corners etc by hand, believe me, patience it takes BUT, sit at a table with a few beers n the radio and just take your time,I aint telling you how to suck eggs here by no means but, and I know this'll sound funny, dont be stressed up thinkin you're gonna cock it up when you try painting by hand, take a few long breaths and take it nice and easy and slow, just use a small amount of paint on the brush, easy to add a little more paint than to try n wipe it off after aint it . You'll do a good job, and it gets easier the more you do it. I found trying to get that tape shite around such small radius's was a bloody nightmare for me, I suppose others found it easy but I found the real small modelling brush did it for me.
Hope it goes well either way mate..
Regards
LilyJack
My lining isn't the best in the world BUT, What I did find easier (this being a learning curve as I went), was, use the stencil tape for all the straight runs, (chuck the beuller roller in the bin, personal preference, the bloody 2" is way to small to get a decent run with that wheel), and use a REALLY fine brush from a hobbyshop to paint in the corners etc by hand, believe me, patience it takes BUT, sit at a table with a few beers n the radio and just take your time,I aint telling you how to suck eggs here by no means but, and I know this'll sound funny, dont be stressed up thinkin you're gonna cock it up when you try painting by hand, take a few long breaths and take it nice and easy and slow, just use a small amount of paint on the brush, easy to add a little more paint than to try n wipe it off after aint it
Hope it goes well either way mate..
Regards
LilyJack
LilyJack- Number of posts : 236
Location : UK
Registration date : 2009-04-01
Pinstriping
![]() Frostie Sun 13 Feb 2011, 7:49 pm
Frostie Sun 13 Feb 2011, 7:49 pm
Hi All,
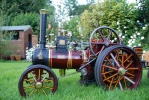
A chuffed Frostie at last, not perfect but good enough to pass muster !!!!
Thanks to all who encouraged me to chuck the buegler into the corner and paint the lines by hand.
I think that the advice to be bold and just go for it gave me the impetus to take my time and get the job done by hand.
I will get the tender fitted to the engine and post some pictures within a couple of days.
Once agan thanks to all you guys who keep looking and active within the forum, you make the job much easier for us new builders.
Tony,
Thanks for the cuppa and the tour of your machine on Saturday afternoon, hopefully I will get to see it in steam soon.
Malcolm
Frostie- Number of posts : 145
Age : 76
Location : Bodmin Cornwall
Registration date : 2010-09-10
Re: Pinstriping the Tender !!!
![]() hughb Thu 17 Feb 2011, 9:37 pm
hughb Thu 17 Feb 2011, 9:37 pm
Hi guuys
As for me well..................!!!""£"$£$% that tape was cr^p and the tool was good well
in the pics ok but on the stand & in the show not so good .......But I like it and when
thay do not just sit on them
Good luck
As for me well..................!!!""£"$£$% that tape was cr^p
in the pics ok but on the
thay do not just sit on them
Good luck
hughb- Number of posts : 575
Age : 54
Location : hertfordshire
Registration date : 2009-03-13
» Beugler pinstriping tool wanted
» Tender and Tender Fittings put together in Duesseldor
» Tank sealer
» Road Loco - 'Blackbeard'
» Help with Kit 7 Tender
» Tender and Tender Fittings put together in Duesseldor
» Tank sealer
» Road Loco - 'Blackbeard'
» Help with Kit 7 Tender
Page 1 of 1
Permissions in this forum:
You cannot reply to topics in this forum