
Hornplates
+2
forge
andyc
6 posters
Page 1 of 1

Hornplates
![]() andyc Mon 10 May 2010, 7:40 pm
andyc Mon 10 May 2010, 7:40 pm
Hi,
Is it possible / advisable to complete / paint the hornplate / spectacle plates assembley and fit it to the boiler in one piece or is it best to paint in seperate bits and then fit the individual parts to the boiler.
regards
Andy
PS - looked at the beugler lining wheel at harrogate on saturday. Is this a viable option for the 2" engine or is it just too small and fiddly to use it.
andyc- Number of posts : 43
Location : cambs
Registration date : 2010-03-02
Re: Hornplates
![]() forge Mon 10 May 2010, 9:39 pm
forge Mon 10 May 2010, 9:39 pm
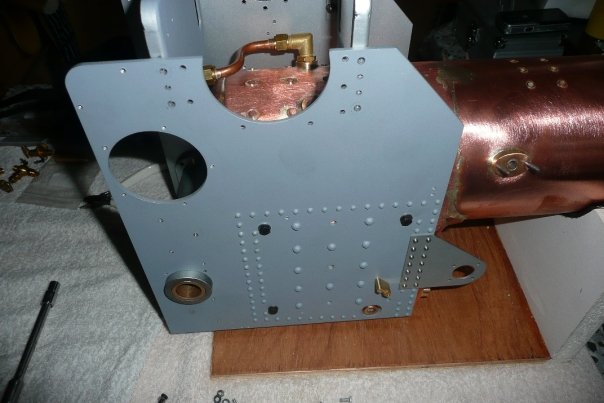
yes Andy, this is how i fitted my hornplates. The parts were painted separately and then put together and fitted to the boiler. the 2nd shaft tube was also fitted at the same time together with the rear axle tube. Please note some filing of the 2nd shaft is required to fit the sight glass top bracket and the diff lock mechanism. everything was adjusted to be square including the cylinder and crank using the alignment bar. the tender was fitted later once some of the difficult parts to reach were fitted to the boiler.
I did not start putting things together until i had the boiler, and i built everything around this. the hardest part was getting the cladding to fit! i suggest you cut each side of this into two bits with the brass fixing straps covering the joins! there are some photos somewhere showing where to cut.
best of luck Jon...
forge- Number of posts : 107
Location : Norfolk (2" Burrell)
Registration date : 2008-07-01
Re: Hornplates
![]() chrisnchrisroberts Mon 10 May 2010, 11:18 pm
chrisnchrisroberts Mon 10 May 2010, 11:18 pm
I assembled mine to about 90%. If I removed the rear spectacle plate once, I removed it 50 times. There was always something else to fit. I had to carve heaps out of the rhs spectacle plate to get the main bearing to fit. Glad I did not paint it first. By assembling it unpainted, I had a better idea of where bits went. There are plenty of threads on here, read them all before you start. I have a buegler but have not tried it yet. My photos are on this forum. Chris
chrisnchrisroberts- Number of posts : 123
Location : Blackbutt, Queensland, Australia
Registration date : 2008-10-31
Re: Hornplates
![]() forge Tue 11 May 2010, 10:18 am
forge Tue 11 May 2010, 10:18 am
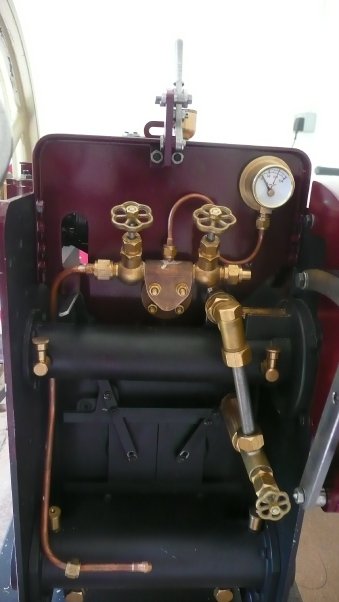
I must agree with Chris, i lost count of the number of times the spectacle plates were removed, but once i had fitted the hornplates they stayed on the boiler. do not try to fit the hornplates and tender to the boiler in one piece as you may find the tender is not exactly square!
Another suggestion, drill a hole in the front spectical plate so a long allen key will go through to adjust the RH crank bearing.
Jon
Another suggestion, drill a hole in the front spectical plate so a long allen key will go through to adjust the RH crank bearing.
Jon
forge- Number of posts : 107
Location : Norfolk (2" Burrell)
Registration date : 2008-07-01
Re: Hornplates
![]() Big Al Tue 11 May 2010, 1:48 pm
Big Al Tue 11 May 2010, 1:48 pm
And
Make sure the hole for the steam pipe is big enough to take the nut as I had to enlarge mine
Also
After my last steaming and run around I saw my tender rocking up and down to the tickover of the engine. On examination I found all of the bolts holding the hornplates on had worked loose despite fixing them with loctite!
This is going to cause a few hours work stripping all the gears off to get at them. I think I ran the boiler a bit hot and it broke down the properties of the loctite. Anyone got any better way of ensuring these don't come loose again?
At the moment its been put to one side to allow space to build the trailer.
I also managed to clip a kerb and break the steering chain, They are not that strong!
and the clack valves leak a bit under pressure but out of the top seals and the safety valve blew at 85 psi on a couple of occasions and the safety glass cover keeps falling off no matter how careful I am fitting it.
For all of you who have highly polished brass bits, they wont be so shiny when high pressure steam, grease and oil has covered or gone through them hehe
Oh! the joys of running an engine.
Al
Big Al- Number of posts : 147
Age : 70
Location : Oxford, England (2" Burrell)
Registration date : 2008-06-18
Re: Hornplates
![]() andyc Tue 11 May 2010, 7:04 pm
andyc Tue 11 May 2010, 7:04 pm
Hi Al,
I am using loctite 648 on anything that is likely to get warm as this is supposedly suitable for high temperature applications. According to the data sheet you have to heat it up to 250 degrees before disassembley takes place. I will have to check how our 2" minnie hornplates are fixed as this engine is still on strakes, which you would think causes more vibration, and this has never shown any signs of loostening.
Out of curiousity did the engine run ok with loose hornplates as i would have thought that this could have altered the timing.
regards
Andy
andyc- Number of posts : 43
Location : cambs
Registration date : 2010-03-02
High temperature gunge
![]() Steve Traill Tue 11 May 2010, 8:38 pm
Steve Traill Tue 11 May 2010, 8:38 pm
On my 4" the hornplates worked loose fairly quickly as the holes were made deliberately oversize to allow for minor variations in the boiler. This meant that the head of the bolt was all that was stopping it move & it wasn't enough. Julia did a set of wonderfull offset bushes as every bolt seemed to be offset however I followed a slightly different route. I cleaned the hole in the hornplate of all paint & grease and mixed up some JB Weld and one at a time inserted the bolts with a thick collar of the JB Weld. This was then screwed in tight and left for 24 hours. Nothing has moved since and that was 4 years ago. Hope it helps.
Steve
Steve

Steve Traill- Number of posts : 800
Age : 67
Location : Illogan Redruth Cornwall
Registration date : 2008-06-29
Re: Hornplates
![]() Julia Tue 11 May 2010, 9:12 pm
Julia Tue 11 May 2010, 9:12 pm
It was hard work making those bushes. Now I understand what JB weld is, I might have done the same.
I suspect the bolts did not turn. The heating and cooling might have been enough to stretch and or bed the bolt into the paint. It is a good idea to plan to tighten the bolts after the first steaming. Also paint under the bolts or against the boiler add to the problem. As Steve says remove.
If the hornplates move it is quite possible that the gauge glass will break - watch out!

Julia- Number of posts : 71
Location : South East England
Registration date : 2008-06-17
Re: Hornplates
![]() Big Al Fri 28 May 2010, 6:31 pm
Big Al Fri 28 May 2010, 6:31 pm
I had a word with some locals who work the full size engines and they suggested using the foliac paste round the hornplate threads as this would go solid when hot and ensure the bolts didn't move. Loctite will always break down eventually with repeated heating and they never touch the stuff where heat is an issue
alan
alan
Big Al- Number of posts : 147
Age : 70
Location : Oxford, England (2" Burrell)
Registration date : 2008-06-18
Re: Hornplates
![]() andyc Mon 31 May 2010, 9:32 am
andyc Mon 31 May 2010, 9:32 am
Hi,
I do like the idea of the foliac as the jb weld seemed a little too permanent. Thanks for sharing the information.
regards
Andy
I do like the idea of the foliac as the jb weld seemed a little too permanent. Thanks for sharing the information.
regards
Andy
andyc- Number of posts : 43
Location : cambs
Registration date : 2010-03-02
» Hornplates alignment tool
» Hornplates
» Hornplates - Kit 9
» Fitting Hornplates.
» Painting inside the hornplates
» Hornplates
» Hornplates - Kit 9
» Fitting Hornplates.
» Painting inside the hornplates
Page 1 of 1
Permissions in this forum:
You cannot reply to topics in this forum