
Kit 20 - Levers and Fittings.
2 posters
Page 1 of 1

Kit 20 - Levers and Fittings.
![]() milford59 Wed 08 Jun 2022, 6:25 pm
milford59 Wed 08 Jun 2022, 6:25 pm
I will get this thread off and running but I haven’t got very far yet. The first thing I had to do was refit (temporarily, I think) the rear spec plate, and that was a bit of a struggle, because I had fully painted it and being stupid, and not thinking ahead, the paint was preventing it from going in nicely. I sorted that, but I will need to touch up the spec plate and the inside of the hornplates later, due to a bit of damage.
So far I have only fitted the regulator lever and that’s nice and smooth and the regulator block is opening the right amount. I think I will need to fit the tender to attach all of the other bits in this kit, and then I will take it all apart and paint. From now on I plan to fit everything in bare metal to check how it goes on, before doing any painting.

So far I have only fitted the regulator lever and that’s nice and smooth and the regulator block is opening the right amount. I think I will need to fit the tender to attach all of the other bits in this kit, and then I will take it all apart and paint. From now on I plan to fit everything in bare metal to check how it goes on, before doing any painting.

milford59- Number of posts : 307
Location : Milford on Sea
Registration date : 2019-05-19
Something wrong here, I think
![]() milford59 Tue 14 Jun 2022, 9:45 pm
milford59 Tue 14 Jun 2022, 9:45 pm
I fitted the Regulator lever, but now I find that the oiler on top of the crankshaft bearing will not clear the rod, when I turn the engine. Have I done something obviously wrong ? Thanks for any advice.


milford59- Number of posts : 307
Location : Milford on Sea
Registration date : 2019-05-19
Reversing lever tip
![]() milford59 Wed 15 Jun 2022, 9:55 pm
milford59 Wed 15 Jun 2022, 9:55 pm
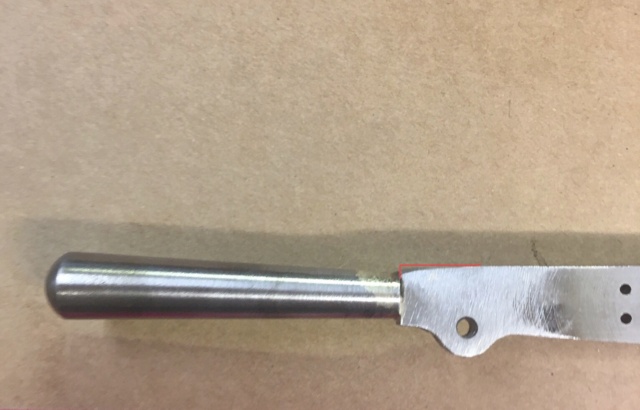
Looking at the instructions, I think the reversing lever top and shaft used to be 2 separate pieces…. Now it’s one piece, brazed together…. When I first assembled it, the brass lever did not operate very well, and then I realised that the concave part of the brass lever was fouling on the sharp corners of the shaft, when closing the lever, so I filed the shaft smooth, as per the picture below, and now it works nicely. Just a small tip for new builders.

milford59- Number of posts : 307
Location : Milford on Sea
Registration date : 2019-05-19
Reach rod tip
![]() milford59 Thu 16 Jun 2022, 9:07 am
milford59 Thu 16 Jun 2022, 9:07 am
I assembled my reach rod and the instructions say to pass it through the spec plates so that it can be attached to the lever on the weighshaft. It was a real fiddle to get it through both plates, and then I read a bit later in the instructions (I should have read them through all the way !!) that the reach rod will foul on the rear spec plate, and will need some fettling. Tip is to remove the rear spec plate before putting the rod through, and then put gear guard on and reversing lever before deciding how much to fettle the spec plate. Also , the rod looks like it might foul slightly on the diff lock knob, so might need a touch off the underside of the rod. (picture shows it off to the side, but will be above it when it’s all attached, I think)


milford59- Number of posts : 307
Location : Milford on Sea
Registration date : 2019-05-19
Re: Kit 20 - Levers and Fittings.
![]() Simon C Thu 16 Jun 2022, 6:53 pm
Simon C Thu 16 Jun 2022, 6:53 pm
Hi milford59
Just seen your post regarding thr regulstor rod.
I did not have the same issue on the SCC, however I did on my 2" engine Patricia.
On Patricia I moved the regulator lever assembly over to the right one hole then redrilled the right hand hole.
After that I just put a dog leg as close to the front spectacle plate as possible, in the regulator rod to give the required clearance.
You have put the support bracket on the front spectacle plate backwards, as it will also carry the simpling valve rod to the left of the regulator rod.
As for the reach rod, that should endup the other side of the difflock pin once you have the quadrants mounted.
Hope that makes sense without using any pictures as I am saving them for use in my build blog "Lockdown 3 still suck at home"
Simon C

Simon C- Number of posts : 303
Location : Derby
Registration date : 2017-07-07
Stephen Cosford likes this post
Re: Kit 20 - Levers and Fittings.
![]() milford59 Thu 16 Jun 2022, 9:34 pm
milford59 Thu 16 Jun 2022, 9:34 pm
Simon…. Thank you very much for your reply… I will consider what to do about the regulator rod, noting what you did to solve the problem….I wonder whether just fitting one of the smaller oilers would be the easiest fix….thanks for the tip about the bracket being the wrong way on the front spec plate.
With regard to the reach rod. I have now got it all mounted (except for the front screw on the quadrant, which was too short) and as you can see it goes directly over the top of the hole for the pin that locks the diff.

With regard to the reach rod. I have now got it all mounted (except for the front screw on the quadrant, which was too short) and as you can see it goes directly over the top of the hole for the pin that locks the diff.

milford59- Number of posts : 307
Location : Milford on Sea
Registration date : 2019-05-19
Re: Kit 20 - Levers and Fittings.
![]() Simon C Fri 17 Jun 2022, 8:23 am
Simon C Fri 17 Jun 2022, 8:23 am
My diff lock pin uses the same hole for the locked and unlocked position
A second hole in the indexing plate lines up when locked.
Simon C
A second hole in the indexing plate lines up when locked.
Simon C
Simon C- Number of posts : 303
Location : Derby
Registration date : 2017-07-07
Re: Kit 20 - Levers and Fittings.
![]() milford59 Fri 17 Jun 2022, 8:37 am
milford59 Fri 17 Jun 2022, 8:37 am
Simon C wrote:My diff lock pin uses the same hole for the locked and unlocked position
A second hole in the indexing plate lines up when locked.
Simon C
Great ! That will sort it then - thanks very much again Simon - I appreciate input from experienced people - I am in the dark with steam- I’ve done cars and motorbikes, but never anything this slow
Edited to say that I just checked and mine doesn’t have the second hole (yet) - but that will be no problem to take the plate out and make the second hole.

milford59- Number of posts : 307
Location : Milford on Sea
Registration date : 2019-05-19
Reversing quadrant
![]() milford59 Sun 19 Jun 2022, 12:04 am
milford59 Sun 19 Jun 2022, 12:04 am
I did the measurements for the quadrant and have now filed the slots - it takes a while with a hand file and in order to get two slots between Full Forward and Mid-range there is not a lot of thickness between the slots. I think I did a couple of them deeper than I needed, so this is not the best job I have done on my kit so far , but it should be functional. I am hoping to buy a small milling machine in the next couple of months, so I might buy a couple more quadrants from the factory and re-do this job to make it a bit neater. Next job is to time the valves, but having read the instructions a few times, I am still clueless, so I think I will leave that job for the time being, and come back to it - I think it can be done any time.


milford59- Number of posts : 307
Location : Milford on Sea
Registration date : 2019-05-19
Re: Kit 20 - Levers and Fittings.
![]() milford59 Wed 29 Jun 2022, 8:53 pm
milford59 Wed 29 Jun 2022, 8:53 pm
I have sorted the reversing lever -it was fouling on the rear spec plate, so I have added a bit of clearance to the spec plate and also tweaked the edge of the reversing lever. The spec plate will be repainted before final fit as it got a bit damaged when re-fitting it a while ago.


milford59- Number of posts : 307
Location : Milford on Sea
Registration date : 2019-05-19
» Flywheel and Gear change
» boiler fittings
» Planned schedule for the next few kits
» steering and boiler
» Tender Fittings - Kit 8
» boiler fittings
» Planned schedule for the next few kits
» steering and boiler
» Tender Fittings - Kit 8
Page 1 of 1
Permissions in this forum:
You cannot reply to topics in this forum|
|
|