
Kit 24 - Govenor and Saftey valve
Page 1 of 2 • 1, 2 ![]()

Kit 24 - Govenor and Saftey valve
![]() Big Al Tue 25 Aug 2009, 4:03 pm
Big Al Tue 25 Aug 2009, 4:03 pm
Couple of points - The horizontal bevel and Vertical bevels are in the wrong packages - they are arse about face
My kit didn't contain an oiler (page 3 end of second paragraph) and it's not listed on packaging. Anyone else missing one?
Keep it cool, have fun
Alan
Big Al- Number of posts : 147
Age : 70
Location : Oxford, England (2" Burrell)
Registration date : 2008-06-18
Re: Kit 24 - Govenor and Saftey valve
![]() Vapor Tue 25 Aug 2009, 4:12 pm
Vapor Tue 25 Aug 2009, 4:12 pm

Vapor- Number of posts : 383
Age : 114
Location : Isle of Wight (2" Burrell & 5" Duchess ex MW)
Registration date : 2008-06-18
Re: Kit 24 - Govenor and Saftey valve
![]() forge Tue 25 Aug 2009, 4:22 pm
forge Tue 25 Aug 2009, 4:22 pm
forge- Number of posts : 107
Location : Norfolk (2" Burrell)
Registration date : 2008-07-01
Re: Kit 24 - Govenor and Saftey valve
![]() malcolm Tue 25 Aug 2009, 4:35 pm
malcolm Tue 25 Aug 2009, 4:35 pm
Malcolm
malcolm- Number of posts : 18
Location : Holbeach, Lincolnshire [ 2" Burrell ]
Registration date : 2008-06-17
Re Kit 24 - Vertcal Bevel
![]() Big Al Tue 25 Aug 2009, 10:15 pm
Big Al Tue 25 Aug 2009, 10:15 pm
Followed instructions and countersunk the 3 holes in the Vertical bevel now cant get the M2 x 6csk screws to take up the thread again
Decided it is because the countersink has burred the threads over so need to run a tap through the holes again. Can anyone tell me if the below tap is the right size?
Metric 2.0 x 0.40 course as advertised on maidstone engineerings site
http://shop.maidstone-engineering.co.uk/?mod=product&cat_id=4&product_id=2036
cheers
Alan
Big Al- Number of posts : 147
Age : 70
Location : Oxford, England (2" Burrell)
Registration date : 2008-06-18
Re: Kit 24 - Govenor and Saftey valve
![]() forge Tue 25 Aug 2009, 11:06 pm
forge Tue 25 Aug 2009, 11:06 pm
call tracy tools, they have every size and style of tap, die, reamer and drills. They have a website but you have to order oer the phone.
forge- Number of posts : 107
Location : Norfolk (2" Burrell)
Registration date : 2008-07-01
Re: Kit 24 - Govenor and Saftey valve
![]() malcolm Wed 26 Aug 2009, 9:08 am
malcolm Wed 26 Aug 2009, 9:08 am
Malcolm
malcolm- Number of posts : 18
Location : Holbeach, Lincolnshire [ 2" Burrell ]
Registration date : 2008-06-17
Re: Kit 24 - Govenor and Saftey valve
![]() LilyJack Wed 26 Aug 2009, 9:39 am
LilyJack Wed 26 Aug 2009, 9:39 am
Are they blind holes with the threads? Just asking coz ya could stick the screws in from the "other side" to cut the threads again?
LilyJack
LilyJack- Number of posts : 236
Location : UK
Registration date : 2009-04-01
Re: Kit 24 - Govenor and Saftey valve
![]() BUNGLE Wed 26 Aug 2009, 11:25 am
BUNGLE Wed 26 Aug 2009, 11:25 am
KINDA LOOKING FORWARD TO DOING THIS ONE, AS IT LOOKS LIKE A SIT AT THE BENCH TO PUT THE WHOLE ASSEMBLY TOGETHER TYPE DEAL, MY OLD LEGS SAY THANK YOU FOR THAT !!
HAPPY BUILDING GUYS, AL, THANKS FOR THE HEAD UPS ON YOUR PROB, WE'LL LOOK OUT FOR THAT.
REGARDS
BUNGLE
BUNGLE- Number of posts : 232
Age : 65
Location : HERTS (2" BURRELL)
Registration date : 2008-06-17
Re : Kit 24 - Govenor and Saftey valve
![]() Big Al Wed 26 Aug 2009, 1:05 pm
Big Al Wed 26 Aug 2009, 1:05 pm
For all others of us. I have an idea you may want to consider if you haven't already countersunk the holes. The problem being the threads are so fine the pressure of the contersunk 'bends' them so you wont get the screws to start. The screws are very fiddly as you will have all found out. I have no choice but to run a tap back through BUT If you screw a small grub screw in the hole first (I found a couple of ones I hadn't used) so that the level of the head is deeper than the countersink depth. When you have used the countersink you may be able to unsrew the grub screw thus re defining the thread. If you cant then keep winding the grub screw in till it comes out in the centre of the bevel and get a tap like me
A thought has just inspired me to consider trying to 'unscrew' the grub screw starting from the inside the bevel to re cut the thread on it's way out. I'll try it tonight. Brilliant idea if it works !!
Alan
Big Al- Number of posts : 147
Age : 70
Location : Oxford, England (2" Burrell)
Registration date : 2008-06-18
Re: Kit 24 - Govenor and Saftey valve
![]() Vapor Wed 26 Aug 2009, 1:35 pm
Vapor Wed 26 Aug 2009, 1:35 pm
Vapor- Number of posts : 383
Age : 114
Location : Isle of Wight (2" Burrell & 5" Duchess ex MW)
Registration date : 2008-06-18
Re: Kit 24 - Govenor and Saftey valve
![]() forge Wed 26 Aug 2009, 8:38 pm
forge Wed 26 Aug 2009, 8:38 pm
forge- Number of posts : 107
Location : Norfolk (2" Burrell)
Registration date : 2008-07-01
Re: Kit 24 - Govenor and Saftey valve
![]() BUNGLE Wed 26 Aug 2009, 10:19 pm
BUNGLE Wed 26 Aug 2009, 10:19 pm
VAPOR, I THINK THATS HOW AL LOST THE WEIGHT !!!!!!!
FORGE, I WAS GOING TO ASK THAT QUESTION TOO, KINDA WORRIED ABOUT ASKING SIMPLE QUESTIONS ANYMORE !!!!!!!! LOL
REGARDS
BUNGLE
BUNGLE- Number of posts : 232
Age : 65
Location : HERTS (2" BURRELL)
Registration date : 2008-06-17
Countersinking the holes to hold the spring strips, & safety valves
![]() Steam Traction World Wed 26 Aug 2009, 11:21 pm
Steam Traction World Wed 26 Aug 2009, 11:21 pm
Try using a drill rather than a countersinking tool. Thats all I used and I didn't have any problems with mucking up the threads. The screws are very small and difficult to put in. I'm only used to big screws (in my dreams!) but even I was able to manage them. The thread is M2 coarse which has a 0.4 pitch. We do have a couple of spare taps, so if you do muck them up, ring Isabel and we'll lend one to you. Alternatively send the bits back to us and we'll put the countersinks in.
Just to confirm we (I) did forget to include the oiler for the governor. We'll put it in kit 17 which should be out next week.
You can disassemble the safety valve for polishing, but you will of course need to set it again. Count the threads or measure a distance that you can refer to when re-assembling, but veer on the safe side when you put it back together. Better that the safeties go off at 80psi rather than 150psi on the first steaming! It is also just about possible to leave the adjusting nut alone and pull the lever off, then un-hook the spring, but it's not easy and probably not worth doing.
Regards
Steve
Steam Traction World- Admin
- Number of posts : 946
Location : Daventry UK
Registration date : 2008-06-18 -

Re: Kit 24 - Govenor and Saftey valve
![]() BUNGLE Thu 27 Aug 2009, 1:05 am
BUNGLE Thu 27 Aug 2009, 1:05 am
THATS GREAT
BUNGLE
BUNGLE- Number of posts : 232
Age : 65
Location : HERTS (2" BURRELL)
Registration date : 2008-06-17
Re: Kit 24 - Govenor and Saftey valve
![]() Big Al Thu 27 Aug 2009, 7:21 am
Big Al Thu 27 Aug 2009, 7:21 am
Ah well, Out with a taper !
Getting smaller Al
Big Al- Number of posts : 147
Age : 70
Location : Oxford, England (2" Burrell)
Registration date : 2008-06-18
Re: Kit 24 - Govenor and Saftey valve
![]() hughb Sat 29 Aug 2009, 8:34 pm
hughb Sat 29 Aug 2009, 8:34 pm
hughb- Number of posts : 575
Age : 54
Location : hertfordshire
Registration date : 2009-03-13
Re: Kit 24 - Govenor and Saftey valve
![]() Big Al Sun 30 Aug 2009, 9:19 am
Big Al Sun 30 Aug 2009, 9:19 am
Used a drill on the govenor top to countersink the holes and it worked, So don't used a countersink as Steve says, I ran a drill carefully over the vertical bevel holes and manages to get them sorted.
When I screwed on the 3 springs on the bevel first I had to cut them down quite a lot, when I finally fixed them tight and filed the heads down to fit the collar all was fine, used a dremel with little grinding wheel and was chuffed when the collar fitted tight.
Trail fitted the springs to the upper spring collar and similar problem with protruding threads fouling the thread of the govenor top. This means that the length of the screws is critical and very small.
When I tried fitting the lower bevel over the shaft I still had too much thread protruding so decided to clamp it carefully in a vice and run a suitable drill through it. That's when it all went wrong!! Drill caught the thread ends and the bevel was not held tight enough in the vice (didn't want to damage it,)so all came adrift and ripped my balls off. All 3 metal springs are now totally trashed (was gonna say something stronger but I know Isobel reads the site
So pee'd off gonna have a big steak, chips and a few beers !!
Yours
Getting bigger again
Al
Big Al- Number of posts : 147
Age : 70
Location : Oxford, England (2" Burrell)
Registration date : 2008-06-18
Re: Kit 24 - Govenor and Saftey valve
![]() northburrell Tue 01 Sep 2009, 6:58 pm
northburrell Tue 01 Sep 2009, 6:58 pm
well ye same for me really used a drill to counter sink no problems, cut the screws, put the springs on and fitted the screws tightened it all up and pop, pop,pop the counter sink on the holes has ment that the spring steal has to bend inwards to follow the counter sink. this has split the springs were the screws go and there all scrap now!!!! lots of swear words and head scratching but no way of fixing it...this needs revising i think.. why cant the springs be held by screwing through the brass ring that slides over the top then just filed to the profile of the ring.. yes you will see the screws but it's a better way of fitting them I think..
Steve I think there's going to be lots of us asking for new springs please. I hope they dont all break again tho!!
northburrell- Number of posts : 197
Location : edinburgh
Registration date : 2008-10-15
Re: Kit 24 - Govenor and Saftey valve
![]() TonyT Wed 02 Sep 2009, 4:25 pm
TonyT Wed 02 Sep 2009, 4:25 pm
I've been following this one with interest as I haven't really started the govenor yet,just been fiddling with my balls
What I have managed to do is slide the spring collars over the springs top and bottom without using the screws to hold the springs and everything is pretty tight.
I have started to wonder if it would be possible to build this part up without using the screws and plenty of Loctite to hold it all together as at the end of the day the govenor is more for show than use isn't it ?
Steve,your thoughts please,and anyone else's please
cheer's
Knackered Tony

TonyT- Number of posts : 134
Age : 56
Location : Truro,Cornwall. (2" Burrell)
Registration date : 2008-06-17
Re: Kit 24 - Govenor and Saftey valve
![]() LilyJack Wed 02 Sep 2009, 10:10 pm
LilyJack Wed 02 Sep 2009, 10:10 pm
Just that if it DOES spin, I'd rather use screws than be anywhere near em when they fly off when the loctite gives. I thought the unit was driven by a little drive belt? It'd be interesting to see if it does work or not because it'd be better if it did. Not as in a true governor but at least have it spinning?
LilyJack
LilyJack- Number of posts : 236
Location : UK
Registration date : 2009-04-01
Re: Kit 24 - Govenor and Saftey valve
![]() TonyT Wed 02 Sep 2009, 11:42 pm
TonyT Wed 02 Sep 2009, 11:42 pm
I was thinking that I probably wouldn't use it that much,and after read the problems that Big Al and Northburrell have been having,I tend to think more for show than use.
Any other thoughts please
cheer's
Tony

TonyT- Number of posts : 134
Age : 56
Location : Truro,Cornwall. (2" Burrell)
Registration date : 2008-06-17
Re: Kit 24 - Govenor and Saftey valve
![]() hughb Thu 03 Sep 2009, 8:09 pm
hughb Thu 03 Sep 2009, 8:09 pm
TonyT wrote:Lilyjack,it will spin,but how often was my thought.The govenor on the 2" is an example of the real thing,as in it does not control the revolutions of the engine,but it does add the finishing touches.
Yes guys I think you are right .But only If they are not played with .Lilyjack {snigger}
hughb- Number of posts : 575
Age : 54
Location : hertfordshire
Registration date : 2009-03-13
Re: Kit 24 - Govenor and Saftey valve
![]() miller Thu 03 Sep 2009, 8:44 pm
miller Thu 03 Sep 2009, 8:44 pm
malcolm wrote:On reading through the governor build instructions this morning I noticed that two thirds of the way down page 2 it says screw the governor top [BU22409] through the brass washer BU22441] but there is not a brass washer supplied nor is it listed in the parts and packing list. Has anyone else found this part?
Malcolm
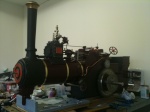
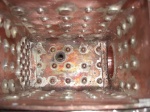
i would like to hear more on this as the washers were definitely made. don't know how they didn't get into the kit ??? (you can see one on the control model pic below)
well the good new guys is that this kit will go together eventually and yes, we realise how small the parts are, (we had to make them don't forget
a photo of this kit on the control model for you....


miller- Number of posts : 270
Location : STW
Registration date : 2008-06-16
Re: Kit 24 - Govenor and Saftey valve
![]() northburrell Mon 07 Sep 2009, 12:25 pm
northburrell Mon 07 Sep 2009, 12:25 pm
Well the governor would not have been used for driving around, the governor is used to keep the engine at a constant speed when loads are put on the engine, like when power is being taken of the the fly wheel and running a log saw or running a thresher etc. ~(full size that is)~ so running around with the governor spinning is probably not a good idea and not true to life
all the traction engines i've seen never have it working and is more for show and scale really. I think your right though some loctite will do the job..
as with my post about what loctite can be used for I used it hold my pressure gauge to the wood backing allong with the captive brass threads, I clamped it over night and it wont budge when pressed on very hard i might add.. i think when i get some new springs ill just use loctite or just screw through the brass casing then file off the the head. hell use both why not
I'm looking at a full size roller just know, there not badly priced either at around £42.000 for a fully restored one. traction engines are over £100.000 but i can understand that.. just finding some were to put it is the challange...!
hope your all well.
Jo
northburrell- Number of posts : 197
Location : edinburgh
Registration date : 2008-10-15
Page 1 of 2 • 1, 2 ![]()
|
|
|