
Tender and Tender Fittings put together in Duesseldor
2 posters
Page 1 of 1

Tender and Tender Fittings put together in Duesseldor
![]() karl heinz marschner Wed 14 Sep 2022, 8:33 pm
karl heinz marschner Wed 14 Sep 2022, 8:33 pm
Tender Sides, Back & Bottom, Water Tank:
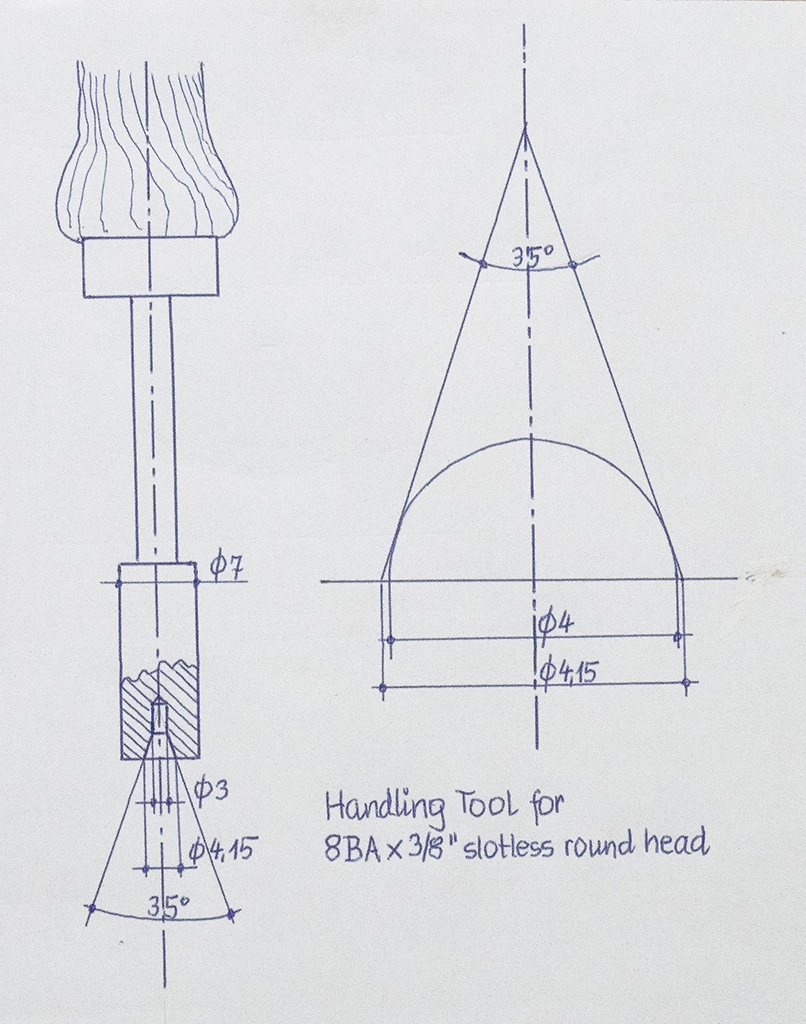
Putting the parts of the tender together came out to be some kind of a challenge for me. To start with I fabricated another special tool for me, which I would need to handle the 8BA slotless round head screws. If somebody wants to make it for himself, here is the design:
Before starting the assembly I tried to bring the back & bottom sheet somewhat closer to the shape of the side-walls. I used a piece of 50 mm diameter piece of steel and a heavy bench vice. After that I followed the instruction and it was relatively easy to put the three parts together. The tank front fitted perfectly. The tank top did not. It did not fit at all:
It was not wide enough and - getting worse - the holes at both sides did not match with the holes in the two side walls. Running a drill through the holes as recommended in the instruction would have ended in a disaster. So, what could I have done? I did not like the idea to send the parts back to STW. I am sure they would have helped me as quick as possible. But, you know, I am living in Germany, and sending back and forth would have meant quite some time. So I decided to salvage the parts. See photo below:
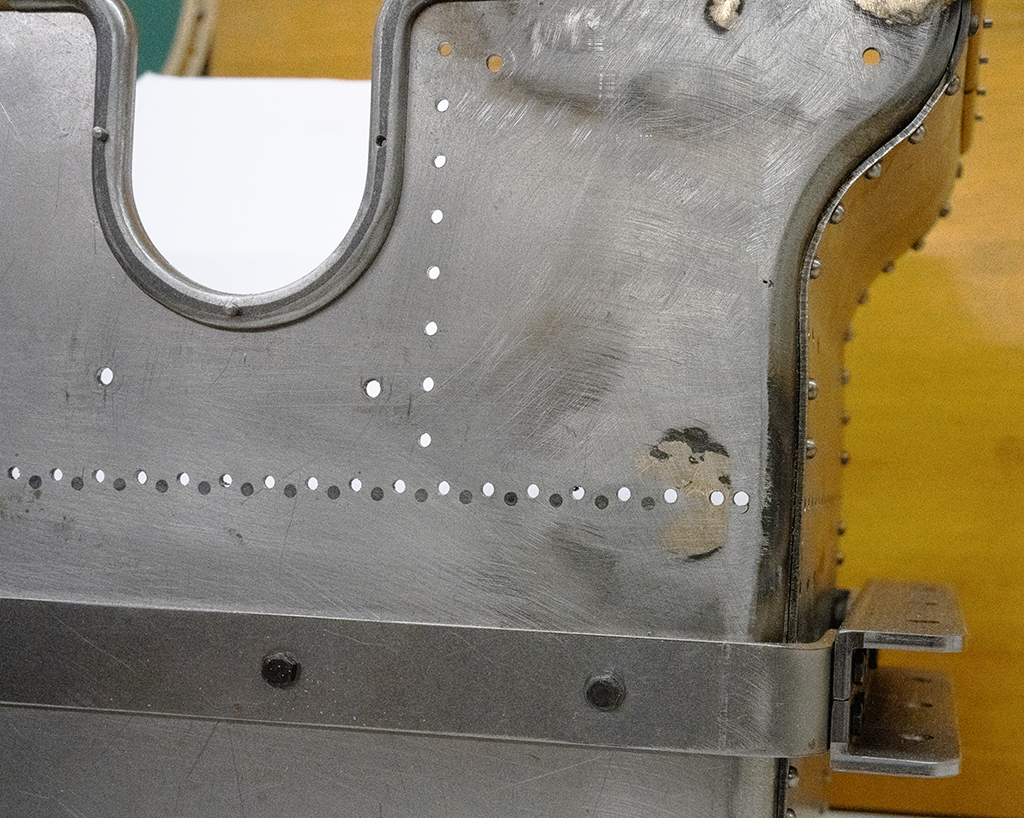
Two holes at the front end and two holes at the back end on each side I sealed by brazing pieces of steel with accurate diameter into the holes. This is a very reliable method, no cock up at all. All the other holes I sealed with 2K-repair paste. After doing that I was able to drill new holes (see photo above). After that the tank top was still not wide enough, so I had to make a shim. Doing all this took me quite some time, so many holes! But with a computer controlled milling machine it is not a big problem.
STW says, to build a Burrel Steam Traction Engine using the premachined parts in their kits, you will not need a turning lathe or a milling machine. I say, yes this is okay, but it helps a lot if have such kind of equipment at hand. It makes you so much more independent. And it is easy if you want to change one or the other part to your own design. I love to do that.
As far as the sealing of the water-tank is concerned, the instructions were difficult for me to understand, and they are slightly inconsistent. The same with the recommendations for the painting procedure. I guess, there is no optimum way. For me I made this decision:
Bunker divider:
The bunker divider was not wide enough as well, so I needed to make an additional shim to fit it into the tender. For the top bunker I added an additional 25 mm high divider. So I can put more pieces of coal into it when everything is finished. See photo below:
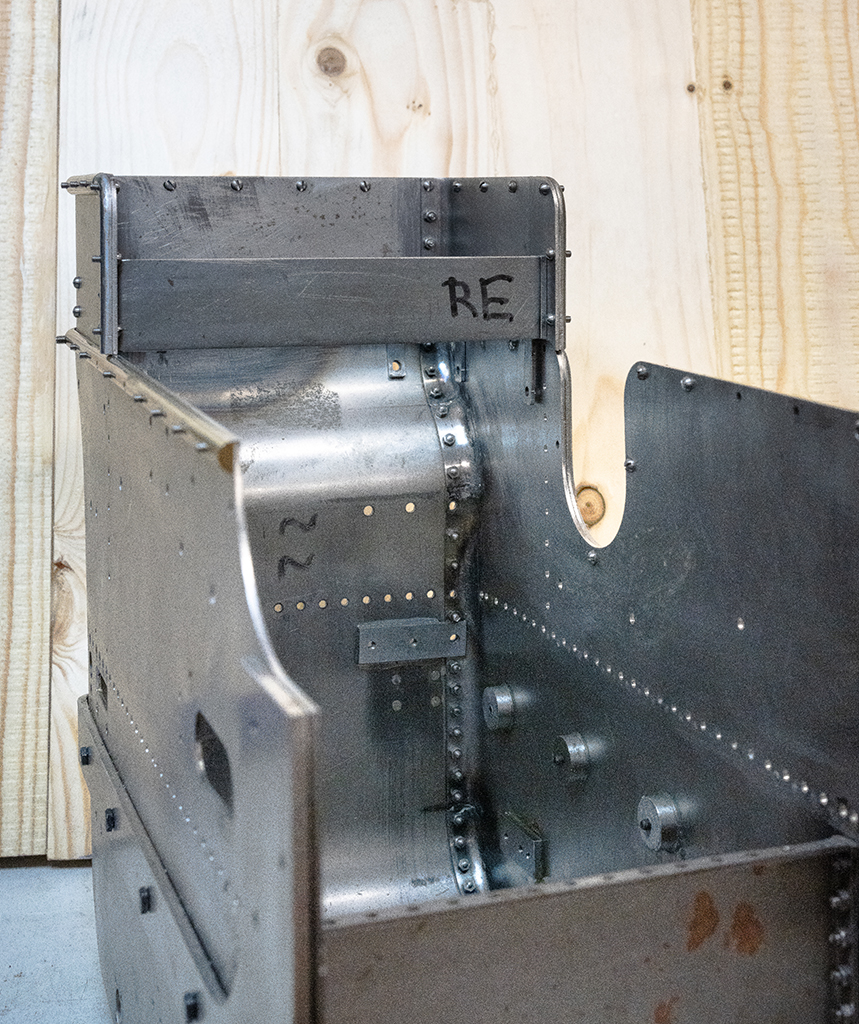
In this photo you can also see, that I provided special nuts to fasten the two tow-straps. I used 2K-adhesive to fix them.
Bulk head connectors:
When I tried to fasten the bulk-head-connectors into the tank-top I found out, that the two holes were too close to the side walls. They would have interfered with the nuts for the tank-top.
So, once more, I used my method to seal them by brazing steel pieces of proper diameter into them. After that I could mill new holes approximately 3 mm apart from the old ones. See photo.

Water Filters:
I did not like the design of the two water filters. So I added solid brass tubes with multiple holes to protect the filter-gauzes inside. See photo.

You may say, thats not necessary, because the water-filters are inside the water-tank. nobody will see them. Okay, but I know how they are looking.
Beading:
The beading of the top bunker fitted perfectly. Not so the lower beading. Once more I had to seal three of the existing holes by brazing round piedes of steel into them, and make new holes after that.
With one of the 8BA-round-head-slot-screws to fix the lower beading I had an accident. I broke the thread in the tapped hole. Normally I would have had to order a new piece of beading for replacement. I found an alternative solution: I changed the tapped hole to M3.
U-shaped beading:
This part was being delivered in flat steel. I really loved the exercise to file the flat steel into semicircular.
Putting the parts of the tender together came out to be some kind of a challenge for me. To start with I fabricated another special tool for me, which I would need to handle the 8BA slotless round head screws. If somebody wants to make it for himself, here is the design:

Before starting the assembly I tried to bring the back & bottom sheet somewhat closer to the shape of the side-walls. I used a piece of 50 mm diameter piece of steel and a heavy bench vice. After that I followed the instruction and it was relatively easy to put the three parts together. The tank front fitted perfectly. The tank top did not. It did not fit at all:
It was not wide enough and - getting worse - the holes at both sides did not match with the holes in the two side walls. Running a drill through the holes as recommended in the instruction would have ended in a disaster. So, what could I have done? I did not like the idea to send the parts back to STW. I am sure they would have helped me as quick as possible. But, you know, I am living in Germany, and sending back and forth would have meant quite some time. So I decided to salvage the parts. See photo below:

Two holes at the front end and two holes at the back end on each side I sealed by brazing pieces of steel with accurate diameter into the holes. This is a very reliable method, no cock up at all. All the other holes I sealed with 2K-repair paste. After doing that I was able to drill new holes (see photo above). After that the tank top was still not wide enough, so I had to make a shim. Doing all this took me quite some time, so many holes! But with a computer controlled milling machine it is not a big problem.
STW says, to build a Burrel Steam Traction Engine using the premachined parts in their kits, you will not need a turning lathe or a milling machine. I say, yes this is okay, but it helps a lot if have such kind of equipment at hand. It makes you so much more independent. And it is easy if you want to change one or the other part to your own design. I love to do that.
As far as the sealing of the water-tank is concerned, the instructions were difficult for me to understand, and they are slightly inconsistent. The same with the recommendations for the painting procedure. I guess, there is no optimum way. For me I made this decision:
- I will not install the tank top before final assembly. The only thing I will do is to put a base coat to the inside of the tank and the inside of the tank cover. And I will seal the inside of the tank with liquid rubber. Sealing of the tank cover I will do after final assembly.
- I will not do any painting at all before I haven't got all metal sheet parts. Only after that I will take apart everything and start painting and lining.
Bunker divider:
The bunker divider was not wide enough as well, so I needed to make an additional shim to fit it into the tender. For the top bunker I added an additional 25 mm high divider. So I can put more pieces of coal into it when everything is finished. See photo below:

In this photo you can also see, that I provided special nuts to fasten the two tow-straps. I used 2K-adhesive to fix them.
Bulk head connectors:
When I tried to fasten the bulk-head-connectors into the tank-top I found out, that the two holes were too close to the side walls. They would have interfered with the nuts for the tank-top.
So, once more, I used my method to seal them by brazing steel pieces of proper diameter into them. After that I could mill new holes approximately 3 mm apart from the old ones. See photo.

Water Filters:
I did not like the design of the two water filters. So I added solid brass tubes with multiple holes to protect the filter-gauzes inside. See photo.

You may say, thats not necessary, because the water-filters are inside the water-tank. nobody will see them. Okay, but I know how they are looking.
Beading:
The beading of the top bunker fitted perfectly. Not so the lower beading. Once more I had to seal three of the existing holes by brazing round piedes of steel into them, and make new holes after that.
With one of the 8BA-round-head-slot-screws to fix the lower beading I had an accident. I broke the thread in the tapped hole. Normally I would have had to order a new piece of beading for replacement. I found an alternative solution: I changed the tapped hole to M3.
U-shaped beading:
This part was being delivered in flat steel. I really loved the exercise to file the flat steel into semicircular.
Last edited by karl heinz marschner on Wed 14 Sep 2022, 9:04 pm; edited 1 time in total (Reason for editing : Supplement. Statements to Beading)

karl heinz marschner- Number of posts : 33
Location : Duesseldorf, Germany
Registration date : 2021-04-13
Burrell_in_Sussex likes this post
Re: Tender and Tender Fittings put together in Duesseldor
![]() elwood-59 Thu 15 Sep 2022, 7:14 pm
elwood-59 Thu 15 Sep 2022, 7:14 pm
Hi,
seems like you are getting along quite good!
Prima, weiter so!
Cheers
Elwood
seems like you are getting along quite good!
Prima, weiter so!
Cheers
Elwood

elwood-59- Number of posts : 300
Location : Germany-NRW
Registration date : 2014-12-17
» 4'' tender and fittings
» Tender Fittings - Kit 8
» Tender pipe fittings
» Planned schedule for the next few kits
» boiler fittings
» Tender Fittings - Kit 8
» Tender pipe fittings
» Planned schedule for the next few kits
» boiler fittings
Page 1 of 1
Permissions in this forum:
You cannot reply to topics in this forum|
|
|