
Bertie's progress part 2
Page 1 of 2 • 1, 2 ![]()

Bertie's progress part 2
![]() wingman Fri 09 Sep 2016, 9:39 pm
wingman Fri 09 Sep 2016, 9:39 pm
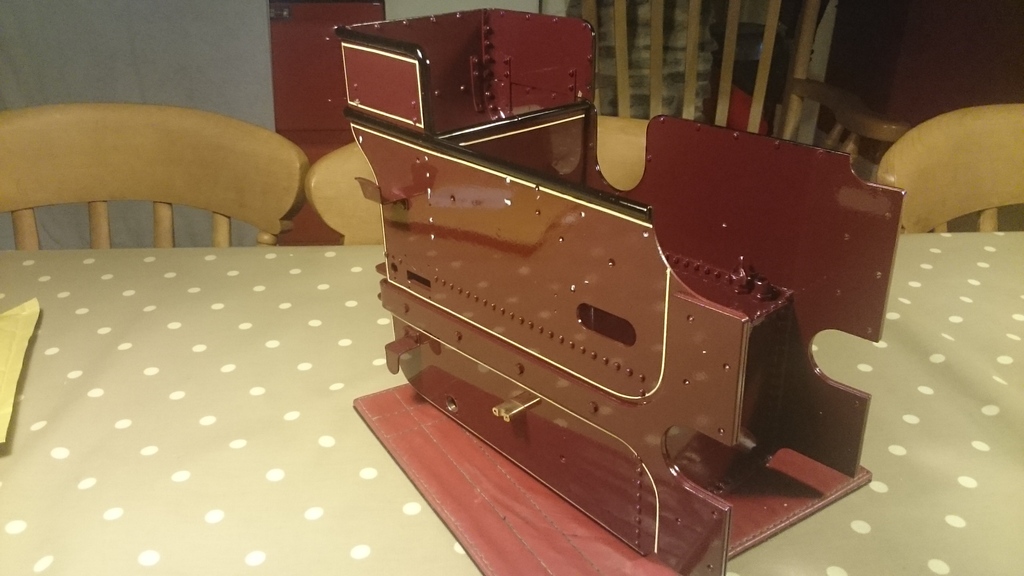
I have now paited the hornplates and tender on Bertie and even managed to get some lines on I am really pleased .....hope you like .


wingman- Number of posts : 57
Location : wales
Registration date : 2016-03-31
Re: Bertie's progress part 2
![]() lynnr Sat 10 Sep 2016, 1:27 pm
lynnr Sat 10 Sep 2016, 1:27 pm
Now we expect lots of updates and pictures of progress.

lynnr- Number of posts : 3242
Age : 55
Location : Highland, 4inch showman
Registration date : 2010-08-06
Re: Bertie's progress part 2
![]() wingman Sat 10 Sep 2016, 3:19 pm
wingman Sat 10 Sep 2016, 3:19 pm
I can't understand why the photo's are cropped off, any suggestions.
Just finishing off the hornplates at the moment will post an update then.
wingman- Number of posts : 57
Location : wales
Registration date : 2016-03-31
Re: Bertie's progress part 2
![]() lynnr Sat 10 Sep 2016, 3:42 pm
lynnr Sat 10 Sep 2016, 3:42 pm
I normally crop to 800 wide so always display correctly. On Pc and larger browsers they do show full.
lynnr- Number of posts : 3242
Age : 55
Location : Highland, 4inch showman
Registration date : 2010-08-06
Re: Bertie's progress part 2
![]() wingman Sat 10 Sep 2016, 9:51 pm
wingman Sat 10 Sep 2016, 9:51 pm
John.
wingman- Number of posts : 57
Location : wales
Registration date : 2016-03-31
Re: Bertie's progress part 2
![]() wingman Sun 11 Sep 2016, 8:21 pm
wingman Sun 11 Sep 2016, 8:21 pm
I have been busy working on the hornplates etc got them lined now but still have the black to do in the rivet area.
I have to say this Craftmaster paint is first class the depth of finish is second to none in my opinion.
Just a very quick update and a couple of photo's,as you can see the hornplates are not bolted to the tender as I still have more work to complete.
John.


wingman- Number of posts : 57
Location : wales
Registration date : 2016-03-31
Re: Bertie's progress part 2
![]() wingman Sun 11 Sep 2016, 8:25 pm
wingman Sun 11 Sep 2016, 8:25 pm
John.
wingman- Number of posts : 57
Location : wales
Registration date : 2016-03-31
Re: Bertie's progress part 2
![]() lynnr Sun 11 Sep 2016, 9:46 pm
lynnr Sun 11 Sep 2016, 9:46 pm
Pictures showing fine on PC screen. Its just tablets and phones that suffer.
lynnr- Number of posts : 3242
Age : 55
Location : Highland, 4inch showman
Registration date : 2010-08-06
Re: Bertie's progress part 2
![]() LiveSteam Sun 11 Sep 2016, 10:42 pm
LiveSteam Sun 11 Sep 2016, 10:42 pm
LiveSteam- Number of posts : 777
Location : Hampshire
Registration date : 2013-09-08
Re: Bertie's progress part 2
![]() wingman Mon 12 Sep 2016, 7:35 am
wingman Mon 12 Sep 2016, 7:35 am
If the photo's are ok then I will leave well alone I think as it must just be the viewing on my tablet.
John.
wingman- Number of posts : 57
Location : wales
Registration date : 2016-03-31
Re: Bertie's progress part 2
![]() wingman Sat 17 Sep 2016, 6:24 pm
wingman Sat 17 Sep 2016, 6:24 pm
Have been busy building uuuuup the fittings on the tender which is now finished and everything went together beautifully.
The work continues with building up the Hornplatesand painting the fittings, everything continues to be a real credit to Steam Traction World.
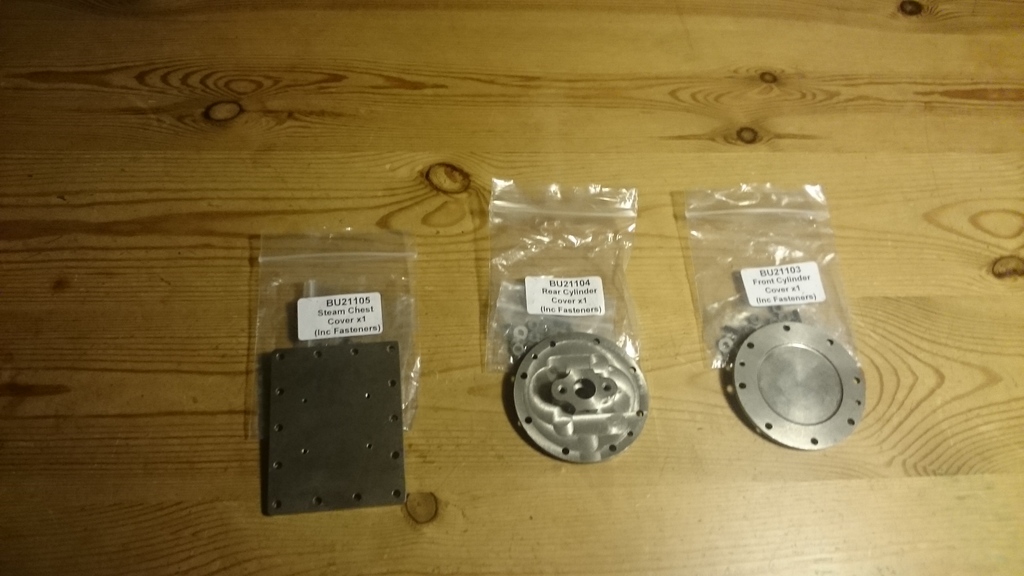
Recieved Kits 11a and 11b a couple of days ago and I must say for me the best of the kits so far both the Cylinder and the fittings awsome engineering I am having trouble keeping my hands off them and making a start but again what engineering from STW wow.........
As much as I am dying to start these kits I am determined to finish the hornplates first.
I will post some pics as soon as I get a chance.
John .
wingman- Number of posts : 57
Location : wales
Registration date : 2016-03-31
Re: Bertie's progress part 2
![]() lynnr Sun 18 Sep 2016, 9:58 am
lynnr Sun 18 Sep 2016, 9:58 am
Even pictures of the new parts just out the box also brings interest.
lynnr- Number of posts : 3242
Age : 55
Location : Highland, 4inch showman
Registration date : 2010-08-06
Re: Bertie's progress part 2
![]() LiveSteam Sun 18 Sep 2016, 7:15 pm
LiveSteam Sun 18 Sep 2016, 7:15 pm
LiveSteam- Number of posts : 777
Location : Hampshire
Registration date : 2013-09-08
Re: Bertie's progress part 2
![]() wingman Sun 18 Sep 2016, 11:26 pm
wingman Sun 18 Sep 2016, 11:26 pm
I'll try and post some more pics tommorrow just diddn't have the camera with me in the workshop tonight.
Have fun with your engines and your builds John.
wingman- Number of posts : 57
Location : wales
Registration date : 2016-03-31
Re: Bertie's progress part 2
![]() ejparrott Mon 19 Sep 2016, 8:59 pm
ejparrott Mon 19 Sep 2016, 8:59 pm
ejparrott- Number of posts : 118
Location : Rugby
Registration date : 2012-09-27
Re: Bertie's progress part 2
![]() wingman Mon 19 Sep 2016, 10:56 pm
wingman Mon 19 Sep 2016, 10:56 pm
The water valve elbow and filter are just fitted temporarily as they need to have a bead of sealant added for water tightness but this has to wait until the water valve itself is fitted this comes in a later kit with the injector I believe.
Love the brass water filler, the wter lifter is now fitted perminantly as are the winch rollers and the tender steps.


wingman- Number of posts : 57
Location : wales
Registration date : 2016-03-31
Re: Bertie's progress part 2
![]() wingman Mon 19 Sep 2016, 11:19 pm
wingman Mon 19 Sep 2016, 11:19 pm
Kit 11A the Cylinder wow what engineering I am totally in awe ,brilliant.
I have taken some photo's of the kit contents including the cylinder and '' The Box'' here they are.

 [/url
[/urland here's the Cylinder itself.


Here I have placed a steel ruler against th e Cylinder to give a perspective of size,although some might say that it is small compared to a 4inch I think that it shows the quality in the engineering and believe me it is quite heavy.


I will try to post some photo's tommorrow of Kit 11B ,the fittings for the cylinder.I am really looking forward to buillding it.
John
wingman- Number of posts : 57
Location : wales
Registration date : 2016-03-31
Re: Bertie's progress part 2
![]() wingman Tue 20 Sep 2016, 12:23 am
wingman Tue 20 Sep 2016, 12:23 am
John.
wingman- Number of posts : 57
Location : wales
Registration date : 2016-03-31
Re: Bertie's progress part 2
![]() LiveSteam Tue 20 Sep 2016, 8:41 pm
LiveSteam Tue 20 Sep 2016, 8:41 pm
As you say the cylinder is lovely, one thing to check for is any swarf or casting sand left in it, well worth blowing all the ports and threads out with compressed air etc (wear eye protection) just to make sure its all nice and clean. I've heard a few have had minor probs with swarf/sand blocking some of the ways etc.
LiveSteam- Number of posts : 777
Location : Hampshire
Registration date : 2013-09-08
Re: Bertie's progress part 2
![]() wingman Tue 20 Sep 2016, 10:59 pm
wingman Tue 20 Sep 2016, 10:59 pm
Thanks, John.
wingman- Number of posts : 57
Location : wales
Registration date : 2016-03-31
Re: Bertie's progress part 2
![]() wingman Wed 21 Sep 2016, 9:09 pm
wingman Wed 21 Sep 2016, 9:09 pm
For me kits 11A & 11b feel like a milestone as I have been waiting to get see and get my hands on them.
I will keep you posted re assembly once the Hornplates are completed.


wingman- Number of posts : 57
Location : wales
Registration date : 2016-03-31
Re: Bertie's progress part 2
![]() ejparrott Wed 28 Sep 2016, 9:16 pm
ejparrott Wed 28 Sep 2016, 9:16 pm
wingman wrote:ejparratt,thanks your interest I see from the long list of locomotives that you have ther that you are a seasoned builder I also note that you have a 2inch Showmans,'thetford town' is that built too (when you say on the shelf) it would certainly be nice to see some pics.
John.
No, it's on the shelf....literally...!! I was given a pile of castings a good many years ago, made some progress with it and started getting it together....then it started to show it's true size, and I could see it was going to be difficult to operate with the full length canopy, so I sort of lost interest in it a bit. Maybe later on in life I may pick it up again, but for now I've enough work putting a new boiler on the Lion and attending to a few issues with the Hunslet, as well as trying to crack o with my Manning Wardle
ejparrott- Number of posts : 118
Location : Rugby
Registration date : 2012-09-27
Re: Bertie's progress part 2
![]() wingman Tue 04 Oct 2016, 5:39 pm
wingman Tue 04 Oct 2016, 5:39 pm

As you can see the hornplates are now temporarily atttched to the tender,this took a bit of fettling to get them to slot together properly as the paint prevented them from sliding together ,got there in the end though.
I have fitted up all fittings that came in kit 10 a great kit that I feel adds so much and gives a really good feeling of achievement I feeel,any way, more pics.


Axle shaft and second shaft fitted,I found the busshes were a really tight fit and wouldn't allow either shaft to turn without binding up but this was soon sorted with use of the good old Dremel and a flap wheel attatchement.A great tool I find when used with a flexi shaft and gently does it aproach.


Just got to touch in the paint on the heads of the fastenings and job done ,really pleased and looking forward to getting on with kits 11A and 11B the cylinder and fittings,
I'll keep you posted.
Have fun, John.
wingman- Number of posts : 57
Location : wales
Registration date : 2016-03-31
Re: Bertie's progress part 2
![]() wingman Tue 04 Oct 2016, 5:41 pm
wingman Tue 04 Oct 2016, 5:41 pm
wingman- Number of posts : 57
Location : wales
Registration date : 2016-03-31
Re: Bertie's progress part 2
![]() LiveSteam Tue 04 Oct 2016, 8:56 pm
LiveSteam Tue 04 Oct 2016, 8:56 pm
Must be something to do with you viewing it on a fruit based product
LiveSteam- Number of posts : 777
Location : Hampshire
Registration date : 2013-09-08
Page 1 of 2 • 1, 2 ![]()
» longer body
» New an improved panels
» Guess the part!
» Help with metal fabrication
|
|
|