
2" Burrell Kit 20
Page 2 of 2 •  1, 2
1, 2
Re: 2" Burrell Kit 20
![]() northburrell Wed 08 Apr 2009, 11:43 pm
northburrell Wed 08 Apr 2009, 11:43 pm
northburrell- Number of posts : 197
Location : edinburgh
Registration date : 2008-10-15
Re: 2" Burrell Kit 20
![]() northburrell Thu 09 Apr 2009, 12:46 pm
northburrell Thu 09 Apr 2009, 12:46 pm
Jo
northburrell- Number of posts : 197
Location : edinburgh
Registration date : 2008-10-15
Re: 2" Burrell Kit 20
![]() LilyJack Thu 09 Apr 2009, 8:41 pm
LilyJack Thu 09 Apr 2009, 8:41 pm
Keep up with the good stuff
Regards
LilyJack.
LilyJack- Number of posts : 236
Location : UK
Registration date : 2009-04-01
Re: 2" Burrell Kit 20
![]() hughb Fri 10 Apr 2009, 4:09 am
hughb Fri 10 Apr 2009, 4:09 am
hughb- Number of posts : 575
Age : 54
Location : hertfordshire
Registration date : 2009-03-13
Re: 2" Burrell Kit 20
![]() hughb Fri 10 Apr 2009, 5:36 pm
hughb Fri 10 Apr 2009, 5:36 pm
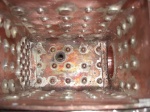
I now have done some of my engine but had some probs one is that I have had to file out the small hole for the steam pipe as the pic shows.

Pluss the other thing I now have found is that the trotel lever rod hits the oil cup on the crank .So I am thinking of moveing the lever to the other side as pic.

Has any one eles found this or is thetre some thing wrong ????
hughb- Number of posts : 575
Age : 54
Location : hertfordshire
Registration date : 2009-03-13
re: Kit 20
![]() Big Al Fri 10 Apr 2009, 7:40 pm
Big Al Fri 10 Apr 2009, 7:40 pm
Well everyone else has put their tuppence worth on about Kit 20 so here’s mine.
It would appear to people that have not got this far that there are going to be problems so here’s my account.
Reach rod – No problem fitting it from the rear once I had taken the diff lock boss off of the shaft. Bit of a jiggle but no real problems
The only problem I had with the reach rod was that it fouled the cleading where the front joins the outer lifting arm. I filed a chamfer on the inside edge and now it clears it just. Think I’ll have a problem when the pin is permanently fixed as the end of the pin, washer and split pin will foul it so might have to put pin in from the boiler side and split pin will show but I’ll see. The reason I think depends on how tight the cleading is around the boiler. The front smoke box end of mine is not level with the smoke box, The gap is very small but probably enough to cause the cleading to be not as tight to the boiler as it should be therefore it fouls the lifting arm.
The spigot for the reversing leaver does not foul the lower water gauge valve. The reason would appear that the top water gauge fitting was fitted close to the axle shaft, i.e. further forward, this resulted in me being unable to line them up as the extension pipe from the boiler was too long. I happened to call into STW and explained this to Steve and came away with a shorter extension by about 1/8 “ This is probably why I haven’t had a problem. If you haven’t fitted the top water gauge fitting, get it as far forward as possible.
The exhaust pipe was a fiddle to fit. The lower nut holding it to the cylinder block was inaccessible and I had to remove the cylinder end plate, 2 studs and 2 nuts to the boiler to be able to get any leverage on it.
I was fortunate that it was raining today (Friday) and spent all day in the garage, thanks to the wife for not moaning, and the next job is to set the timing. This could be fun as when I turn the crankshaft over with the reverse lever pulled back, it moves around. I have already broken the pin in the left hand lifting arm but it could be that I am trying to hold the leaver too far back. as I see the drawings show the reverse position is only just past half way on the quadrant, not fully back like I was holding it. Must read the instructions first
Alan
Big Al- Number of posts : 147
Age : 70
Location : Oxford, England (2" Burrell)
Registration date : 2008-06-18
Re: 2" Burrell Kit 20
![]() northburrell Fri 10 Apr 2009, 8:22 pm
northburrell Fri 10 Apr 2009, 8:22 pm
The motion of the Stevensons valve gear while rocking the expansion link will make it want to pull on the reverser.. Like it details in the instructions the die block should not touch the ends of the expansion link when in full forward or reverse.. This is to allow for link slip while running. if there is no gad the reverser will be twanged by the motion of the link resulting in worn out bits in time.
set the piston TDC, piston all the way to the front. move your reverser forward to drop the expansion link. move the reverser so you get a nice 1 mm gap between the die block and the top of the link. mark on the reverser were the locking pin slot should be filed.. carefully file the slot but make sure it's not sloppy or the reverser may move back and forth when turning over.
now move the reverser backwards and do the same. mark and file the slot. the important thing is the gap between the die block and the top and bottom of the link. this defines were your full forward ad full reverse are.
With the piston still at TDC move your reverser to full forward. then screw the valve rod and slide valve in the chest to uncover the port at the front of the piston. Turn the crank 180 to BDC, the slide valve should now have moved to the other side of the chest and uncovered to rear port. look at how much port is showing at TDC and BDC and screw the valve rod in and out to get them equal.
Now put it in reverse and look at the port openings, as long as they open by a fairly good amount this will be fine. As mentioned in the instructions it will all move when in steam and might need tweaking after a few runs. And that you really wont be going backwards that much so concentrate on getting the valve openings set nice for full forward gear.
you can then mark some more slots on the reverser and check that the port openings get smaller and smaller for each slot closer to mid gear.. mid gear can be filed once you have full forward and reverse slot filed. It's half way between the two.
Jo
northburrell- Number of posts : 197
Location : edinburgh
Registration date : 2008-10-15
Re: 2" Burrell Kit 20
![]() BUNGLE Sun 12 Apr 2009, 8:09 pm
BUNGLE Sun 12 Apr 2009, 8:09 pm
I WENT TO THE MODEL RALLY AT THE BURRELL MUSEUM TODAY (EASTER SUNDAY), THERE WAS 5 OR 6 MW 4" BURRELLS THERE, ALONG WITH SOME 'OWNER BUILDS'. ALL THE MW OILER/REG. RODS HAD JUST ABOUT 1mm CLEARANCE, I.E VERY CLOSE ! SPOKE TO TIM WATSON ABOUT THAT, HE COMMENTED THAT OF COURSE ON THE 2" IT WOULD BE HALF THAT !! OH SH*T.
THE 'OWNER BUILDS' MOSTLY HAD A JOGGLE IN THE ROD TO CLEAR THE OILER, GUESS IF THIS IS GOING TO BE A PROB. STW WILL HAVE TO SUPPLY JOGGLED RODS TO SOLVE THAT.
STEVE ????????????
HOPE THAT HELPS
BUNGLE
P.S RALLY WAS VERY GOOD. GOOD ROAD RUN TOO
BUNGLE- Number of posts : 232
Age : 65
Location : HERTS (2" BURRELL)
Registration date : 2008-06-17
Re: 2" Burrell Kit 20
![]() LilyJack Sun 12 Apr 2009, 9:30 pm
LilyJack Sun 12 Apr 2009, 9:30 pm
Best Regards
LilyJack
LilyJack- Number of posts : 236
Location : UK
Registration date : 2009-04-01
Re: 2" Burrell Kit 20
![]() BUNGLE Mon 13 Apr 2009, 9:11 pm
BUNGLE Mon 13 Apr 2009, 9:11 pm
NO SORRY, YOUR'E ALL WRONG THERE, WHAT HUGHB HAS FOUND, AND I'VE NOW SEEN ON THE 4" IS THE OILER ON THE CONROD BIG. AS IT ROTATES IT COMES UP ABOVE THE LEVEL OF THE SPEC. PLATES, AND CATCHS THE REGULATER ROD, WHICH RUNS BACK TO FRONT OF THE ENGINE ACROSS THE TOP OF THE SPEC PLATES, AND OF COURSE THE CRANK.
HOPE THAT HELPS YOU UNDERSTAND WHAT WE MEAN, GUESS IT'S HARD IF YOUV'E NOT GOT IT IN FRONT OF YOU, AND NOT FAMILAR WITH TRACTION ENGINES (YOU SAID YOU WERE NEW TO T.E's EARLIER)
REGARDS
BUNGLE
BUNGLE- Number of posts : 232
Age : 65
Location : HERTS (2" BURRELL)
Registration date : 2008-06-17
Re: 2" Burrell Kit 20
![]() LilyJack Mon 13 Apr 2009, 11:13 pm
LilyJack Mon 13 Apr 2009, 11:13 pm
Thanks for bringing me up to speed on it, be interesting to see how it's dealt with whether it be by STW or by ourselves..
Best Regards,,
LilyJack
LilyJack- Number of posts : 236
Location : UK
Registration date : 2009-04-01
Re Regulator rod clash
![]() Big Al Tue 14 Apr 2009, 4:31 pm
Big Al Tue 14 Apr 2009, 4:31 pm
My regulator rod is spot on and just clears the oil pot for the crankshaft by about 2mm. What I have noticed from your picture is that the regulator rod does not appear to go through the centre of the guide, It looks to be to the right of centre which indicates it might be the positioning of your cylinder block on the boiler which, I assume is designated by the position of the holes and not a lot you can do with that, but it may affect the lining up of the side valve threads where the slide goes through the weighshaft bracket!
It just looks a bit on the skew if you go by the line of the rod through the guide.
Can’t you put a slight bend in the last bit of the regulater valve rod coming from the block so the long rod misses the oiler as it doesn’t look far out on your pictures?
Alan
Big Al- Number of posts : 147
Age : 70
Location : Oxford, England (2" Burrell)
Registration date : 2008-06-18
Re: 2" Burrell Kit 20
![]() northburrell Wed 15 Apr 2009, 2:25 pm
northburrell Wed 15 Apr 2009, 2:25 pm
You could take the oil pot off remove the nut the cup screws down to and file the nut down the half the thickness this will drop the oil pot on the big end and clear the rod..
Jo
northburrell- Number of posts : 197
Location : edinburgh
Registration date : 2008-10-15
Re: 2" Burrell Kit 20
![]() hughb Thu 16 Apr 2009, 6:14 pm
hughb Thu 16 Apr 2009, 6:14 pm
Ho can I put this .
Ok I now have gone as far as I can with out the last bit to do and I did not get a spring .Ok I have been a long time at this as I was doing the veg and busted my hand on the wall .Got black Finger nailes. Not had that before ,and in my job??/,
ok I have fixed the trotle rod. By filing the holes to the left a bit .Not got a pic but here is the one before.
OK as for the I had to pull out the crank best way I could think of was this .

After getting in the rod after undoing the steam pipe I foud in the notes it may hit the S/P and had to file some of and the rod .Ok no probs BUT I found it hit the main barings

Ok took it of and filed some away to begin with .

Ok now I have got all in place and it all works ok . I am looking to the next bit in the post .
I am still haveing fun with my engine .
hughb- Number of posts : 575
Age : 54
Location : hertfordshire
Registration date : 2009-03-13
Re: 2" Burrell Kit 20
![]() LilyJack Fri 17 Apr 2009, 12:47 pm
LilyJack Fri 17 Apr 2009, 12:47 pm
I guess with everything so "small" things can get a tad fiddly as the workings begin to be fitted. I CANT WAIT for that time( he jests obviously )
Keep up the good stuff chap..
Best Regards
LilyJack
LilyJack- Number of posts : 236
Location : UK
Registration date : 2009-04-01
Re: 2" Burrell Kit 20
![]() northburrell Fri 17 Apr 2009, 3:37 pm
northburrell Fri 17 Apr 2009, 3:37 pm
I think Julia has a picture on her site of a Burrell that has the Regulator like this.. it's pretty simple to make it work the other way from the instuctions..
anyone ever seen a regulator work this way round?? pulling it backwards to go??
Jo
northburrell- Number of posts : 197
Location : edinburgh
Registration date : 2008-10-15
Re: 2" Burrell Kit 20
![]() northburrell Tue 21 Apr 2009, 3:21 pm
northburrell Tue 21 Apr 2009, 3:21 pm
I had no problems getting it through as my crank is out and i took the right hand steam pipe out also ,the rod can now be taken in and out with ease..
I'v found no problems with clashes on the bearing housing or the big round bit of the second shaft.. I did have problems in these places at first but found that if you take the nasty corners off the reach rod and put a little jiggle in the reverser end to move the rod come further out from the hornplate it clears both parts by a good 1mm each side.. I think the design was ment for it to run were i have it now but maybe the reach rod is kinked a little too much making it hit the bearing housing.. I did have to remove a small amount from the rear spec plate but found that having nice curved corners on the reach rod greatly reduced the amount that needed to come out..keep trial fitting and you can get it spot on without taking off the housing etc.
My new valvehandle for the water gauge also works well and wont need an extension..
Just thought i'd let you know.
Last edited by northburrell on Wed 22 Apr 2009, 10:09 pm; edited 1 time in total
northburrell- Number of posts : 197
Location : edinburgh
Registration date : 2008-10-15
Re: 2" Burrell Kit 20
![]() hughb Tue 21 Apr 2009, 9:28 pm
hughb Tue 21 Apr 2009, 9:28 pm
Thats good to know well done . May be it is just me with the bearing
hughb- Number of posts : 575
Age : 54
Location : hertfordshire
Registration date : 2009-03-13
Re: 2" Burrell Kit 20
![]() northburrell Wed 22 Apr 2009, 10:06 pm
northburrell Wed 22 Apr 2009, 10:06 pm
I think it's just fitting the reach rod as it comes out the box hat might make it clash, a little tweaking and filing off the square edges even just in that area of clash really helps it fit better..
Both ways are good ways of fixing the problem but some people might not want to remove there bearing house....
Hope your hard at making us all one of those barrels...
northburrell- Number of posts : 197
Location : edinburgh
Registration date : 2008-10-15
Re: 2" Burrell Kit 20
![]() hughb Thu 23 Apr 2009, 9:12 pm
hughb Thu 23 Apr 2009, 9:12 pm
Hi yes I seem to just see one thing BUT not always the right thnig ..As for the barral ok working on the end . But I now have only one pic I will do more at w/e I hope as it will rain I hope .Got no water in my gardning barrels {snigger} no punnorthburrell wrote:Hi Hugh..
I think it's just fitting the reach rod as it comes out the box hat might make it clash, a little tweaking and filing off the square edges even just in that area of clash really helps it fit better..
Both ways are good ways of fixing the problem but some people might not want to remove there bearing house....
Hope your hard at making us all one of those barrels...
hughb- Number of posts : 575
Age : 54
Location : hertfordshire
Registration date : 2009-03-13
Page 2 of 2 • 1, 2
|
|
|