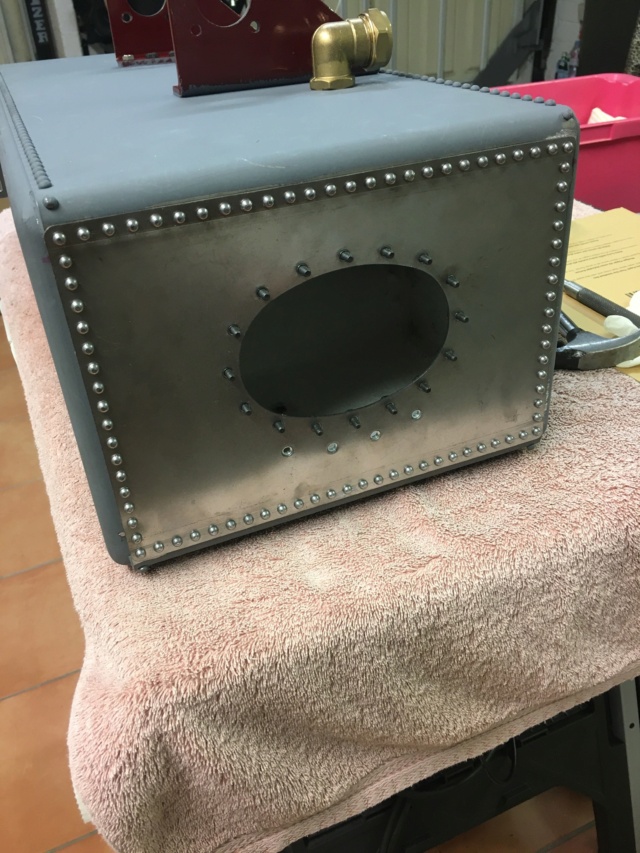
Kit 14A - Belly Tank
+3
Jelk
milford59
tef 20
7 posters
Page 1 of 2
Page 1 of 2 • 1, 2 
 Kit 14A - Belly Tank
I am starting the thread on the Belly Tank, although I don’t think I will be starting on this kit for a little while…. I will probably get the bracket out to see how it fits with the cutouts that I have enlarged slightly on the cladding, and then it will be packed up for a few weeks at least, before I start. Apparently there are 400 small bolts for this kit , and some fettling to be done. Pictures will follow when I get off and running.
milford59- Number of posts : 307
Location : Milford on Sea
Registration date : 2019-05-19
 Re: Kit 14A - Belly Tank
Not a great start to this kit as the belly tank bracket is the wrong size… I e-mailed (the very helpful) Will, and it seems that I have a “Modified” bracket, which is too wide for the threaded holes in the boiler….. so Will is going to send me one of the “original” design brackets. Hopefully that will sort the issue.
milford59- Number of posts : 307
Location : Milford on Sea
Registration date : 2019-05-19
milford59 likes this post
 Re: Kit 14A - Belly Tank
After doing the stripes on my tender I thought that I should make a start on the belly tank so that I can trial fit it, but I need the correct bracket and I think Will is going to send it to me very soon. Once I know that the belly tank fits onto the hornplates and the underside of the boiler, I can check the cut out on the cladding….paint the cladding….fit the cork and the cladding and then re-fit all of the moving parts on top of the boiler.
So far, so good with the belly tank, but now that I have fitted all the brackets and offered up the bottom panel, I can see that I will need to force the sides apart by a few mm to get all the holes to line up. Of course, the hardest part is yet to come with fitting all of the tiny screws , and I want to paint some of the inside seams with the Cromapol before it’s all finally put together.

So far, so good with the belly tank, but now that I have fitted all the brackets and offered up the bottom panel, I can see that I will need to force the sides apart by a few mm to get all the holes to line up. Of course, the hardest part is yet to come with fitting all of the tiny screws , and I want to paint some of the inside seams with the Cromapol before it’s all finally put together.

milford59- Number of posts : 307
Location : Milford on Sea
Registration date : 2019-05-19
 Re: Kit 14A - Belly Tank
I had some old sash clamps that I inherited from my father-in-law so I used them to get the sides apart to line up the holes….. now that I have the bottom plate on with a few temporary cap-heads , I can see that I am going to need longer rivet bolts on the bottom- the 6mm will not go through far enough to be able to get a nut on. The sides have not been bent round quite enough for the bottom plate to sit absolutely flush…You can see the small gap in the picture.
I will send an e-mail to Will to ask him to kindly supply 140 of the 10mm variety. I am sure that this won’t affect the integrity of the tank when it is all together and sealed inside.
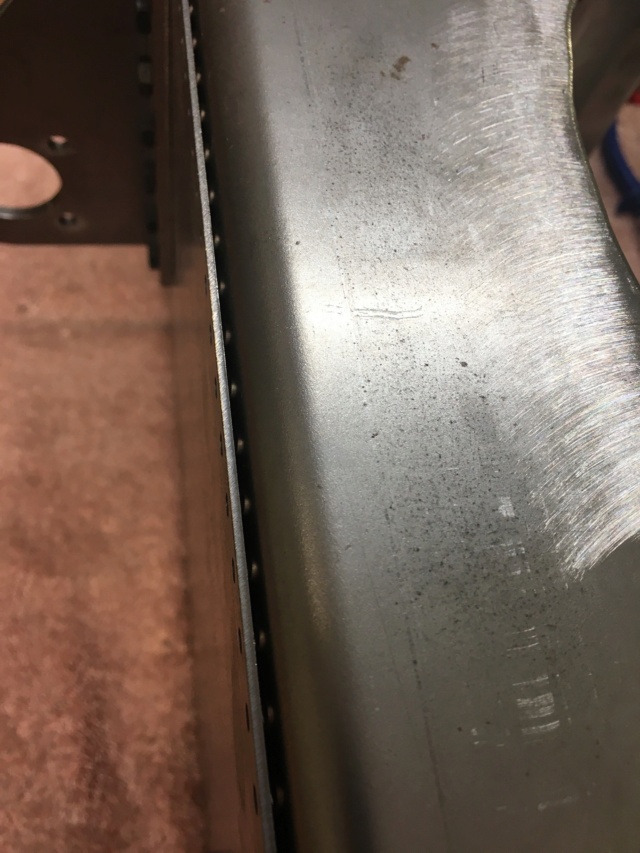
I will send an e-mail to Will to ask him to kindly supply 140 of the 10mm variety. I am sure that this won’t affect the integrity of the tank when it is all together and sealed inside.

milford59- Number of posts : 307
Location : Milford on Sea
Registration date : 2019-05-19
 Re: Kit 14A - Belly Tank
Ok - now that I have actually started to try to put the rivet bolts in, I can see why every thread you read about the belly tank suggests the construction is a pain…. The rivet bolts are too short for the job. We have a 3mm thick piece of steel butting against approx 2mm thick piece of steel, with a couple of tenths of a mm gap between them…. That means you have, if you are lucky, 1mm of thread to work with on the inside - and the nuts are thicker than that.
I don’t understand why 10mm rivet bolts are supplied with the tender, which is a thinner sandwich of 2 steel plates , and only 6mm bolts with the belly tank.
I will call Will tomorrow to buy some 10mm length bolts which I am sure will make the job easier, but at £36.00 per 100 according to the STW website , I guess that I will be going without some mince pies this Xmas….
milford59- Number of posts : 307
Location : Milford on Sea
Registration date : 2019-05-19
Mutleybob and TheBurrell like this post
 Re: Kit 14A - Belly Tank
Hi Milford
Had the same problem and Will sent them out FOC as the 6mm ones are incorrect! Defo wouldn't be paying for them if there not fit for the job required..
Mark
Had the same problem and Will sent them out FOC as the 6mm ones are incorrect! Defo wouldn't be paying for them if there not fit for the job required..
Mark
tef 20- Number of posts : 161
Location : Livingston 4 " Burrell
Registration date : 2008-06-19
 Re: Kit 14A - Belly Tank
tef 20 wrote:Hi Milford
Had the same problem and Will sent them out FOC as the 6mm ones are incorrect! Defo wouldn't be paying for them if there not fit for the job required..
Mark
Thanks Mark
milford59- Number of posts : 307
Location : Milford on Sea
Registration date : 2019-05-19
 Re: Kit 14A - Belly Tank
Will at STW is a top man ! I just spoke to him on the phone and he will be sending me the longer rivet bolts ASAP - hopefully I will get them by the weekend and I can press on with the construction of the belly tank.
milford59- Number of posts : 307
Location : Milford on Sea
Registration date : 2019-05-19
 Re: Kit 14A - Belly Tank
The belly tank is still work-in-progress. I am using the Cromapol for sealing the inside of the tank, so I have made a start on this part. It needs another coat, and I need to coat the inside of the bottom piece, and then once it is fitted together completely I will just need to get a good coating on all of the seams.
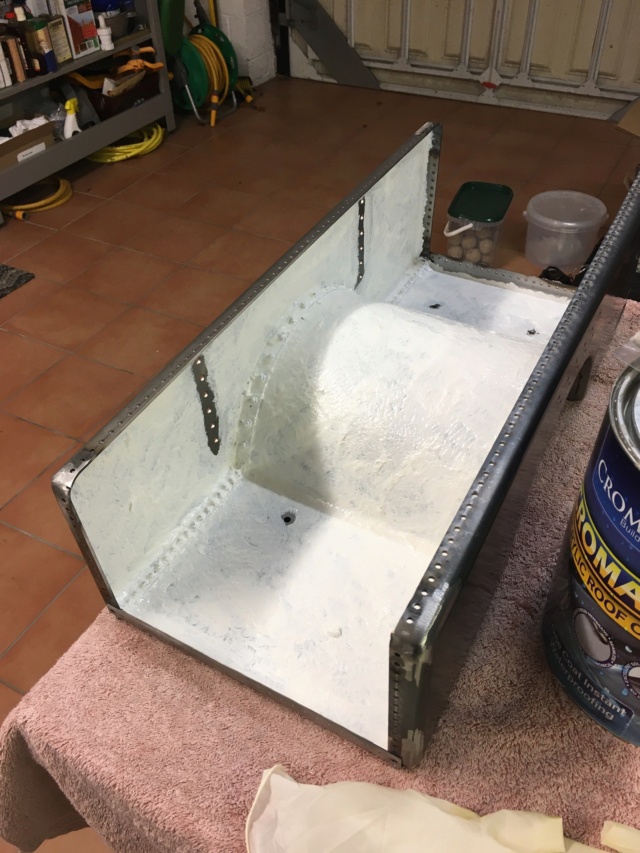
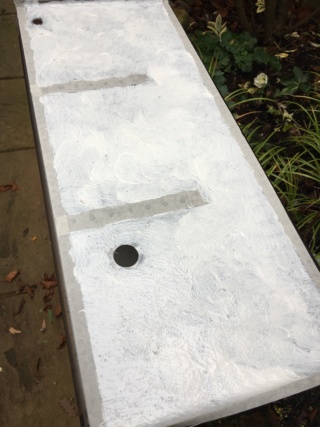
I am also painting the bottom of the tank with the Cromapol before I assemble it and then I will be putting the brackets inside.


I am also painting the bottom of the tank with the Cromapol before I assemble it and then I will be putting the brackets inside.
milford59- Number of posts : 307
Location : Milford on Sea
Registration date : 2019-05-19
trev crane and TheBurrell like this post
milford59- Number of posts : 307
Location : Milford on Sea
Registration date : 2019-05-19
 Re: Kit 14A - Belly Tank
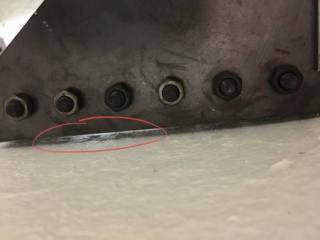
I have put all of the brackets back inside and attached the hornplate brackets to the outside, but I find that there is a gap of 5-6mm to the floor of the tank….I wonder whether the hornplate bracket holes are in the right place ?? (in which case I guess I will need a spacer to take up that gap) - or maybe they are in the wrong place…. I can’t yet trial fit the belly tank because I am waiting for the correct front bracket. I will e-mail Will again.



milford59- Number of posts : 307
Location : Milford on Sea
Registration date : 2019-05-19
 Re: Kit 14A - Belly Tank
Hi Milford
I am also just starting out on my belly tank and it is certainly looks like it is going to test my patience.
Firstly, the holes in the curved section on the top of the tank don't remotely begin to line up, they are not even in the same parish. I spoke to Will and have decided to re drill them all on his suggestion. I can see that some of the 6mm rivet bolts are nowhere near going to be long enough. I can work out how to attach the top to the sides followed by the bottom plate and then seal it with cromapol. What is really puzzling me is the two endplates and how i'm going to manage to get them fitted and sealed. Working through the inspection plates and fitting those tiny nuts seems like an impossible task to me!
Any help or suggestions on how to achieve this would be greatly appreciated
John
Jelk- Number of posts : 23
Age : 74
Location : Lincs
Registration date : 2020-08-29
 Re: Kit 14A - Belly Tank
Hi John,
I found that the 6mm bolts were simply not long enough so Will supplied me with 150 of the 10mm bolts and I bought the others that I needed in 10mm size and the task was made simpler. I had to re-drill a few holes and I had to squeeze the sides apart with a big sash clamp in order to get the holes close, and then I put temporary capheads in a few places before starting with the small rivet bolts. Like you, I am not looking forward to fitting the endplates, but I am sure it is just a task that will take a LONG time to achieve. Once they are on, my plan is to poke the brush though the hole and slap on copious amounts of Cromapol to seal it around the seams. My main concern at the moment is the major issue with the brackets/holes not lining up and I am waiting to get some advice from Will on this.
I found that the 6mm bolts were simply not long enough so Will supplied me with 150 of the 10mm bolts and I bought the others that I needed in 10mm size and the task was made simpler. I had to re-drill a few holes and I had to squeeze the sides apart with a big sash clamp in order to get the holes close, and then I put temporary capheads in a few places before starting with the small rivet bolts. Like you, I am not looking forward to fitting the endplates, but I am sure it is just a task that will take a LONG time to achieve. Once they are on, my plan is to poke the brush though the hole and slap on copious amounts of Cromapol to seal it around the seams. My main concern at the moment is the major issue with the brackets/holes not lining up and I am waiting to get some advice from Will on this.
milford59- Number of posts : 307
Location : Milford on Sea
Registration date : 2019-05-19
 Re: Kit 14A - Belly Tank
Hi
Can you check the "flatness" of the belly tank rear and bottom panels. These can have a subtle bow in them from manufacture and when you put the 90 brackets inside everything may need a little pull together. I know this was the case on my showman when I was doing the belly tank.
Lynn
Can you check the "flatness" of the belly tank rear and bottom panels. These can have a subtle bow in them from manufacture and when you put the 90 brackets inside everything may need a little pull together. I know this was the case on my showman when I was doing the belly tank.
Lynn
milford59 wrote:I have put all of the brackets back inside and attached the hornplate brackets to the outside, but I find that there is a gap of 5-6mm to the floor of the tank….I wonder whether the hornplate bracket holes are in the right place ?? (in which case I guess I will need a spacer to take up that gap) - or maybe they are in the wrong place…. I can’t yet trial fit the belly tank because I am waiting for the correct front bracket. I will e-mail Will again.
_________________
Lynn
Technical Support
Steam Traction World Ltd
milford59 likes this post
 Re: Kit 14A - Belly Tank
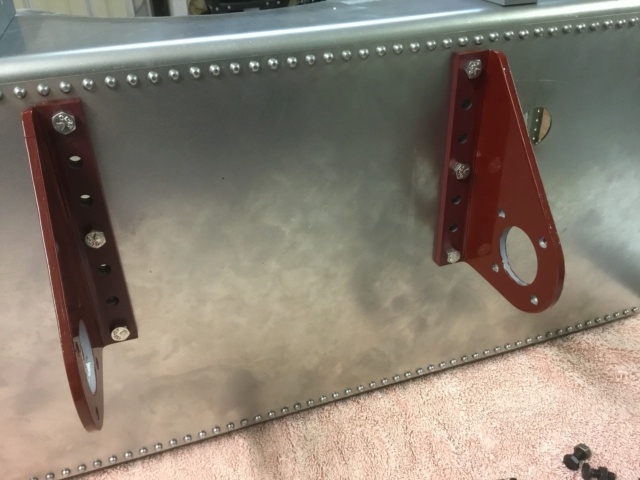
Lynn - you were absolutely right !! Once I re-assembled and looked carefully along the face of the tank, I could see the slight bow. I have used 20mm bolts to pull it together through just 3 of the holes for the time being, and when I get my new belly tank bracket in position, on the underside of the boiler, I can trial fit the tank before tightening it all up. Thank you very much for that tip.



milford59- Number of posts : 307
Location : Milford on Sea
Registration date : 2019-05-19
TheBurrell likes this post
 Re: Kit 14A - Belly Tank
Hi
The unmodified forward tank support should be with you in the next couple days.
The unmodified forward tank support should be with you in the next couple days.
_________________
Lynn
Technical Support
Steam Traction World Ltd
milford59 likes this post
 Re: Kit 14A - Belly Tank
The front bracket for the belly tank arrived today (thanks Lynn) and after a bit of fettling of the holes, I have it temporarily mounted…. I can see that the fixing of the belly tank is going to be a major job !!
I have offered the tank up into position and the first thing I notice is that I need about 3mm more clearance between the rear brackets on the tank so that said brackets will fit on the outside of the plates with the threaded holes in, which are at the front of the hornplates…. I am glad that I haven’t done much painting on the tank yet - just a bit of primer…. I will gain a bit more clearance by grinding off the black paint that I applied to those plates, and I will gently shave the inside faces of the brackets on the back of the tank, and then try again.
I don’t know how it will be at the front yet - I’ve got to get the rear clearance sorted first - My plan is to get it completely fixed front and back, then remove it and refit the cladding… then re-attach it to check it clears the cladding ok…. Then I can start to think about final painting.
milford59- Number of posts : 307
Location : Milford on Sea
Registration date : 2019-05-19
 Re: Kit 14A - Belly Tank
Ok - some progress has been made, but a long way to go with this tank. I now have the necessary clearance to get the brackets to fit the plates on the front of the hornplates and I attached it there with a couple of bolts each side. As I expected, the holes won’t line up between the front bracket attached to the boiler and the right angle bracket attached to the front of the tank. Why would they?? - I had to move the hornplates several mm in order to get the right distance between the rear face of the cylinder and the crankshaft, so they were never going to line up. In my opinion, this is an example of bad design - the holes in both brackets should be elongated slots, to allow for the fact that simple holes are highly unlikely to line up.
milford59- Number of posts : 307
Location : Milford on Sea
Registration date : 2019-05-19
 Re: Kit 14A - Belly Tank
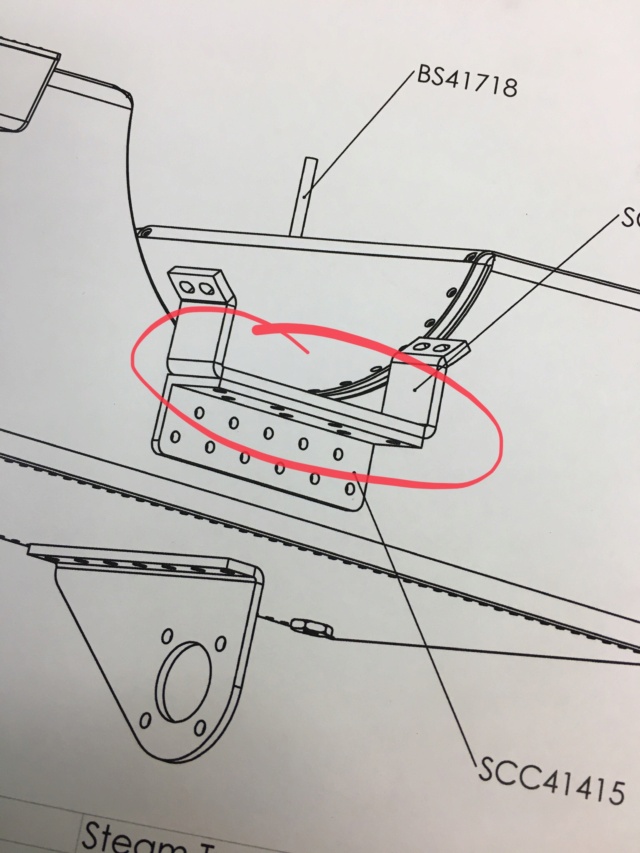
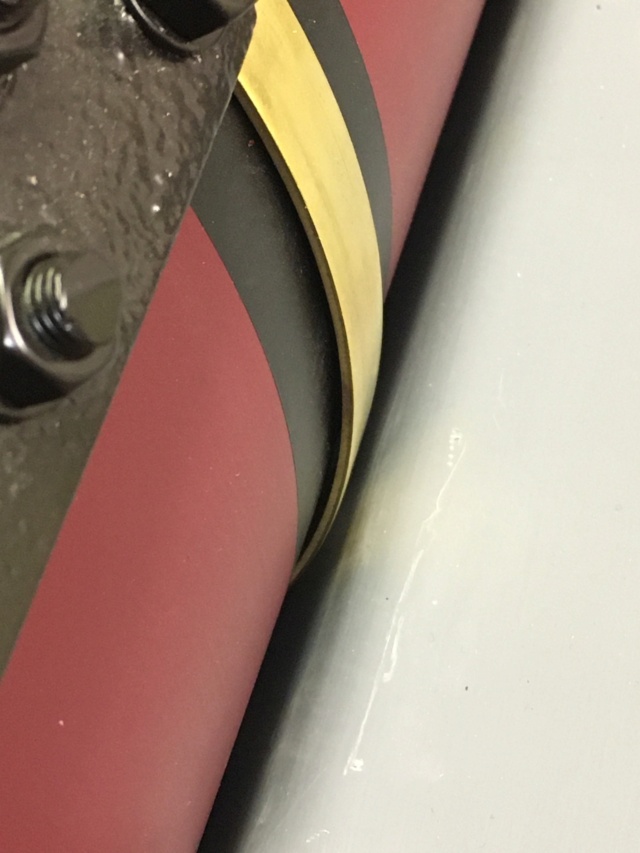
I have attached the cleading and fixed the belly tank on again to check the measurements at the front end, where both brackets are located. The brass bands round the boiler are not fully tight, but they still rotate easily which tells me that there is no issue with clearance. I have checked that the hornplates are perfectly square to a horizontal line on the side of the boiler, to confirm that the belly tank does not tilt either forwards or backwards, but the brackets at the front will not align vertically as shown in the ISO…….
………The clearance from the underside of the boiler to the uppermost face of the support bracket should apparently be 18.75mm and my gap is almost exactly that. However, the gap from the underside of the boiler to the uppermost face of the right-angle bracket which is attached to the front of the belly tank is only 14mm, and that is why my assembly is impossible to do as per the ISO.
The inescapable conclusion is that the right-angle belly tank bracket is attached to the front of the belly tank too high…. Unless somebody can tell me differently…..?


milford59- Number of posts : 307
Location : Milford on Sea
Registration date : 2019-05-19
 Re: Kit 14A - Belly Tank
Hi,
I have been watching these posts with great interest as I should be receiving my Belly tanks in the not too distant future. You seem to be having numerous hurdles in this build, do you think this the same with all the SCC tanks or have you just been unlucky. I have looked through the forum and seen a number of different problems.
It seems strange that STW have not made life easier, and your'e not getting a lot of help from the forum
Hope the rest of the tank build goes easier. I was looking forward to this part of the build but not so sure now.
Tony
tony.wheels- Number of posts : 26
Location : Brixham
Registration date : 2021-09-29
 Re: Kit 14A - Belly Tank
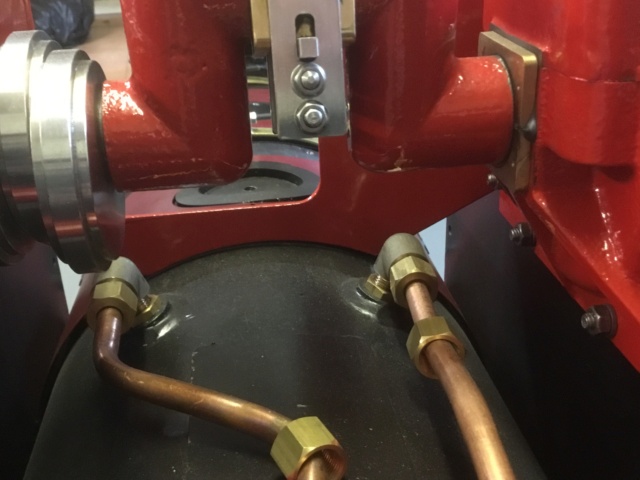
I have had a number of e-mails back and forth with Lynn who is now providing the STW support to builders since Will is no longer there. Lynn is obviously very experienced and knowledgeable as you can see from the many helpful and informative posts that she makes on the forum. Her suggestions, to explain why the 2 front brackets would not fit as per the ISO drawing, were that I must have either fitted the hornplates too high or I had fitted the hornplates with a backwards tilt.
I have pointed out to Lynn in my most recent e-mail that I did not think that either of these scenarios is possible as you can see from the photo below that there is no room for the hornplates to be lowered or tilted forwards as the spectacle plate to top-of-boiler clearance is only about 2mm. We have established that the support bracket to underside of boiler clearance is as per the CAD drawings (18.75mm) so in my mind, the only possible explanation is that the right angle bracket attached to the front of the belly tank is located too high, because it should sit BELOW the support bracket (whereas mine can only sit above)
I am awaiting her reply, and although it is a bit dissapointing to keep having issues, which can detract from the enjoyment of the build, I am used to setbacks with projects having built a kit-car, rebuilt various racing cars and a couple of motorbikes. Having said that, the tolerances on this kit are, understandably, variable so the idea that it can be done “with hand tools only” is maybe a little bit unrealistic…
As an example…. If you have to align your hornplates (front to rear) to get the correct distance between the cylinder and the crankshaft - even a couple of millimetres - you will have to grind out the holes on the hornplates. This means that the holes for the 2 belly tank brackets won’t line up…. A load more holes to grind out in 6mm thick steel…..no problem if you have a mill…. But a mill is not a hand tool is it !!! The simple solution to this particular issue would be for STW to slot the holes in the brackets, in expectation of having to move the hornplates.
The important thing for me with this issue is to understand the reasons why it won’t fit together properly - if it turns out the holes in the belly tank ARE in the wrong place then I feel confident that I can drill them correctly and re-position the bracket.
As for the construction of the tank itself, I am only halfway through and the end plates are going to be harder I guess, but once I sort out the brackets I will continue with that job.
You may have seen that I have tried to create threads for most of the kits - the whole point of this is to try to help other builders with pictures, and small tips that I might pick up whilst constructing. It’s fair to say that the instructions leave an awful lot to be desired. As previously mentioned, I am no mug when it comes to building stuff, but I have struggled at times with just a couple of lines and a few drawings for some sections of the build. Perhaps most of the people who build these kits have some experience of steam first - I don’t know. I hope anyone from STW who reads this will take it in the spirit in which it is intended , which is constructive feedback that will enable them to continue to improve the product and the “builder experience”.

milford59- Number of posts : 307
Location : Milford on Sea
Registration date : 2019-05-19
Mutleybob and Stephen Cosford like this post
 Re: Kit 14A - Belly Tank
milford59 wrote: since Will is no longer there................
Off topic but sad to hear that Will has gone
LiveSteam- Number of posts : 778
Location : Hampshire
Registration date : 2013-09-08
 Re: Kit 14A - Belly Tank
Thanks for the very explanatory reply and also for the great help you are providing and the fantastic photos. I can see you have the ability to solve the issue.
I did not know Will had gone but that explains why I haven't received a reply to an email I sent him 2 weeks ago.
I am surprised that we have not been advised that he is no longer our source of contact or help.
With regards to the belly tank problem I am going to go through all the posts on the forum and see if there is a path to take before fitting the hornplates. Not hopeful.
Maybe if someone popped down from STW to have a look at the problem, it might get sorted for their future kits,
it's often difficult to explain the situation on the phone or by email.
Thanks again
Tony
tony.wheels- Number of posts : 26
Location : Brixham
Registration date : 2021-09-29
 Re: Kit 14A - Belly Tank
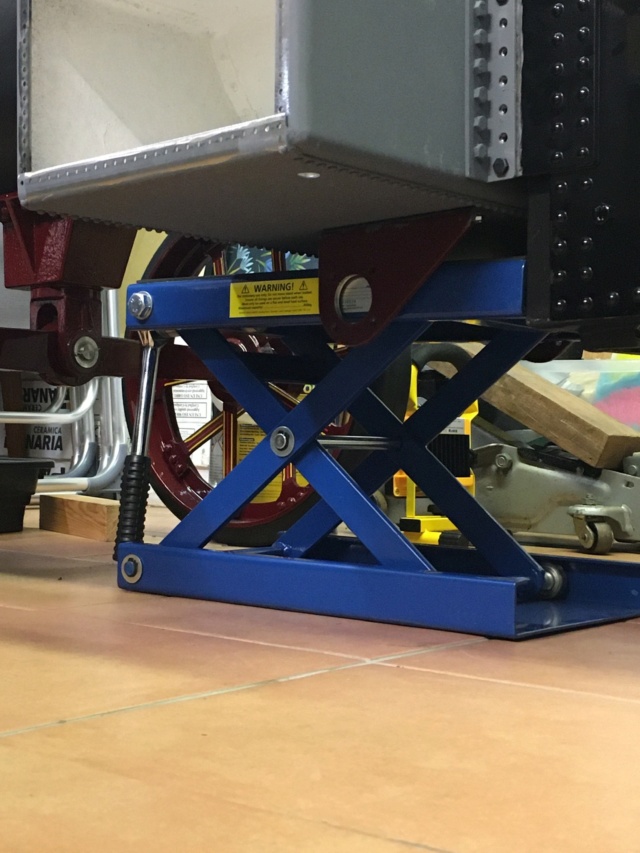
Here is a useful bit of kit if you have to do things on your own and don’t have a ready helper available. I have had the belly tank on and off half a dozen times whilst getting the positions right for re-drilling the holes on the front of the tank for the right angle bracket, and this screw-jack lift has been very useful. It just fits between the 2 steering brackets - I will also be able to use it when I am fitting the tender.

milford59- Number of posts : 307
Location : Milford on Sea
Registration date : 2019-05-19
Mutleybob likes this post
milford59- Number of posts : 307
Location : Milford on Sea
Registration date : 2019-05-19
Lynn@STW, Mutleybob and TheBurrell like this post
Page 1 of 2 • 1, 2 
 Similar topics
» Andy's 4"dcc road loco
» Belly tank
» Cylinder block and cleading & Steering
» belly tank construction
» belly tank & steering
» Belly tank
» Cylinder block and cleading & Steering
» belly tank construction
» belly tank & steering
Page 1 of 2
Permissions in this forum:
You cannot reply to topics in this forum|
|
|


