
The Pied Piper
+3
LiveSteam
gwr1475
elwood-59
7 posters
Page 1 of 1

The Pied Piper
![]() elwood-59 Sat 29 Oct 2016, 12:24 am
elwood-59 Sat 29 Oct 2016, 12:24 am
Hello,
today I would like to start a loose compilation of my journey to a DCC Road Loco. it is just to show some of my progress and by far not another complete built diary. Others have done so already and for sure better than I could. I do refer to those guides every time I run into a problem and it is always a source for helpful information.
I live in Germany so I an cut off from most of your (local) supply and have to get around with what is locally available or order it from the UK. But lets begin with the beginning:
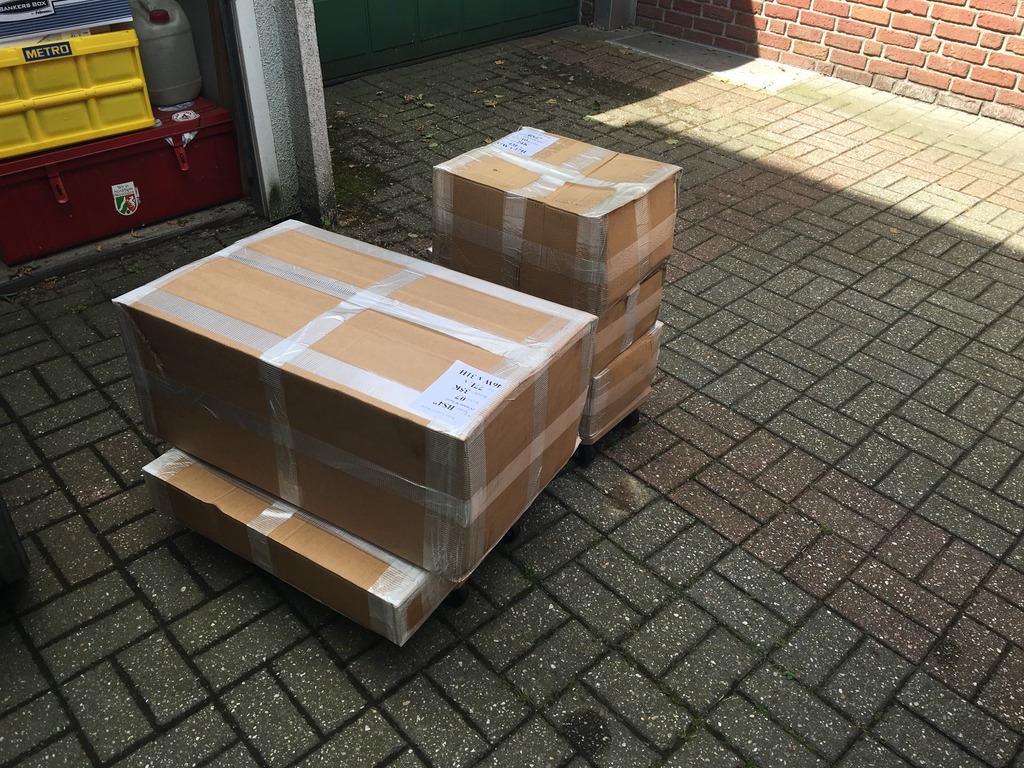
Some time ago I picked up my first few kits from STW. Due to availability I started with the kits 4,5 and 7-10, which I picked up in Daventry, as I was around anyways and wanted to chat with Steve and Dean and save the postage for the kits to be send to Germany.
That's what my car looked like after Dean played TETRIS with the boxes

Boxes unloaded
I started with cleaning the rims
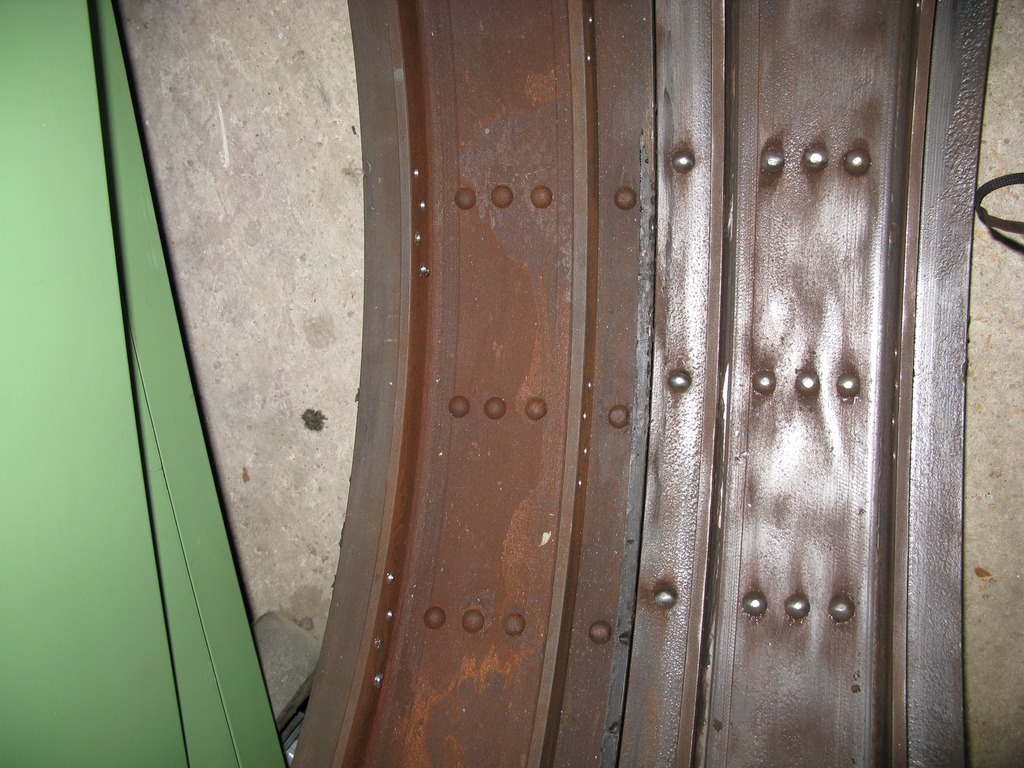
a shot before and after but in real terms the cleaned rim did not look that bad, but it still had some rust on it I could not get out at all.

so I used a chemical rust converter that is widely used in car restorations to passivate the rest of the rust and to have a solid base for the primer.
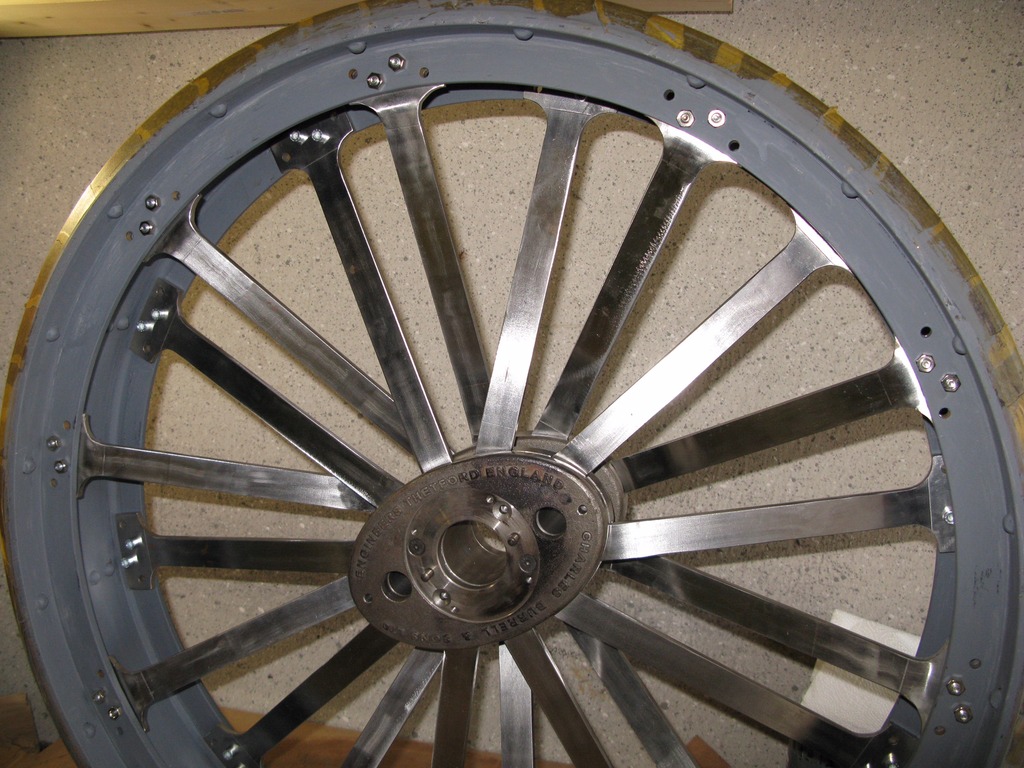
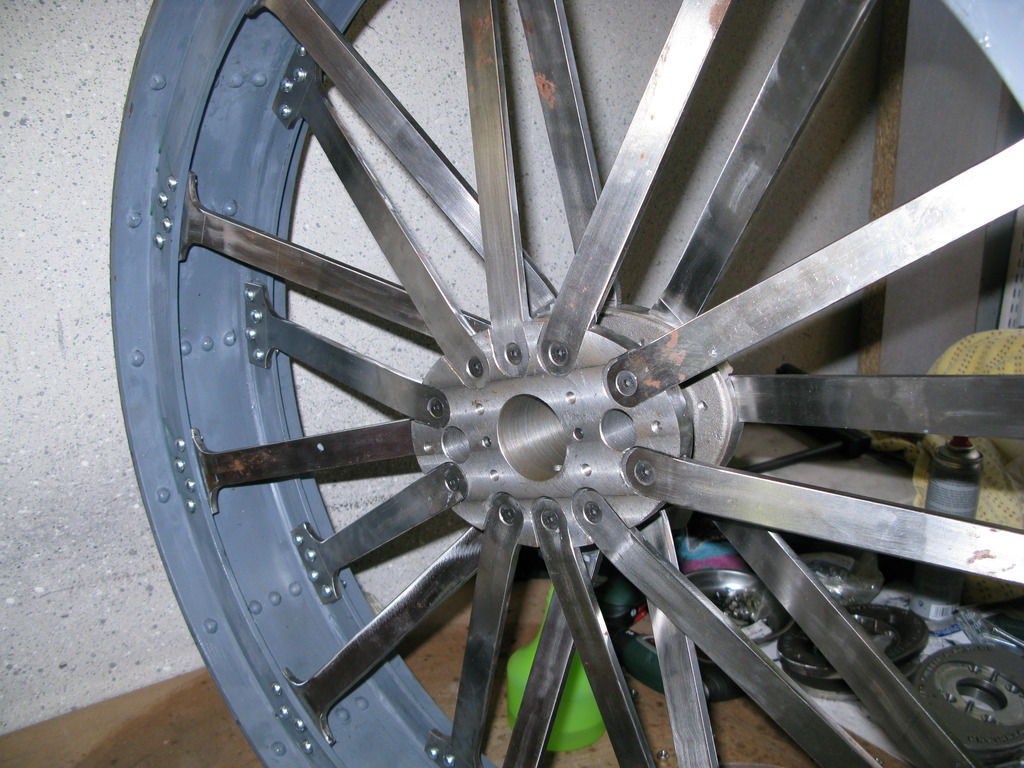
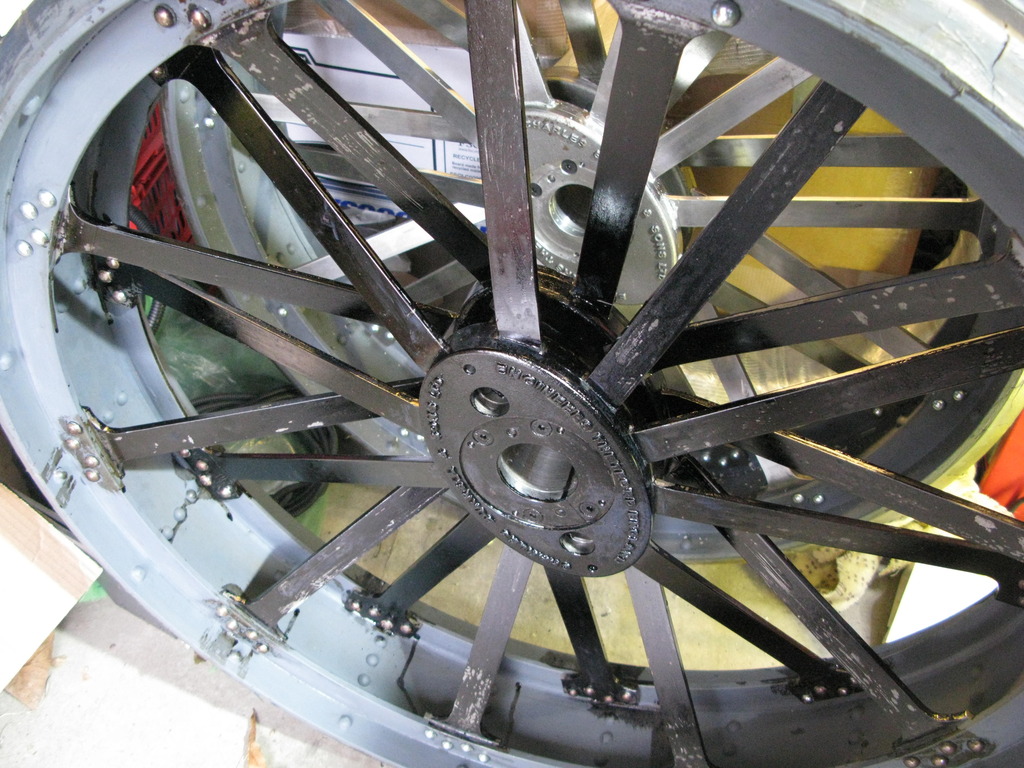
test fit of the rim and hub

In order to be able to work on the rim while assembling the rim and also while cleaning with a wire brush I built a small device consisting of just some castors and a flat board. This allowed me to roll the rim and later complete wheel into any position I needed. Health and Safety, please look in a different direction, but for me it worked, I just had to be careful when I turned the wheel as I should have added some guard rails to prevent the rim from jumping off the tiny wheels.


cleaning and removing mill scale from the spokes was done with Patio Cleaner, 20 min in the acid and the mill scale just washed off.

After the primer was applied I started to do the test assembly with two bolts on each spoke only. The instructions called for a assembly jig consisting
of a 16 mm spacer for the inside of the rim (brake band side); not having such a spacer at hand I used some old magazines, easy to find and works like a charm.
first wheel finished

continued with opening up the holes in rims and spokes with a 1/4“ reamer to fit the rivet bolts.

Remark here: don’t overdo it, I opened some holes too much so the rivet bolt started to turn in it’s hole when I tried to tighten the nut. Bad idea. Used locking fluid to hold the head of the rivet bolt, just had to wait a few minutes each to have the fluid to set. Lesson learned!

next job was to „seal“ the spokes at the rims (thanks Lynn, for the hint) with epoxy and to fit the rivet nuts on the inside of each bolt; I used baby oil tissues to clean off the excess of epoxy from the spokes and to built a nice fillet. yes on the real wheels there were no fillets, but it I just did a small one barely to cover the gap between spoke and rim.
Locking fluid for the nuts

and nuts fitted

Final step:
[

So far about 60 h, using a diary to monitor the work, so to be able to refer to later.

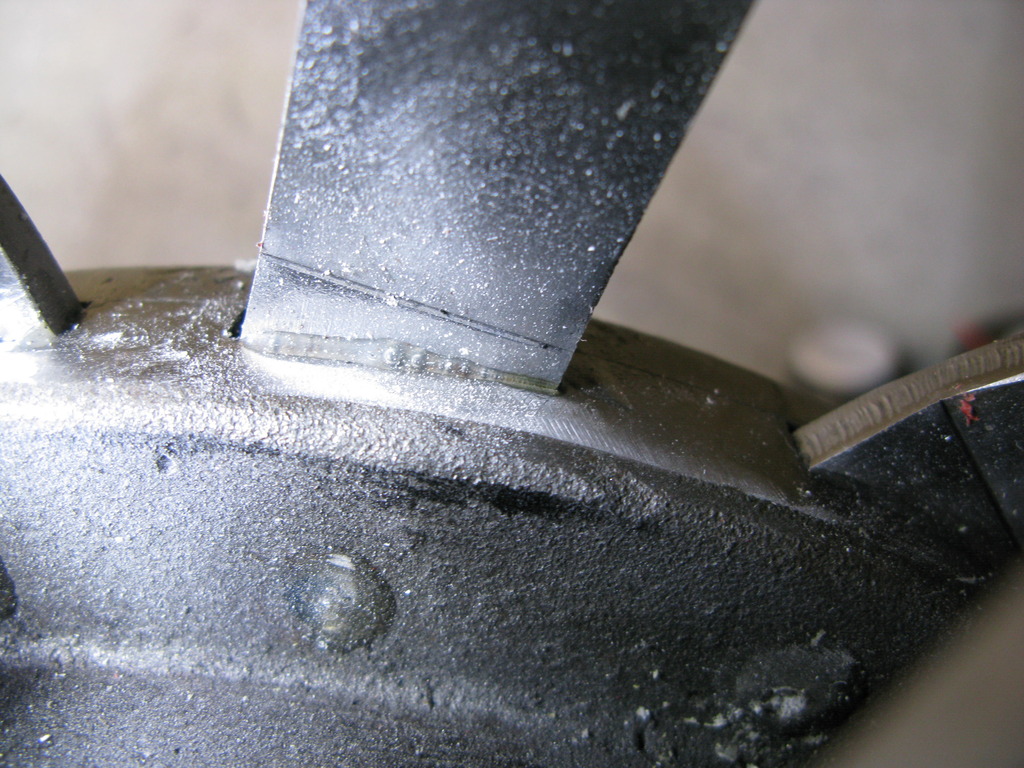
This is my next issue the holes for the M6 bolts to fix the spokes to the hub. I would like to fill them to make them less obvious - any idea how to hide them - I plan to fill them with jb weld, level to the surface and would then like to have a similar surface structure and surrounding material (raw casting): I once tried coase emery paper pressed on half set epoxy so the surcface texture of the emery paper was pressed into the expoy skin.
Open for any idea or did you leave the holes as they were?
Thanks for reading
Elwood
today I would like to start a loose compilation of my journey to a DCC Road Loco. it is just to show some of my progress and by far not another complete built diary. Others have done so already and for sure better than I could. I do refer to those guides every time I run into a problem and it is always a source for helpful information.
I live in Germany so I an cut off from most of your (local) supply and have to get around with what is locally available or order it from the UK. But lets begin with the beginning:
Some time ago I picked up my first few kits from STW. Due to availability I started with the kits 4,5 and 7-10, which I picked up in Daventry, as I was around anyways and wanted to chat with Steve and Dean and save the postage for the kits to be send to Germany.
That's what my car looked like after Dean played TETRIS with the boxes
Boxes unloaded
I started with cleaning the rims
a shot before and after but in real terms the cleaned rim did not look that bad, but it still had some rust on it I could not get out at all.
so I used a chemical rust converter that is widely used in car restorations to passivate the rest of the rust and to have a solid base for the primer.
test fit of the rim and hub
In order to be able to work on the rim while assembling the rim and also while cleaning with a wire brush I built a small device consisting of just some castors and a flat board. This allowed me to roll the rim and later complete wheel into any position I needed. Health and Safety, please look in a different direction, but for me it worked, I just had to be careful when I turned the wheel as I should have added some guard rails to prevent the rim from jumping off the tiny wheels.
cleaning and removing mill scale from the spokes was done with Patio Cleaner, 20 min in the acid and the mill scale just washed off.
After the primer was applied I started to do the test assembly with two bolts on each spoke only. The instructions called for a assembly jig consisting
of a 16 mm spacer for the inside of the rim (brake band side); not having such a spacer at hand I used some old magazines, easy to find and works like a charm.
first wheel finished
continued with opening up the holes in rims and spokes with a 1/4“ reamer to fit the rivet bolts.
Remark here: don’t overdo it, I opened some holes too much so the rivet bolt started to turn in it’s hole when I tried to tighten the nut. Bad idea. Used locking fluid to hold the head of the rivet bolt, just had to wait a few minutes each to have the fluid to set. Lesson learned!
next job was to „seal“ the spokes at the rims (thanks Lynn, for the hint) with epoxy and to fit the rivet nuts on the inside of each bolt; I used baby oil tissues to clean off the excess of epoxy from the spokes and to built a nice fillet. yes on the real wheels there were no fillets, but it I just did a small one barely to cover the gap between spoke and rim.
Locking fluid for the nuts
and nuts fitted
Final step:
[
So far about 60 h, using a diary to monitor the work, so to be able to refer to later.
This is my next issue the holes for the M6 bolts to fix the spokes to the hub. I would like to fill them to make them less obvious - any idea how to hide them - I plan to fill them with jb weld, level to the surface and would then like to have a similar surface structure and surrounding material (raw casting): I once tried coase emery paper pressed on half set epoxy so the surcface texture of the emery paper was pressed into the expoy skin.
Open for any idea or did you leave the holes as they were?
Thanks for reading
Elwood
Last edited by elwood-59 on Sat 29 Oct 2016, 3:04 am; edited 1 time in total (Reason for editing : Wrong picture)

elwood-59- Number of posts : 300
Location : Germany-NRW
Registration date : 2014-12-17
Re: The Pied Piper
![]() gwr1475 Sat 29 Oct 2016, 8:02 pm
gwr1475 Sat 29 Oct 2016, 8:02 pm
Fantastic set of pictures!! Please keep them coming.

gwr1475- Number of posts : 61
Location : canada
Registration date : 2012-11-18
Re: The Pied Piper
![]() LiveSteam Sat 29 Oct 2016, 8:22 pm
LiveSteam Sat 29 Oct 2016, 8:22 pm
Nice set of detailed pictures, keep them coming.
LiveSteam- Number of posts : 778
Location : Hampshire
Registration date : 2013-09-08
Re: The Pied Piper
![]() IanL Sun 30 Oct 2016, 11:19 am
IanL Sun 30 Oct 2016, 11:19 am
Hi there is a cover plate to fit on the outside of the hub that will hide the spoke base you can then fill any gaps visible also make sure the edge of the cover casting does not show up on the completed hub

IanL- Number of posts : 437
Age : 68
Location : Nottinghamshire
Registration date : 2011-07-25
Re: The Pied Piper
![]() elwood-59 Sun 30 Oct 2016, 1:40 pm
elwood-59 Sun 30 Oct 2016, 1:40 pm
Hi Ian,
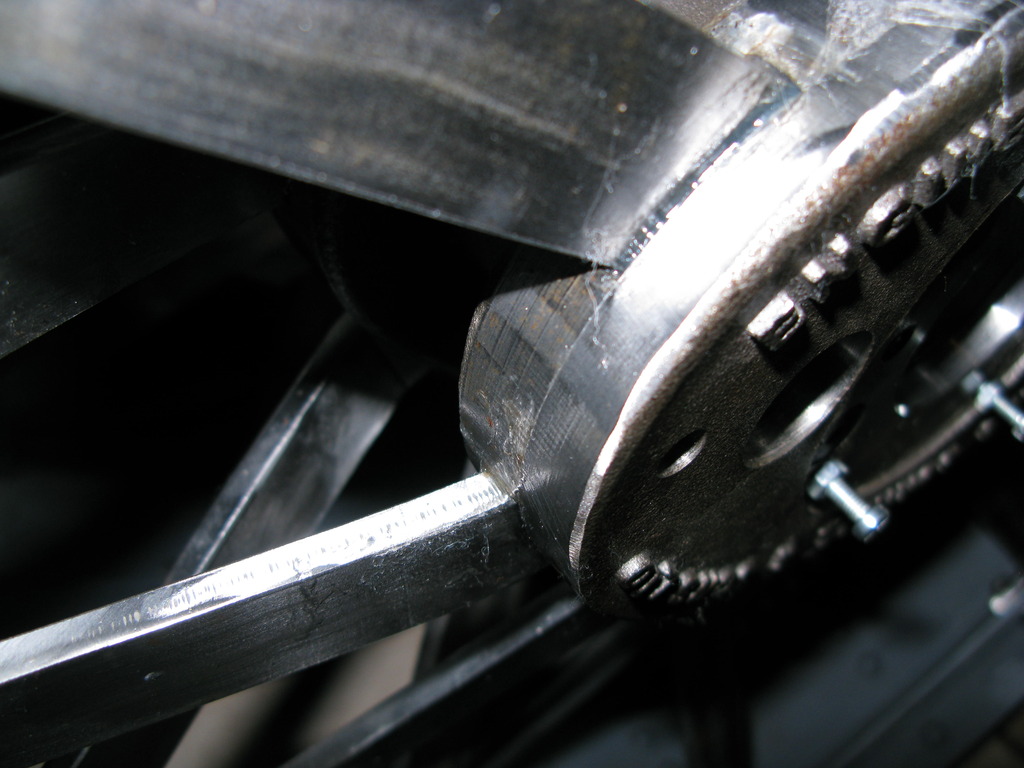
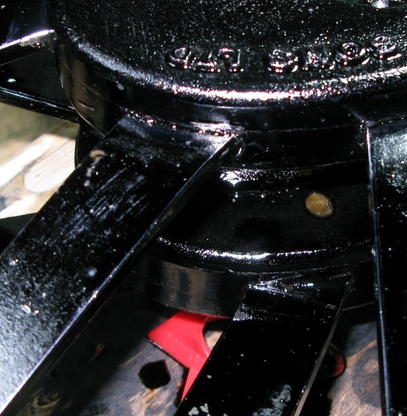
Yep I know I was referring to the holes in the hub itself, i.e. the threaded holes for the M6 countersunk bolts. For the moment I have left off the inner and outer cover until the holes are worked at.
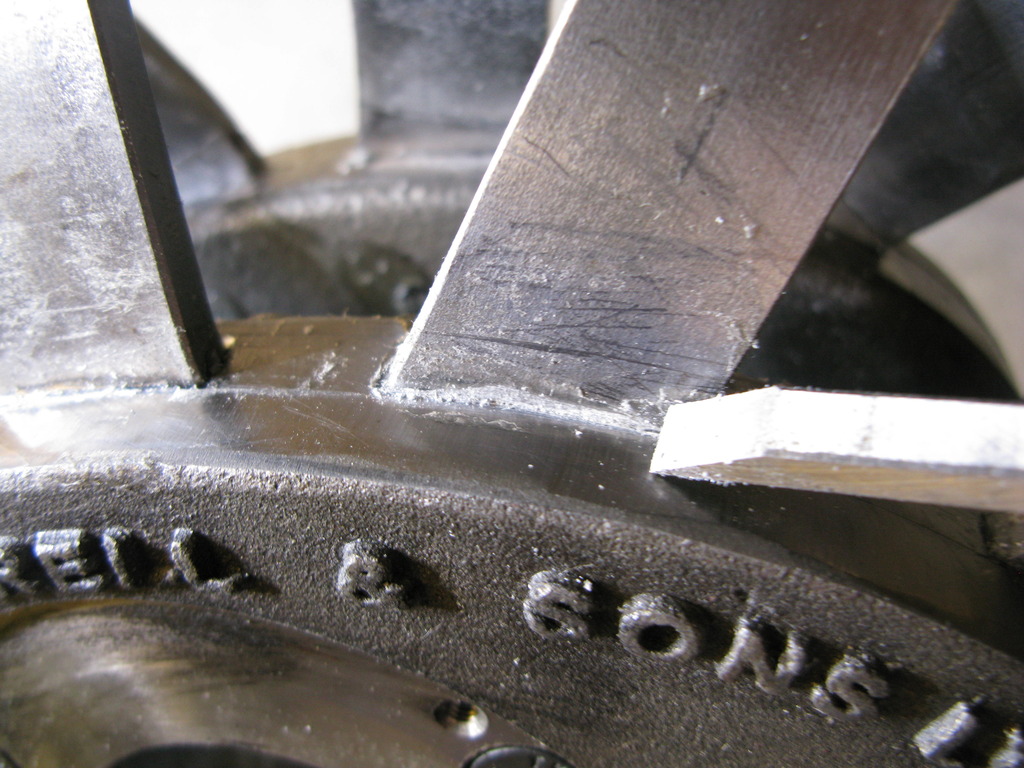
Also my covers, to be more exact the letters like "BURRELL" suffered from air bubbles in the lost wax casting so like the upper part of the "R" is partly filled, will try to drill the cast bubble to make it step below the protruding letter. I will try to add a picture later, probably, but this is only a by-discussion with above question as to how to sort out the holes. BTW you can see the hole in question in the background of the picture, I hope.
Trusting this explanation is helpful and sorry for my bad English
Elwood
Yep I know
Also my covers, to be more exact the letters like "BURRELL" suffered from air bubbles in the lost wax casting so like the upper part of the "R" is partly filled, will try to drill the cast bubble to make it step below the protruding letter. I will try to add a picture later, probably, but this is only a by-discussion with above question as to how to sort out the holes. BTW you can see the hole in question in the background of the picture, I hope.
Trusting this explanation is helpful and sorry for my bad English
Elwood
elwood-59- Number of posts : 300
Location : Germany-NRW
Registration date : 2014-12-17
Re: The Pied Piper
![]() sonick45 Sun 30 Oct 2016, 7:53 pm
sonick45 Sun 30 Oct 2016, 7:53 pm
Re the holes you wish to fill. When i was ready to to glue my spokes in place i put some aryldite down the threaded hole and when the spoke had been tightened in place i wiped the excess glue away with my finger covering said hole. After a quick sand all over the following day you cant see the holes or the cover face edges when its all painted.
sonick45- Number of posts : 511
Location : Barton-Le-Clay (Beds)
Registration date : 2009-01-26
Re: The Pied Piper
![]() elwood-59 Sun 30 Oct 2016, 8:18 pm
elwood-59 Sun 30 Oct 2016, 8:18 pm
thanks for the idea, unfortunately it's too late, spokes already fitted 
I might try to get some epoxy into the holes one by one and wait for it to set and the press emery paper to get the surface structure.
THX
Elwood
I might try to get some epoxy into the holes one by one and wait for it to set and the press emery paper to get the surface structure.
THX
Elwood
elwood-59- Number of posts : 300
Location : Germany-NRW
Registration date : 2014-12-17
Re: The Pied Piper
![]() sonick45 Sun 30 Oct 2016, 8:47 pm
sonick45 Sun 30 Oct 2016, 8:47 pm
I wouldnt worry to much about surface texture as that will all changed when yoi have several coats of paint over it.
sonick45- Number of posts : 511
Location : Barton-Le-Clay (Beds)
Registration date : 2009-01-26
Re: The Pied Piper
![]() elwood-59 Mon 31 Oct 2016, 1:36 pm
elwood-59 Mon 31 Oct 2016, 1:36 pm
I just do not know how obvious it is to see in the end. I assume after painting and assembly you might not see it anymore too much or not at all, but I can only tell AFTER and it might be too late. Others might not see it right away but I know it's there.
Just wondering. I did check my pictures of other RL but I do not seem to have a good example of a finished wheel to show that.
Elwood
Just wondering. I did check my pictures of other RL but I do not seem to have a good example of a finished wheel to show that.
Elwood
elwood-59- Number of posts : 300
Location : Germany-NRW
Registration date : 2014-12-17
Re: The Pied Piper
![]() elwood-59 Tue 01 Nov 2016, 4:27 pm
elwood-59 Tue 01 Nov 2016, 4:27 pm
Quick update.
spend some time to dress the rivet bolts. I was looking at different forum threads on how to do it the best way and found most seem to be using a grinder fit to a small hand held drill. I was looking into the same thing originally, ordered a flexible shaft to ease getting into a tight spot. A local DIY market had a „15% one item“ special offer, I took the opportunity and bought a long neck angle grinder, equipped with a cutting disk, a grinding disk and a flap wheel. it looked good, small enough to get between the spokes so I hoped it would do the work.

I also bought a small „cart“ - originally meant to be used with pots for plants I assume but just big enough to take the hub. By sheer luck the hight of the little gizmo is just right for the inside (brake side) of the wheel, the wheel „hovers“ over the table with it’s lover side only a few mm above the work bench. Wheel turns easily, no need to fight with the weight. We will see as I plan to use it for painting. I hope with the wheel laying flat when painting on those parts like the spokes the paint will run less easily. I hope,

you can also see part of it below the hub in the first picture.
Picture taken after using the grinder.

Expecting to have to go at it for quite some time each I was surprised it on took me a few seconds to get to that point. Looking at the pictures I might go back and do some more cosmetic dressing , but then again, this is the rivet head made by „hammering“ so they need not to look perfect.
Being a bit afraid of any heat produced by grinding I tried my luck with one bolt first and kept on going on it, even after that the bolt still was cool to the touch so I assume the thread locking compound used was not affected.
Also I started with the holes in the hub, this is where I am right now. It’s the inside, so unless using a mirror or laying down below the tender you will not see those, other than the holes for the „outside“ spokes, they will be (yes partially) visible from the outside.

I will think about is some more, maybe I find a different solution.
enough of that, now.
Elwood
PS no relation to the manufacturer of the tool whatsoever, just a satisfied customer.
spend some time to dress the rivet bolts. I was looking at different forum threads on how to do it the best way and found most seem to be using a grinder fit to a small hand held drill. I was looking into the same thing originally, ordered a flexible shaft to ease getting into a tight spot. A local DIY market had a „15% one item“ special offer, I took the opportunity and bought a long neck angle grinder, equipped with a cutting disk, a grinding disk and a flap wheel. it looked good, small enough to get between the spokes so I hoped it would do the work.
I also bought a small „cart“ - originally meant to be used with pots for plants I assume but just big enough to take the hub. By sheer luck the hight of the little gizmo is just right for the inside (brake side) of the wheel, the wheel „hovers“ over the table with it’s lover side only a few mm above the work bench. Wheel turns easily, no need to fight with the weight. We will see as I plan to use it for painting. I hope with the wheel laying flat when painting on those parts like the spokes the paint will run less easily. I hope,
you can also see part of it below the hub in the first picture.
Picture taken after using the grinder.
Expecting to have to go at it for quite some time each I was surprised it on took me a few seconds to get to that point. Looking at the pictures I might go back and do some more cosmetic dressing , but then again, this is the rivet head made by „hammering“ so they need not to look perfect.
Being a bit afraid of any heat produced by grinding I tried my luck with one bolt first and kept on going on it, even after that the bolt still was cool to the touch so I assume the thread locking compound used was not affected.
Also I started with the holes in the hub, this is where I am right now. It’s the inside, so unless using a mirror or laying down below the tender you will not see those, other than the holes for the „outside“ spokes, they will be (yes partially) visible from the outside.
I will think about is some more, maybe I find a different solution.
enough of that, now.
Elwood
PS no relation to the manufacturer of the tool whatsoever, just a satisfied customer.
elwood-59- Number of posts : 300
Location : Germany-NRW
Registration date : 2014-12-17
Re: The Pied Piper
![]() MrStationHouse Tue 01 Nov 2016, 5:35 pm
MrStationHouse Tue 01 Nov 2016, 5:35 pm
Black and Decker Power files are also useful tools to have in the box, I used mine a lot on the build.
With best wishes
Simon
With best wishes
Simon
MrStationHouse- Number of posts : 314
Location : Malmesbury
Registration date : 2011-04-26
Re: The Pied Piper
![]() elwood-59 Tue 01 Nov 2016, 5:49 pm
elwood-59 Tue 01 Nov 2016, 5:49 pm
Hi Simon,
Definitely! Used it on the spokes but found it harder to clean the rivets and was afraid to grind more than just the heads by accident. The grinder was easier to use at least for me.
Elwood
Definitely! Used it on the spokes but found it harder to clean the rivets and was afraid to grind more than just the heads by accident. The grinder was easier to use at least for me.
Elwood
elwood-59- Number of posts : 300
Location : Germany-NRW
Registration date : 2014-12-17
Re: The Pied Piper
![]() Steve Traill Wed 02 Nov 2016, 11:12 am
Steve Traill Wed 02 Nov 2016, 11:12 am
When it came to finishing the threaded end of the rivet bolts I used a spare dolly mounted in a vice pointing upwards, dropped the good end of the rivet into it and then dressed the threaded end with the other dolly. There was enough meat on the rivet to form a nice round top to it, only took a couple of taps for each one. A good few layers of paint & it looks like the other side.
Regarding the holes I would fill them with car body filler or something similar, if left open they could eventually leave a rusty stain on the paintwork, especially if you're at a wet rally!
Regarding the holes I would fill them with car body filler or something similar, if left open they could eventually leave a rusty stain on the paintwork, especially if you're at a wet rally!

Steve Traill- Number of posts : 800
Age : 67
Location : Illogan Redruth Cornwall
Registration date : 2008-06-29
Re: The Pied Piper
![]() elwood-59 Wed 02 Nov 2016, 12:44 pm
elwood-59 Wed 02 Nov 2016, 12:44 pm
Hi Steve,
Thanks for your suggestions. The rivets are done now, hoping with primer and paint the rivets will be ok.
As for the holes in the hub, I did the first few yesterday and after sending the post had another look at the almost set epoxy and they seem to look good. Of course the holes need to be filled and sealed against rust.
Elwood
elwood-59- Number of posts : 300
Location : Germany-NRW
Registration date : 2014-12-17
Re: The Pied Piper
![]() elwood-59 Sat 31 Dec 2016, 2:20 pm
elwood-59 Sat 31 Dec 2016, 2:20 pm
Just noticed that a long time has passed since my last update, so here comes a bit longish one to cover two months.
As already told, I was able to fill the holes in the hub sufficiently, with some paint they should almost disappear.
After my last post, temperature dropped and as I only have a unheated garage to work out of and the epoxy I use need at least 15 deg C to set, I was faced with either stop for good and postpone the fitting of the cover until spring (hmm) or search for a different approach. At that moment Government gave my wheels asylum in our living room, providing I did not mess up the tiles or do anything smelly in the house (I think she knows me better than I do myself)-
To here are the wheels stored to get up to room temperature:

I put the wheels on the side again, using the little turntable again to be able to reach any side.
Between the spokes I put some newspaper to avoid the epoxy to drip down on the other side.
After covering the holes not to be filled (the bolt holes and the two holes for the dowel pins with tape ( barely visible here

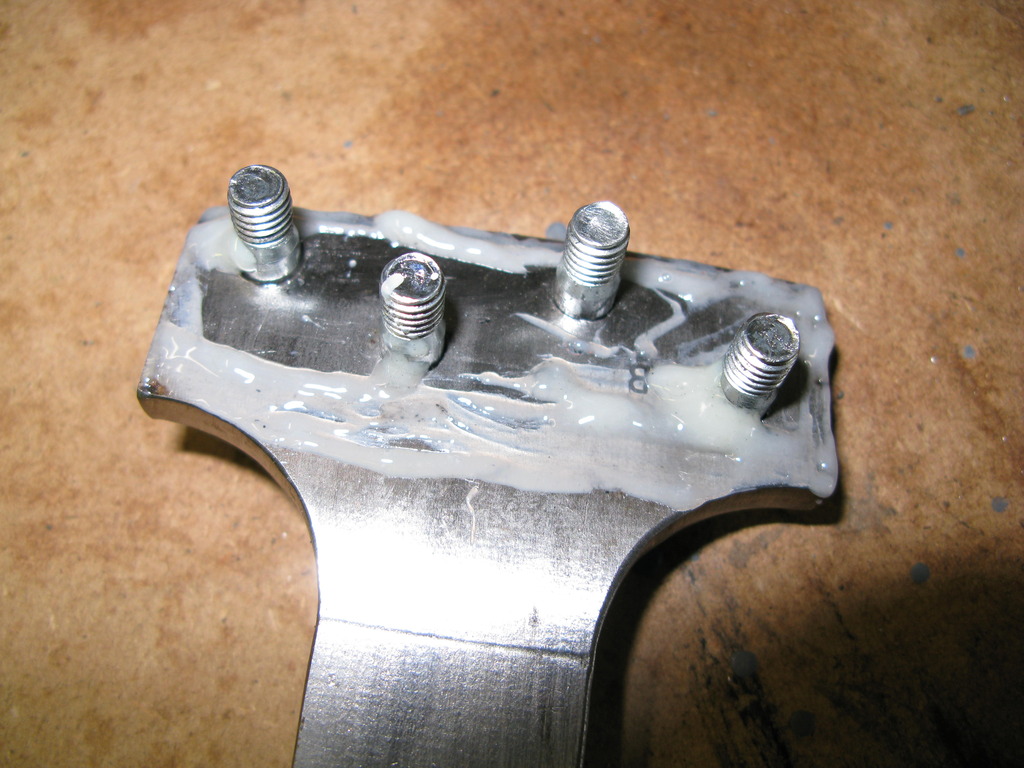
and (at the last moment remembered to also add M4 bolts to the treads for the hub cap) I mixed up plenty of epoxy to cover the area and to have some of it to squeeze out to give good coverage.

As you can see a lot more squeezed out than needed, but the picture only shows the too much side, I also had a not enough side…
I even remembered to remove as much from the holes for the cover stud thread.

After the epoxy had time to settle ) about 1h again I used baby oil tissues to remove most of the surplus epoxy trying to make a fillet as nice as possible.
some areas tuned out quite good, some were not as good.
In order to remove the rest and to clean up as much of the left over epoxy I used a carpenters broach to scape the area and to carve out the shape as much as possible. I also noticed that I had missed some areas where larger drops have accumulated and left to harden, especially during fitting of the spokes to the rims. Should have had a closer eye to that, then.
After the expo had fully dried and hardened I went and filled up the small gaps with same epoxy. I found a syringe kind of version at which the epoxy mixes up in the hollow needle already, giving me the chance to put a nice bead along the areas needed. I warmed up the two component tubes with a hair drier as I noticed that the epoxy will flow a bit batter at higher temperatures.

After hardening, this, then was also dressed up.

Just notice that on the picture you see a lot of scratches you do not see while looking at the wheel directly. Hope it is not my eyesight
Last step was to prepare the wheels for storage as I have to wait for better weather: after discussing with Adam of Craftmaster Paint I decided to wait until ambient temperatures are back up in a fairer region - I have no provisions to heat up my garage, no possibly to built up a paint shop in the back garden and fir certain reason s (smell) can not got into the house for painting.
This is what the wheels do look like now, after being treated with Fertan, a „rust converter“ i came across when still playing with cars. will change rust into a stable Fe3 compound. It just paint on like very thin paint and while drying will do its wonders. You can see them working as the chemical reaction makes the light brown stuff turn violet, so it is easy to see where it has found rust.

Just beginning

almost done

After it is completely dry it will give a black coat which can stay on the steel until ready to be painted. just prior to that it needs tp be rinsed off and can be painted over after water has dried away-
I then proceeded with the Tender, quite straight forward, only some holes needed some persuasion by a small drill to let me mount the bolts. I first went and installed M3 allen head bolts on every other hole to be able to attach the back and bottom plate to the sides. After the bend was done i added the rivet bolts, first the empty ones between the allen head screws and then replace the allen heads by rivet bolts one by one.

I trial assembled the tow straps and tow bracket but took it off again for cleaning and removing the miss scale- I still do not know if I want to remove the mill scale also on the tender sheets as they seem to be different, might only go over it with 320 grit emery paper to give paint something to grab to.

So this is current statua
Both rear wheels ready for primer, filler and paint.
Tender ready too.
Still undecided if I should paint the tender as a whole or to remover the tow straps and bracket and paint them separately for better rust protection—-
enough for now:
All the best wishes for 2017 and always one finger of water above the firebox.
As already told, I was able to fill the holes in the hub sufficiently, with some paint they should almost disappear.
After my last post, temperature dropped and as I only have a unheated garage to work out of and the epoxy I use need at least 15 deg C to set, I was faced with either stop for good and postpone the fitting of the cover until spring (hmm) or search for a different approach. At that moment Government gave my wheels asylum in our living room, providing I did not mess up the tiles or do anything smelly in the house (I think she knows me better than I do myself)-
To here are the wheels stored to get up to room temperature:
I put the wheels on the side again, using the little turntable again to be able to reach any side.
Between the spokes I put some newspaper to avoid the epoxy to drip down on the other side.
After covering the holes not to be filled (the bolt holes and the two holes for the dowel pins with tape ( barely visible here
and (at the last moment remembered to also add M4 bolts to the treads for the hub cap) I mixed up plenty of epoxy to cover the area and to have some of it to squeeze out to give good coverage.
As you can see a lot more squeezed out than needed, but the picture only shows the too much side, I also had a not enough side…
I even remembered to remove as much from the holes for the cover stud thread.
After the epoxy had time to settle ) about 1h again I used baby oil tissues to remove most of the surplus epoxy trying to make a fillet as nice as possible.
some areas tuned out quite good, some were not as good.
In order to remove the rest and to clean up as much of the left over epoxy I used a carpenters broach to scape the area and to carve out the shape as much as possible. I also noticed that I had missed some areas where larger drops have accumulated and left to harden, especially during fitting of the spokes to the rims. Should have had a closer eye to that, then.
After the expo had fully dried and hardened I went and filled up the small gaps with same epoxy. I found a syringe kind of version at which the epoxy mixes up in the hollow needle already, giving me the chance to put a nice bead along the areas needed. I warmed up the two component tubes with a hair drier as I noticed that the epoxy will flow a bit batter at higher temperatures.
After hardening, this, then was also dressed up.
Just notice that on the picture you see a lot of scratches you do not see while looking at the wheel directly. Hope it is not my eyesight
Last step was to prepare the wheels for storage as I have to wait for better weather: after discussing with Adam of Craftmaster Paint I decided to wait until ambient temperatures are back up in a fairer region - I have no provisions to heat up my garage, no possibly to built up a paint shop in the back garden and fir certain reason s (smell) can not got into the house for painting.
This is what the wheels do look like now, after being treated with Fertan, a „rust converter“ i came across when still playing with cars. will change rust into a stable Fe3 compound. It just paint on like very thin paint and while drying will do its wonders. You can see them working as the chemical reaction makes the light brown stuff turn violet, so it is easy to see where it has found rust.
Just beginning
almost done
After it is completely dry it will give a black coat which can stay on the steel until ready to be painted. just prior to that it needs tp be rinsed off and can be painted over after water has dried away-
I then proceeded with the Tender, quite straight forward, only some holes needed some persuasion by a small drill to let me mount the bolts. I first went and installed M3 allen head bolts on every other hole to be able to attach the back and bottom plate to the sides. After the bend was done i added the rivet bolts, first the empty ones between the allen head screws and then replace the allen heads by rivet bolts one by one.
I trial assembled the tow straps and tow bracket but took it off again for cleaning and removing the miss scale- I still do not know if I want to remove the mill scale also on the tender sheets as they seem to be different, might only go over it with 320 grit emery paper to give paint something to grab to.
So this is current statua
Both rear wheels ready for primer, filler and paint.
Tender ready too.
Still undecided if I should paint the tender as a whole or to remover the tow straps and bracket and paint them separately for better rust protection—-
enough for now:
All the best wishes for 2017 and always one finger of water above the firebox.
elwood-59- Number of posts : 300
Location : Germany-NRW
Registration date : 2014-12-17
Page 1 of 1
Permissions in this forum:
You cannot reply to topics in this forum|
|
|