
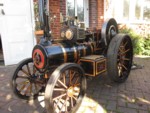
Martin's 6" Foden LWB
+4
lynnr
iain
mikero
martinj
8 posters
Page 1 of 1

Martin's 6" Foden LWB
![]() martinj Sat 22 Sep 2012, 10:27 pm
martinj Sat 22 Sep 2012, 10:27 pm
I have just about finished the downstairs toilet and built myself a bigger shed so a couple of weeks ago I finally made a start on my Foden. Six kits had been delivered by then, kit No 7 has now arrived.

Kits 1 to 6

Kit 1 Chassis

Kit 1 Small Items

Kit 2 Springs

Kits 3 and 4 Front wheels

Kits 5 and 6 rear wheels
Started by cleaning up the springs, The heat treatment seemed to have softened the mill scale so that a few passes with the flap wheel turned the black and rusty to shiny. Also cleaned up the tips of each leaf to round off the cut edges. Each leaf was then coated with Owatrol Oil to stop any rust – it dries quite slowly but after a few days it becomes a hard varnish like coating

Spring leaves before and after

Springs ready for painting.
Then started work on the chassis components. Found the mill scale much harder and difficult to shift with a flap wheel. I tried concrete cleaner which worked well with the small components that could be left to soak in a bucket but repeatedly painting it on the larger items appeared to be ineffective. The best way appeared to be a selection of twist knot wire brushes fitted to a variable speed angle grinder. It was a slow process taking about 10 hours to do each of the main rails but I got there in the end.
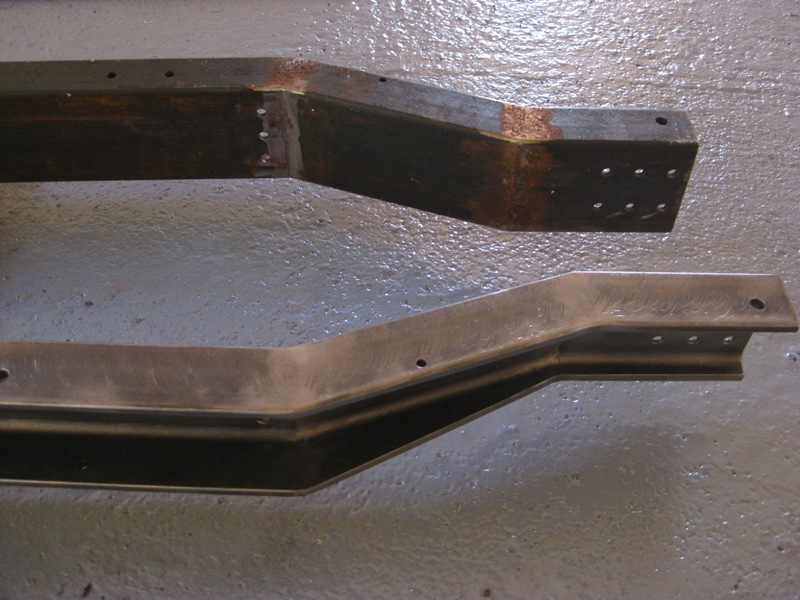
Chassis rails before and after
Steve’s instructions referred to the channel section being rather industrial. The inside and outside of the top and bottom faces of the channel are covered with deep curved grooves presumably caused by the rolling process. I have given them a coat of Owatrol Oil and will see how they look after primer and the first coat of undercoat is rubbed down. I was considering then using a polyester stopper in the visible areas to create a flatter surface. Most of the top face will be covered by the bodywork and the bottom face only visible if you crawl underneath the beast. The inside of the channel section is the main problem as most of that will be on show.


Well I have made a start, I’m hoping there won’t be so much work required to clean up the machined chassis components then I will be on for a massive painting session. I may leave the wheels for a bit but it would be nice to get the chassis assembled before I start playing with Kit 7 (boiler cradle and front axle).
A few useless statistics for kits 1 to 6
Components: 74
Fastenings: 229
Weight: 210.6 kg
Kits 1 to 6
Kit 1 Chassis
Kit 1 Small Items
Kit 2 Springs
Kits 3 and 4 Front wheels
Kits 5 and 6 rear wheels
Started by cleaning up the springs, The heat treatment seemed to have softened the mill scale so that a few passes with the flap wheel turned the black and rusty to shiny. Also cleaned up the tips of each leaf to round off the cut edges. Each leaf was then coated with Owatrol Oil to stop any rust – it dries quite slowly but after a few days it becomes a hard varnish like coating
Spring leaves before and after
Springs ready for painting.
Then started work on the chassis components. Found the mill scale much harder and difficult to shift with a flap wheel. I tried concrete cleaner which worked well with the small components that could be left to soak in a bucket but repeatedly painting it on the larger items appeared to be ineffective. The best way appeared to be a selection of twist knot wire brushes fitted to a variable speed angle grinder. It was a slow process taking about 10 hours to do each of the main rails but I got there in the end.
Chassis rails before and after
Steve’s instructions referred to the channel section being rather industrial. The inside and outside of the top and bottom faces of the channel are covered with deep curved grooves presumably caused by the rolling process. I have given them a coat of Owatrol Oil and will see how they look after primer and the first coat of undercoat is rubbed down. I was considering then using a polyester stopper in the visible areas to create a flatter surface. Most of the top face will be covered by the bodywork and the bottom face only visible if you crawl underneath the beast. The inside of the channel section is the main problem as most of that will be on show.
Well I have made a start, I’m hoping there won’t be so much work required to clean up the machined chassis components then I will be on for a massive painting session. I may leave the wheels for a bit but it would be nice to get the chassis assembled before I start playing with Kit 7 (boiler cradle and front axle).
A few useless statistics for kits 1 to 6
Components: 74
Fastenings: 229
Weight: 210.6 kg
martinj- Number of posts : 42
Location : Liskeard, Cornwall
Registration date : 2010-11-29
Re: Martin's 6" Foden LWB
![]() mikero Sat 22 Sep 2012, 10:38 pm
mikero Sat 22 Sep 2012, 10:38 pm
and there's me thinking the chassis rails on my 4.5" took a long time to clean up, mind you a coat of red oxide fills a lot of the small holes.
Mike
Mike

mikero- Number of posts : 261
Location : Brighton
Registration date : 2011-07-19
Re: Martin's 6" Foden LWB
![]() iain Tue 25 Sep 2012, 7:12 am
iain Tue 25 Sep 2012, 7:12 am
I'll be at the same stage next week can't wait!
I'm thinking of black nickelling the springs but not 100% sure yet.
I'm thinking of black nickelling the springs but not 100% sure yet.
iain- Number of posts : 172
Location : Lincoln
Registration date : 2012-09-11
Re: Martin's 6" Foden LWB
![]() lynnr Tue 25 Sep 2012, 8:11 am
lynnr Tue 25 Sep 2012, 8:11 am
Looking very good.
I had experience of the 6" chassis when I was at the factory for a week back late feb. I was building up once of the control model chassis for Dean and Steve. I found mitered flap disks in the grinder were very effective on removing the scale of the open sides of the rails. You could find out how much for a "lunchtime" sandblast at your local garage or metal fabricators? It may be more cost effective than using a dozen disks and 10 hours of your time?
I had experience of the 6" chassis when I was at the factory for a week back late feb. I was building up once of the control model chassis for Dean and Steve. I found mitered flap disks in the grinder were very effective on removing the scale of the open sides of the rails. You could find out how much for a "lunchtime" sandblast at your local garage or metal fabricators? It may be more cost effective than using a dozen disks and 10 hours of your time?

lynnr- Number of posts : 3242
Age : 55
Location : Highland, 4inch showman
Registration date : 2010-08-06
Re: Martin's 6" Foden LWB
![]() hippy dave Tue 25 Sep 2012, 7:59 pm
hippy dave Tue 25 Sep 2012, 7:59 pm
I used flap discs and wire brush in an angle grinder and with a couple of high build undercoats and 3 top coats it has come up lovely its suprising how much of the imperfections are hinden with a bit of paint 
hippy dave- Number of posts : 188
Location : bognor regis
Registration date : 2011-07-31
Re: Martin's 6" Foden LWB
![]() martinj Thu 27 Sep 2012, 11:36 pm
martinj Thu 27 Sep 2012, 11:36 pm
Not much to report by way of progress but have unpacked Kit 7 and it is indeed a beauty to behold. You would certainly need access to some serious workshop machinery and the skills to match to be able to build one of these from scratch.

Kit 7
The scores on the doors are now:
Components 108
Fastenings 286
Weight 249 Kg
Kit 7
The scores on the doors are now:
Components 108
Fastenings 286
Weight 249 Kg
martinj- Number of posts : 42
Location : Liskeard, Cornwall
Registration date : 2010-11-29
Re: Martin's 6" Foden LWB
![]() Steam Traction World Fri 28 Sep 2012, 9:52 am
Steam Traction World Fri 28 Sep 2012, 9:52 am
Excellent to see another builder start a thread on the build progress. Well done Martin. Keep up the good work especially the information on number of components/weights etc as i'm finding that bit really interesting.
Dean
Dean
Steam Traction World- Admin
- Number of posts : 946
Location : Daventry UK
Registration date : 2008-06-18 -

Re: Martin's 6" Foden LWB
![]() hippy dave Sun 30 Sep 2012, 5:48 pm
hippy dave Sun 30 Sep 2012, 5:48 pm
Cheers Martin like dean said its a brilliant idea keeping a track on the number of bits and weights pics are really good to i had good intentions of keeping a diary of pics but have done rubbish so im really glad you are cheers
hippy dave- Number of posts : 188
Location : bognor regis
Registration date : 2011-07-31
Re: Martin's 6" Foden LWB
![]() martinj Thu 18 Oct 2012, 9:26 pm
martinj Thu 18 Oct 2012, 9:26 pm
Been away for two weeks so no progress again but on Monday a heavy parcel was delivered. Tuesday SWMBO was having her hair done so I smuggled the scales (kitchen and bathroom) out to the shed. Tuesday afternoon got a phone call – got to go away and earn some money. So here is a picture of the kit and by popular demand, the magic numbers so far. Someday I will have some pictures of a few bits painted and even bolted together.

Kit 8 - Axle Boxes, Brake Drums and Radius Arms
Components 144
Fastenings 358
Weight 288 Kg
Kit 8 - Axle Boxes, Brake Drums and Radius Arms
Components 144
Fastenings 358
Weight 288 Kg
martinj- Number of posts : 42
Location : Liskeard, Cornwall
Registration date : 2010-11-29
Re: Martin's 6" Foden LWB
![]() martinj Tue 04 Dec 2012, 5:43 pm
martinj Tue 04 Dec 2012, 5:43 pm
Embarrassingly I have nothing more to report as regards making any progress with the build. The little short job turned into two jobs and lasted far too long but at least I now won't have to raid the piggy bank to pay for the next couple of kits. Kit 9 has now arrived and was the heaviest since the chassis with the axle alone weighing in at over 20kg and almost 10kg for the sprocket. Anyway here is a picture and the latest scores.

Kit 9 Rear Axle and Differential
Totals so far:
Components 188
Fastenings 457
Weight 340 kg
Kit 9 Rear Axle and Differential
Totals so far:
Components 188
Fastenings 457
Weight 340 kg
martinj- Number of posts : 42
Location : Liskeard, Cornwall
Registration date : 2010-11-29
Re: Martin's 6" Foden LWB
![]() hippy dave Wed 05 Dec 2012, 6:10 pm
hippy dave Wed 05 Dec 2012, 6:10 pm
cheers for keeping score always look forward to the update 
hippy dave- Number of posts : 188
Location : bognor regis
Registration date : 2011-07-31
Re: Martin's 6" Foden LWB
![]() Robfishman Wed 05 Dec 2012, 10:29 pm
Robfishman Wed 05 Dec 2012, 10:29 pm
It's surprising just how many bits there are on these builds. I'm up to 3448 components and fasteners our showmans build so far. Great to see the progress and yes please keèp the stats coming in.
Robfishman- Number of posts : 1061
Age : 49
Location : Chandlers Ford Hants 4" showmans & 4" Roller
Registration date : 2010-11-26 -
Re: Martin's 6" Foden LWB
![]() martinj Mon 11 Feb 2013, 8:28 pm
martinj Mon 11 Feb 2013, 8:28 pm
Still no significant progress to report, its either been too cold or too damp to do any painting in my shed on the end of Bodmin Moor. Indoors one bedroom is looking a bit smarter so my credit rating has gone up and I will be able to get some hours in when the weather improves.
Kit 10 has arrived, slightly out of sequence as "kit" 11 was a boiler deposit paid before Christmas. Some hefty bits of metal that proved a bit too much for the packaging but everything seems OK. I was a bit concerned that the brake rods may have been bent but having seen them in the images of the control models I have satisfied myself they are as they should be.
We received drawings for both the C Type and SWB so can confirm that the cross members discussed in Bill's (Burrel1) thread are fitted differently on the two versions. Also from earlier in the thread the radius rod brackets also carry the brake shaft on the SWB hence the additional holes spotted by Iain.
Anyway here is the photo of kit 10

And for all the numbers fans, at the third of the way point we have
Components 240
Fastenings 612
Weight 371.6 Kg or 7 cwt 1 qtr 7 lbs
Kit 10 has arrived, slightly out of sequence as "kit" 11 was a boiler deposit paid before Christmas. Some hefty bits of metal that proved a bit too much for the packaging but everything seems OK. I was a bit concerned that the brake rods may have been bent but having seen them in the images of the control models I have satisfied myself they are as they should be.
We received drawings for both the C Type and SWB so can confirm that the cross members discussed in Bill's (Burrel1) thread are fitted differently on the two versions. Also from earlier in the thread the radius rod brackets also carry the brake shaft on the SWB hence the additional holes spotted by Iain.
Anyway here is the photo of kit 10
And for all the numbers fans, at the third of the way point we have
Components 240
Fastenings 612
Weight 371.6 Kg or 7 cwt 1 qtr 7 lbs
martinj- Number of posts : 42
Location : Liskeard, Cornwall
Registration date : 2010-11-29
A little progress
![]() martinj Sat 23 Feb 2013, 8:55 pm
martinj Sat 23 Feb 2013, 8:55 pm
With temperatures in double figures I spent a bit of time in the shed last week.
I started painting the springs figuring that as most of it would be out of sight I could learn froma few my many mistakes before venturing into areas that would be more public. The main issues I had were how to hold/support the various bits to be able to cover all the surfaces without ending up with finger prints and marks where some of the leaves ended up resting against my beam of nails. I had a few runs particularly where the paint got through holes and the dreaded specks of dust.
At least the springs gave me enough confidence to have a go at the chassis components effectively a day behind the springs
I have used Craftmaster paints, two coats of primer, two undercoat and one Alfa Red topcoat (just on the springs) so far. But then the temperatures dropped and everything was covered in a layer of condensation in the morning so no more painting.
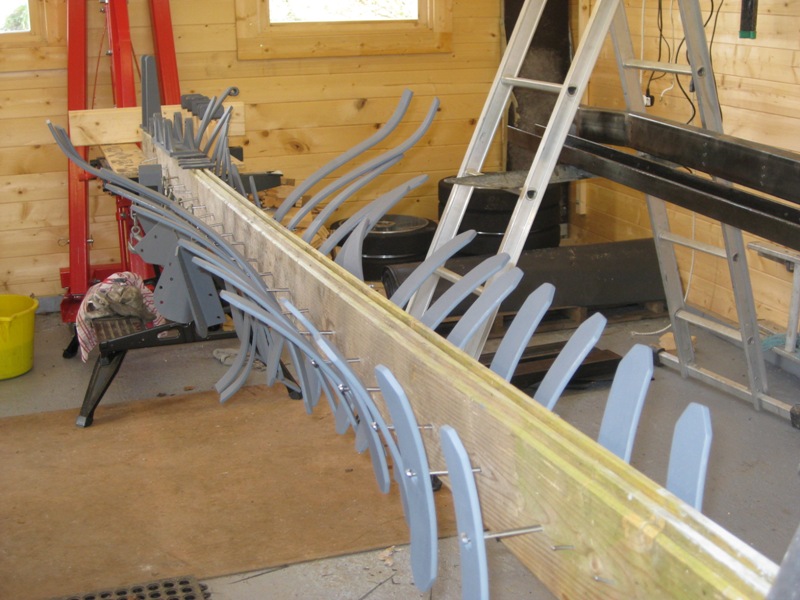
I amused myself by starting to clean up the wheels using a selection of wire brushes in a drill and finishing off the corners with wire brushes in a Dremel - life expectancy of Dremel brushes about 10 - 15 minutes.
Now work has stopped play for a while so the paint will have a chance to harden. The high build primer and undercoat has certainly reduced the severity of the gouges in the chassis members (see my first post above) but I will use some stopper and give it all a light rub down before the next coat. With the springs I was thinking I might flatten off the runs etc on the faces of the leaves but probably not make them any thicker with more paint but I will add a final top coat once they are assembled.


Martin
I started painting the springs figuring that as most of it would be out of sight I could learn from
At least the springs gave me enough confidence to have a go at the chassis components effectively a day behind the springs
I have used Craftmaster paints, two coats of primer, two undercoat and one Alfa Red topcoat (just on the springs) so far. But then the temperatures dropped and everything was covered in a layer of condensation in the morning so no more painting.
I amused myself by starting to clean up the wheels using a selection of wire brushes in a drill and finishing off the corners with wire brushes in a Dremel - life expectancy of Dremel brushes about 10 - 15 minutes.
Now work has stopped play for a while so the paint will have a chance to harden. The high build primer and undercoat has certainly reduced the severity of the gouges in the chassis members (see my first post above) but I will use some stopper and give it all a light rub down before the next coat. With the springs I was thinking I might flatten off the runs etc on the faces of the leaves but probably not make them any thicker with more paint but I will add a final top coat once they are assembled.
Martin
martinj- Number of posts : 42
Location : Liskeard, Cornwall
Registration date : 2010-11-29
Re: Martin's 6" Foden LWB
![]() highpressure Sun 24 Feb 2013, 8:54 am
highpressure Sun 24 Feb 2013, 8:54 am
Slightly off thread but that look like a beam from a log cabin supporting them??? And that looks like a new cabin you're in, was it from Dunster House as I built one from them six years ago and was very impressed and had several extra beams which went into the log burner we installed.
Otherwise looking very good so far, lots of painting and heavy bits in these engines!!! Will enjoy seeing these beasts shooting round the rally field.
Otherwise looking very good so far, lots of painting and heavy bits in these engines!!! Will enjoy seeing these beasts shooting round the rally field.
highpressure- Number of posts : 1096
Age : 57
Location : West Sussex, 4" DCC Road Loco
Registration date : 2008-06-18 -
Re: Martin's 6" Foden LWB
![]() martinj Sun 24 Feb 2013, 9:39 am
martinj Sun 24 Feb 2013, 9:39 am
Yes it is a Dunster House. 90% happy with them and it was very easy to build but had an issue with doors and frames being incompatible in the lock department. Customer Service is hopeless, ended up buying a short length of SS bar and making my own striker plates.
Fitted a few extra windows so with the spare logs supplied and the leftovers I have made a sturdy bench as well having a fair few bits for odds and sods.
Martin
Fitted a few extra windows so with the spare logs supplied and the leftovers I have made a sturdy bench as well having a fair few bits for odds and sods.
Martin
martinj- Number of posts : 42
Location : Liskeard, Cornwall
Registration date : 2010-11-29
foden updates
![]() hippy dave Sun 03 Nov 2013, 6:52 pm
hippy dave Sun 03 Nov 2013, 6:52 pm
Hi Martin whats the updates on the weight and part numbers so far:D
hippy dave- Number of posts : 188
Location : bognor regis
Registration date : 2011-07-31
Re: Martin's 6" Foden LWB
![]() martinj Sun 03 Nov 2013, 7:04 pm
martinj Sun 03 Nov 2013, 7:04 pm
Hi Dave
Sorry I am well behind and haven't had a chance to do anything much over the summer. I will try and smuggle the scales out to the shed and catch up with the last three or four kits soon. Some hefty lumps waiting out there.
Martin
Sorry I am well behind and haven't had a chance to do anything much over the summer. I will try and smuggle the scales out to the shed and catch up with the last three or four kits soon. Some hefty lumps waiting out there.
Martin
martinj- Number of posts : 42
Location : Liskeard, Cornwall
Registration date : 2010-11-29
hippy dave- Number of posts : 188
Location : bognor regis
Registration date : 2011-07-31
Re: Martin's 6" Foden LWB
![]() martinj Tue 12 Nov 2013, 11:26 pm
martinj Tue 12 Nov 2013, 11:26 pm
As mentioned above it has been a busy summer with too many demands on my time that have kept me out of the shed. I feel more like a kit collector than a kit builder but hopefully the balance will change soon. Anyway I have updated the stats now and as were are round about the half way point here is the full half time score sheet.
It is a table with five columns, I hope it looks OK on a computer screen but appreciate it may not work on a phone. There was an icon to create a table in the post a reply pane but it didn't seem to help me.
Kit Supplied Components Fastenings Weight kg
Chassis Feb 12 24 222 102.9
Springs Apr 12 36 1 25.5
1st Front Wheel Jun 12 6 3 12.9
2nd Front Wheel Jun 12 6 3 12.9
1st Rear Wheel Jul 12 1 28.2
2nd Rear Wheel Aug 12 1 28.2
Front Axle Sep 12 34 57 38.4
Axle Boxes Oct 12 36 72 38.7
Back Axle Nov 12 44 99 52.5
Boiler Payment Dec 12
Brakes Feb 13 52 155 31.3
Steering Apr 13 32 40 12.5
Water Tanks May 13 20 180 75.0
Cylinder Payment Jul 13
Smokebox Aug 13 36 279 30.3
Cylinder Oct 13 4 22 43.3
Total 332 1133 532.7
So there we are, 14 kits of hardware and over half a tonne of metal
Martin
martinj- Number of posts : 42
Location : Liskeard, Cornwall
Registration date : 2010-11-29
» 4.5" Short Wheel Base Foden & 4.5" Foden Artic
» Latest 6" Foden next to the 4.5" Foden
» Foden Kit 20 & 19
» FODEN KIT 4 AND 5
» Foden SWB Last Kit!!!
» Latest 6" Foden next to the 4.5" Foden
» Foden Kit 20 & 19
» FODEN KIT 4 AND 5
» Foden SWB Last Kit!!!
Page 1 of 1
Permissions in this forum:
You cannot reply to topics in this forum|
|
|