
Kit 23 Alignments
5 posters
Page 1 of 1

Kit 23 Alignments
![]() highpressure Thu 16 Feb 2012, 10:12 pm
highpressure Thu 16 Feb 2012, 10:12 pm
Could anyone else who has put kit 23 together just check a few things with me?? When the inner bevel is in place and the main diff case goes on where abouts is the end of the inner bevel shaft in relation to the diff case centre? Are yours level with each other? On mine the inner bevel shaft is set back by about 5mm meaning when the outer bevel brass pack washers go on they only come into contact with the edge of the diff case centre boss. Is this right? I would have hoped the inner and diff case lined up so the brass washers ran against the entire face of both. If I havent explained this very well I will try and takes some pictures. A thinner shim will reduce it but only by 1mm or so. Then I can check the backlash when in place and see how the outer bevel goes on. That will be almost impossible to gauge the backlash there as its completly enclosed by the diff case.
Are there plans to provide different thickness shims for the outer bevel to to take up backlash if it is present? Funnily enough out of all the kits so far including ones we were warned about being tricky this one looks like it will be the most challenging to set up right and will make a hell of a difference between an engine that runs quiet and one that clatters along with lots of diff noise....
Are there plans to provide different thickness shims for the outer bevel to to take up backlash if it is present? Funnily enough out of all the kits so far including ones we were warned about being tricky this one looks like it will be the most challenging to set up right and will make a hell of a difference between an engine that runs quiet and one that clatters along with lots of diff noise....
highpressure- Number of posts : 1096
Age : 57
Location : West Sussex, 4" DCC Road Loco
Registration date : 2008-06-18 -

Re: Kit 23 Alignments
![]() Steam Traction World Fri 17 Feb 2012, 8:35 am
Steam Traction World Fri 17 Feb 2012, 8:35 am
Hi Kevin
I put a couple of clues in the instructions supplied with Kit 23 that should alleviate your concerns. I’ve copied the relevant parts below.
‘The clearance between the Pinions and Bevel is just to stop the teeth bottoming out and being too notchy. In service, the Bevels will tend to be forced outwards by the power of the engine being transmitted through the Pinions.’
‘Under normal driving conditions the three Diff Pinions only turn slightly as one wheel goes faster than the other when steering to either the left or right.’
The position of the inner bevel boss is totally irrelevant. It is the shims that will determine things. The only real way of understanding what sort of backlash exists between the pinions and the outer bevel is to reduce the thickness of shim and operate the diff to how smooth (or not) it is. Continue reducing the shims until it becomes unacceptably notchy. Then fit the previous thicker size. You’re limited to what you can do at the moment because you only have a difference of 3mm in the outer shim. You’ll be able to fine tune things once the other thicknesses come in from the laser cutters.
Regards
Steve
Steam Traction World- Admin
- Number of posts : 946
Location : Daventry UK
Registration date : 2008-06-18 -
Re: Kit 23 Alignments
![]() highpressure Sat 18 Feb 2012, 8:40 am
highpressure Sat 18 Feb 2012, 8:40 am
Ahhh instructions.... thats where I have been going wrong!!!  As a man I dont read instructions, just plough headlong in and then refering to scant sections of the words to try and discover what the extra bits are for or why something doesnt seem to fit
Digesting what you have said and considering again how the diff will work the pinions will only rotate if the diff is locked, say to allow the winch to run or very slightly as the two wheels rotate at slightly differing speeds. And as you say the pinions will gravitate outwards so if anything it could afford to be on the slightly tight side to allow for this and a small degree of wear.
Until the shims arrive and the inner bevlel can be set correctly I cant really tell how the overall assembly will be. Will there be any shims for the outer bevel in place of the two brass pack washers to help set that up too??
Cheers Kev
highpressure- Number of posts : 1096
Age : 57
Location : West Sussex, 4" DCC Road Loco
Registration date : 2008-06-18 -
Re: Kit 23 Alignments
![]() highpressure Sat 25 Feb 2012, 11:17 am
highpressure Sat 25 Feb 2012, 11:17 am
Hi STW,
The shims arrived for the diff today and I have tried them out. The comp slip says there should be a 1mm and a 1.5mm of BS42370 the inner bevel shim. The bag they are in says they are 1.5mm and 2mm Ideally I need the 1mm shim as to get the inner bevel to an acceptable point I now have to remove the brass washer which is probably not the thing to do. Do you have 1mm shims or is that a printing error?? If so can I have a 1mm one or can I send the brass one back to you to take 1mm off it to get it to the right size?? It currently measures nearly 3mm and it needs to be 2mm, I reckon the overall gap needs to be 4mm so it could be 2.5mm and go with the 1.5mm shim as an alternative.
Cheers Kev.
The shims arrived for the diff today and I have tried them out. The comp slip says there should be a 1mm and a 1.5mm of BS42370 the inner bevel shim. The bag they are in says they are 1.5mm and 2mm
Cheers Kev.
highpressure- Number of posts : 1096
Age : 57
Location : West Sussex, 4" DCC Road Loco
Registration date : 2008-06-18 -
Re: Kit 23 Alignments
![]() bjwlancashire Sun 26 Feb 2012, 2:02 pm
bjwlancashire Sun 26 Feb 2012, 2:02 pm
Kev
I picked my diff up last Wednesday and also the two packing shims. I found that one of the two shims was only fractionally thinner than the one supplied with the kit, maybe 0.2mm. Id id measue them but cannot remember the sizes, your comments are correct. I think one additional shim of 1.0mm would make the best fit. I ended up using both of the extra shims instead of the one that came with the kit. It does seem a little looser than ideal but when your driving forward or backward it will be irrelevant. The time you would most notice it would be when closing the regulator to stop or change direction and the slack takes up.
I have just found some galvanised steel at 1mm thick, hidden under my bench and I am about to make a shim from it and see how that runs, I will let you know later.
Brian

bjwlancashire- Number of posts : 938
Location : Mellor, Lancashire
Registration date : 2010-09-07
Re: Kit 23 Alignments
![]() highpressure Sun 26 Feb 2012, 4:39 pm
highpressure Sun 26 Feb 2012, 4:39 pm
Finally got to the point where I can put the wheel on and try it on the ground pushing back and forth. Initally it looked like nothing would line up!! The Boss the keep the LH wheel on looked like it was too fat but I discovered the axle wasnt in the right place. Then it wouldnt go over the axle due to burrs, but afetr cleaning and trial fitting it went on smoothly and the securing pin can just be pushed in with the lightest of finger pressure, very pleasing fit. Then went to the other side!!! Couldnt seem to get the wheel anywhere near the right place as the brake shaft fouled the spokes big time!!! Eventually found out that the axle was too far over to the left !!! Had visions of issues with axle length and brake shafts too long etc but finally got it all where it should be and it all fitted just right.... Jacked up the left side to test the diff and still havent got it right yet but need a reply to the above to get the right depth of shim really, although as Steve said running along there is almost no movement in the diff so wouldnt really make a noise in normal use, just want to get it as good as poss before starting to introduce wear.
Then pushed it out of the garage..... Holy Sh*t!!!! Having taken it to a number of shows last year and moved it about on various surfaces I am stunned by how much more inertia there is with it now, but I shouldnt be as we have added some big old kits in the last few months. Plus also all the bits and pieces in the drive train adding resistance to it. I can say now for certain it wont be going to any shows before it runs, I like my abdominal wall as it is at the moment and my spine is quite well aligned!!! Besides trying to back it out of the trailer without having the flywheel and being able to engage it in gear to help it out means it would be a liabilty as it is. Still I will take the organ to the early ones and enjoy talking to people.
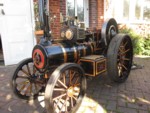
Current state of play with all kits in place, just sorting out gaskets for the cylinder covers and valve chests and painting makers plates.


Quite a depth of shine on the hornplates!! The slightly warmer weather and sunny day just makes the longing to light up worse!!!! Roll on July!!!!
Cheers All Kev.
Then pushed it out of the garage..... Holy Sh*t!!!!
Current state of play with all kits in place, just sorting out gaskets for the cylinder covers and valve chests and painting makers plates.
Quite a depth of shine on the hornplates!! The slightly warmer weather and sunny day just makes the longing to light up worse!!!! Roll on July!!!!
Cheers All Kev.
highpressure- Number of posts : 1096
Age : 57
Location : West Sussex, 4" DCC Road Loco
Registration date : 2008-06-18 -
Diff shims
![]() Tony King Sun 26 Feb 2012, 5:02 pm
Tony King Sun 26 Feb 2012, 5:02 pm
Hi Kev,
Great to see the pictures of your engine, it looks fabulous.
I may be speaking out of turn here, but I have not had any of the shimming problems with the diff that every one else is having.
The one thing I did do, was make little spacers to go on the inside of the little diff gears to ensure they were at the maximum radius, inside the crown wheel. This ensures that they are at the "max load position" right away & the "big" shimming everyone is having problems with, will be correct for drive conditions!! If that makes sence?
It may have no bearing on your problem, but it might be worth a try!
Regards
Tony
Tony King- Number of posts : 856
Age : 68
Location : scotland
Registration date : 2008-10-31
Re: Kit 23 Alignments
![]() bjwlancashire Sun 26 Feb 2012, 6:11 pm
bjwlancashire Sun 26 Feb 2012, 6:11 pm
Hi Tony
I understand your point about a spacer to push the pinions to the highestpoint of travel on there shafts. I have just made a 1mm shim and with the 2mm shim making a total of 3mm it does give a good setting with a smooth running diff apart from the odd time when one of the pinions presumably slides down it's axle a little as it gets towards the highest point of the diff rotation. It will be interesting to try this set up with both wheels on and the drive piece on the RH side so that the wheels are fixed and the gap between the wheels is fixed.
Kev
Are your inside wheel rivets clear of the brake blocks now everything is assembled?? It is looking good now with all the extra weight added, my arms and shoulders are aching with all the lifting etc.
Brian
Last edited by bjwlancashire on Sun 26 Feb 2012, 7:02 pm; edited 1 time in total (Reason for editing : all fingers and thumbs typing making spelling mistakes!!)
bjwlancashire- Number of posts : 938
Location : Mellor, Lancashire
Registration date : 2010-09-07
Re: Kit 23 Alignments
![]() highpressure Sun 26 Feb 2012, 6:31 pm
highpressure Sun 26 Feb 2012, 6:31 pm
Brian,
Havent tried the brake blocks on yet, so dont know how they fit against the rivets, will try during the week or next weekend.
Tony,
The pinions on mine are vey tight in the main casting and on the central pin, dont think there is any space for a shim at the bottom, speaking from memory though so will need to have another look when I take it apart again to recheck shims. When you say running smooth this is where perhaps opinions might differ, for instance can you hear any noise or feeling anything when rotating the bevels? For me there is a distinct "ringing, clattering" type of noise and if holding it can feel an obvious clunk as it rotates. The trouble is not knowing how much is good or bad or how others are getting on without being able to compare them its very difficult to know where to call it a day. Steve very kindly popped in last week and said it definately needed shimming but I seem to be going over the same stuff again and again and it doesnt feel like I am getting anywhere But again as Steve has said its not the end of the world as the internals are not rotating constantly anyway and I know I am very unlikely to use the winch at all so I wont loose any sleep over it.
Kev
Havent tried the brake blocks on yet, so dont know how they fit against the rivets, will try during the week or next weekend.
Tony,
The pinions on mine are vey tight in the main casting and on the central pin, dont think there is any space for a shim at the bottom, speaking from memory though so will need to have another look when I take it apart again to recheck shims. When you say running smooth this is where perhaps opinions might differ, for instance can you hear any noise or feeling anything when rotating the bevels? For me there is a distinct "ringing, clattering" type of noise and if holding it can feel an obvious clunk as it rotates. The trouble is not knowing how much is good or bad or how others are getting on without being able to compare them its very difficult to know where to call it a day. Steve very kindly popped in last week and said it definately needed shimming but I seem to be going over the same stuff again and again and it doesnt feel like I am getting anywhere
Kev
highpressure- Number of posts : 1096
Age : 57
Location : West Sussex, 4" DCC Road Loco
Registration date : 2008-06-18 -
Re: Kit 23 Alignments
![]() bjwlancashire Sun 26 Feb 2012, 7:09 pm
bjwlancashire Sun 26 Feb 2012, 7:09 pm
Kev
When I was playing with the pinions on the bevel gears it did seem like they were not running smooth until they were partially beyond the outer diameter of the bevel gear so Tony's solution of pushing them that way using spacers would improve things. The pinion gear teeth seemed to clash on the sides of the bevel gear teeth as if they are to close or too far towards the centre of the bevel. With the 3mm spacer setting I have now the pinions are still allowing some backlash between themselves and the bevel gear teeth but the pinion gear teeth are just touching or clear of the sides of the opposing gear tooth as they rotate. I think I will be OK winching at the current setting - should I ever try it.
Brian
bjwlancashire- Number of posts : 938
Location : Mellor, Lancashire
Registration date : 2010-09-07
Re: Kit 23 Alignments
![]() Brian M Sun 26 Feb 2012, 8:36 pm
Brian M Sun 26 Feb 2012, 8:36 pm
Looks great, you should be as proud as punch with the finish.... 
All the best,
Brian
All the best,
Brian

Brian M- Number of posts : 261
Location : Cheshire
Registration date : 2011-01-30
Re: Kit 23 Alignments
![]() Tony King Sun 26 Feb 2012, 9:10 pm
Tony King Sun 26 Feb 2012, 9:10 pm
Hi Kev,
I just tried to reply, but its got lost somewhere, so I'll try again!!
Firstly, I'd ensure the pinions were nice & free on their shafts & do whatever is required to ensure they still spin freely when finally assembled into the main hub.
My diff is very slightly "notchy", but is completely free & fairly quiet when I spin the LH side wheel with the shaft & RH wheel stationary, ie with the pinions travelling at top speed!!
I did notice the inside wheel rim rivet heads ( nuts!) where catching the brake blocks, but have sorted that by putting one of the shims (BS42371) that STW have just supplied, between the diff assembly & the axle tube, thus moving the whole assembly out enough to allow clearance.
Hope this helps.
I now realise that it's going to be fun getting all the clearances just right on the rear axle, when the RHS components arrive!!....... Can't wait!!
Regards,
Tony
Tony King- Number of posts : 856
Age : 68
Location : scotland
Registration date : 2008-10-31
Re: Kit 23 Alignments
![]() bjwlancashire Sun 26 Feb 2012, 9:27 pm
bjwlancashire Sun 26 Feb 2012, 9:27 pm
Tony King wrote:Hi Kev,
I now realise that it's going to be fun getting all the clearances just right on the rear axle, when the RHS components arrive!!....... Can't wait!!
Regards,
Tony
I hope the axles are long enough!!!!!!!
bjwlancashire- Number of posts : 938
Location : Mellor, Lancashire
Registration date : 2010-09-07
Tony King- Number of posts : 856
Age : 68
Location : scotland
Registration date : 2008-10-31
Re: Kit 23 Alignments
![]() Steam Traction World Mon 27 Feb 2012, 10:15 am
Steam Traction World Mon 27 Feb 2012, 10:15 am
We should have indeed supplied a 1mm shim for the inner bevel, or at least that was the intention. We can’t blame the laser cutters this time. It looks like our order to them got mucked up. I’ve contacted them to see when they can supply us with the 1mm ones and I’ll put a post on the forum when I get a reply.
Regarding the RH wheel. All the ‘tight’ clearance issues are on the LH side. In the scheme of things there is bags of room on the RH side. We’ll machine the Drive Casting undersize and provide shims to make up the difference. Hopefully this time we’ll supply the right ones in the right combination to suit most situations. So don’t panic.
Regards
Steve
Steam Traction World- Admin
- Number of posts : 946
Location : Daventry UK
Registration date : 2008-06-18 -
Don't panic
![]() Tony King Mon 27 Feb 2012, 5:01 pm
Tony King Mon 27 Feb 2012, 5:01 pm
Mr Mannering!!! Blimey that takes me back!! 
Steve, have no doubts at all, that "all is under control"!! I think you've had all the "shite" at the beginning of the year, so I reackon you're in for an easy time from now on
Regards,
Tony
P.S. Tell Craig (or Lynn )to get some pictures up on the forum
Steve, have no doubts at all, that "all is under control"!! I think you've had all the "shite" at the beginning of the year, so I reackon you're in for an easy time from now on
Regards,
Tony
P.S. Tell Craig (or Lynn
Tony King- Number of posts : 856
Age : 68
Location : scotland
Registration date : 2008-10-31
Re: Kit 23 Alignments
![]() highpressure Sat 03 Mar 2012, 5:32 pm
highpressure Sat 03 Mar 2012, 5:32 pm
Hi Tony,
just to say that I have put the LH wheel on properly today having got to a point where I feel the diff is as good as it needs to be without torturing myself any further and then also fitted the brake block. The outer bevel is such that the end of the crank is dead in line with the outer edge so I suspect just where it should be. The brake then fits exactly as planned right on the band. The only thing that struck me is the screw on the handle is almost up as far as it can go and it just gives the blocks clearance when the wheel is rotating but as long as there is a gap then fine. The rivets do not touch the block at all. Not sure I can see how there is any space for a "special Lining" if thats coming to make the brakes more efficient unless the blocks are to be changed out to thinner ones including the lining. The spring doesnt seem to have any bearing on the block as it rests in the off position unless I have it set up wrong which is a posibility. Any one elses photos just to show how they have it always appreciated.
Made the gaskets for the cylinder end covers and valve chests but havent fitted them yet otherwise just a waitin' for the next kit.
Cheers All Kev.
highpressure- Number of posts : 1096
Age : 57
Location : West Sussex, 4" DCC Road Loco
Registration date : 2008-06-18 -
Page 1 of 1
Permissions in this forum:
You cannot reply to topics in this forum|
|
|